Sunday, July 30, 2023

Autumn Has Arrived -- Picket Fence Studios

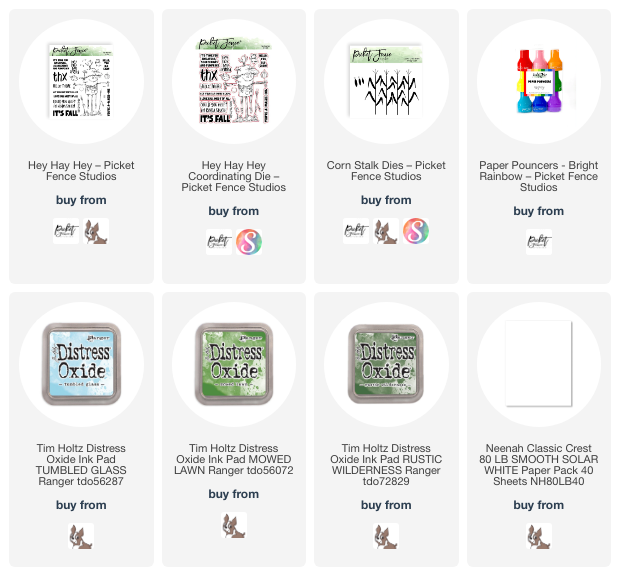
I have been so honored to be a guest designer this month for Picket Fence Studios for their July release!  Today I'm sharing one more card I made with some of the beautiful new products.


I wanted to create a night scene for the beautiful Autumn Has Arrived stamp.  First I stamped the image in black ink onto 80# Neenah.  I kept the stamp in my MISTI and stamped it again onto masking paper.  Then I cut the masking paper image out with my scissors.  (I didn't even bother cutting the pine branches on either end.)

I placed the mask over the image and used ink blending brushes to color through the Mini Haunted Moon Blending Stencil.  This set has three layers for the moon and one circle mask.  I didn't ink the first layer, then added Lost Shadow Distress ink through the second stencil layer.  The third layer is Weathered Wood.  Then I held the circle mask over the moon and blended on just a bit of Antique Linen Distress ink around the circle.

Keeping that circle mask over the moon, I ink blended Chipped Sapphire Distress ink first being careful not to cover that Antique Linen too much.  Then I added some Black Soot just around the edges.

I removed the mask from the image and colored it with my Copic markers.  I kept a somewhat muted color pallet since this is a night scene.  I trimmed the panel to 4" x 5-¼" and glued it to an A2 card base.

I inked some Chipped Sapphire onto a scrap of white cardstock.  I used my heat tool to dry it thoroughly and then stamped the sentiment from the Autumn Has Arrived set in Versamark ink.  I added white embossing powder and heat set it.  After I trimmed it with my scissors, I popped it up on the card with foam tape.

I was thrilled to be Picket Fence's guest designer for this new release, and I hope you will check out all of the new goodies over in their shop.  Thanks so much for stopping by today!

Thank you so much for using my affiliate links to shop (never any additional cost to you)!

Saturday, July 29, 2023

Hey Hay Hey--You're A-Maize-ing Card -- Picket Fence Studios

Happy Saturday crafty friends!  Today I have a quick blog post to share the most adorable scarecrow set called Hey Hay Hey from Picket Fence Studio's July release!  This is my second card using products from this release.  Check out my blog post where I shared my card with the gorgeous Lemon Queen Sunflower, if you haven't seen it.

I stamped the scarecrow and pumpkins from the Hey Hay Hey set with Copic safe ink.  After I colored the images I cut them out with coordinating dies.  Then I added foam tape to the back of the scarecrow.

Next I die cut the corn stalks from the Corn Stalk dies set from green and yellow cardstock.  I used a dark yellow colored pencil to add details to the corn.  I set all of the images aside to create the card background.


I used the awesome Paper Pouncers to add Mowed Lawn and Rustic Wilderness Distress Oxide inks to a 5" x 7" card base for the grass.  I used Tumbled Glass Oxide for the sky.

First I adhered the cornstalks, then added the scarecrow and pumpkins.  There are little notes in the Hey Hay Hey set that I stamped above the bird.

The sentiments from the Hey Hay Hey set are stamped in black ink and cut out with the coordinating dies.  I love dimension on my cards, so I popped those up with foam tape.

I think that this scarecrow has such a unique look and is so adorable!  Be sure to check out Picket Fence's release to see the gorgeous fall florals available!  Thanks so much for stopping by.  I hope you have lots of crafty time this weekend!

Thank you for choosing to use my affiliate links (never any additional cost to you)!

Wednesday, July 26, 2023

Simon Says Stamp "Just A Note" Release feat. the Darcy Bouquet Embossing Folder

Hello friends!!  The latest Simon Says Stamp release called Just A Note is now available!  As always, be sure to check out all of the wonderful new crafty goodies over in their shop--there's always such a good variety of styles to choose from!

My card features the new and so gorgeous Darcy Bouquet Embossing Folder and Cutting Die set!

I started out by embossing a piece of watercolor paper with the Darcy Bouquet embossing folder.  Then I used the included coordinating dies and cut out the three flowers.  To emboss these separate flowers, I positioned them over the matching flowers in the embossing folder, securing the die cuts with removable tape.  

For all of my watercoloring, I used a set of watercolor brush markers.  I first did a wash of the light green over all of the embossed greenery.  Then I used several different Prismacolor green pencils to color over the raised leaves.  I blended out the pencil coloring with Gamsol and a blending stump.

For the flowers, I combined 2 to 3 colors of the watercolor brush markers to achieve a shade I liked.  For example, the pinkish flower is Crimson and Purple Wine combined with a couple drops of Lava Rock.  It's fun to combine colors to get different shades!

Here's a look at my colorful mess!  You can see that I painted the flowers' edges before I adhered the die cut flowers.

Next I added some pretty gold splatters over the piece with metallic gold watercolor and a paintbrush.  I added a sentiment from the Messages For Everyone stamp set that I stamped in black ink.  It's popped up with a strip of narrow foam tape.

I really enjoyed my coloring time on this project!  This is such a gorgeous embossing folder and I have lots more ideas of how I want to use it!  Don't forget to check out the entire Just A Note release!!

Thank you for using my affiliate links (never any additional cost to you)!

Birthday Card with Layered Coneflowers

Happy Wednesday friends! The coneflowers still happily growing here in this heat is what inspired my card today!  I've used the beautiful Honey Bee Stamps Lovely Layers: Coneflower Honey Cuts for this card I plan to use as a birthday card.  The coneflowers are the only thing happy about this heat!  Haha!

The A2 card base is made from 80# Neenah with a purple cardstock layer.  I topped this with the beautiful Delicate Daisy Cover Plate Base and Top also die cut from 80# Neenah.  FYI, I didn't realize I would be totally covering the little die cut openings that would show the purple cardstock!  If I were to remake this, I'd just skip that purple cardstock layer!

Next I die cut all of the pieces of the Lovely Layers: Coneflower from light purple, green, and yellow cardstock I have in my stash. I chose some inks I haven't used in a while to color the pieces with Detail Blender Brushes. I first used two shades of purple ink to color the flower petals, but I wasn't quite happy with them. So I used a fairly dark, bright pink ink to go over it, and now I love it!  Starting with colored cardstock makes the ink blending lots faster!  (The cardstock and inks I used are linked below.)

To add splatters to the petals and leaves, I smooshed the green ink and the purple ink I used onto my craft mat. I diluted them just a bit with water and used a paintbrush to add the splatters. I repeated the same steps with white acrylic paint to add the white drops.

When the pieces were dry, I used Bee Creative glue to adhere the layers and to glue the pieces to the card. For the top flower, I did use a few foam squares to adhere it instead of glue.

I stamped the sentiment from the Big Time Kindness stamp set in Intense Black ink and cut it out with the coordinating die. It only took a small piece of a narrow foam strip at the bottom of the sentiment and a few dots of glue at the top to adhere it to the card.

I added a bit of bling with purple pearls from the Autumn Pearl Sticker set placed around the flowers.

I hope you're staying cool wherever you are and that you've enjoyed my card making process today! Thank you so much for stopping by.

Thank you for using my affiliate links (never any additional cost to you)!

Tuesday, July 25, 2023

Christmas Cheer Gnomes

It's still Christmas in July for our Rubbernecker Stamps' posts and I'm happy about that!  One more Christmas card done now saves lots of time during the holidays!  This card features the totally adorable new Christmas Cheer Gnomes Set!


First I stamped the cute image from the Christmas Cheer Gnomes Set in Copic safe black ink.  I colored the image and the sky with my markers.  Then I used a white gel pen to add dots of snow onto the sky and image.

Next I die cut it with a Nested Square Stitch die.  I added a black mat layer and then foam tape on the back.  I adhered it to a piece red paper from the Ho Ho Ho paper pad that was die cut with the next largest Nested Square Stitch die.


I trimmed another piece of red paper to 4-¼" x 5-½" and glued it to an A2 card base.  Next I used the largest Nested Rectangle Small Stitch die to cut white cardstock and some striped paper from the Snowflake Fun slimline paper pad.  The measures striped piece measures about 2-¾" x 5-¼".

I used glue to adhere the matted image to the card.  Then I stamped the sentiment from the Christmas Cheer Gnomes Set in black ink.  I trimmed it and added a red mat layer before popping it up with foam tape.


Have you started making your Christmas cards?  If not, I hope I've given you some inspiration with this adorable and easy card!  Thanks so much for stopping by!

Thank you for using my affiliate links to shop (never any additional cost to you)!

Monday, July 24, 2023

Gorgeous New Lemon Queen Sunflower Set

I'm thrilled to be a guest designer for Picket Fence Studios' July release!  This is a release full of fun and awesome products for fall and Halloween.  It's so hot where I am that I love thinking ahead to the cooler fall days!

This card is also part of an Instagram hop with Picket Fence!  There will be one winner chosen amongst the commenters to win a $75 gift card to their shop!!

My card today features the absolutely gorgeous Lemon Queen Sunflower stamp set!

I wanted to do no-line coloring of this beautiful stamp, and stamped it onto 80# Neenah with light colored ink.  It didn't take very long for me to realize that my no-line coloring skills need a little assistance with the flower's center!  My coloring experience hasn't reached that far to handle the awesome details of the center of the flower.

So I started over and, this time, I inked up the flower center with a medium brown ink cube.  I used a cloth to dab and soften the edges of the brown ink.  I used the light no-line ink for the petals.

This made coloring the flower's center much easier!  Here is a list of the Copic markers I used to color the flower:  V01,Y19, Y13, Y11, Y00; E59, E57, E49, E57, E25, E35; G85, G24, G43.

I used  B39 and B37 to color the space surrounding the flower in dark blues for a dramatic look!

After I finished with the Copic markers, I used some colored pencils to add more depth to the petals and details to the flower center.  I used these Prismacolor Pencils: Chestnut, Dark Brown, Sienna Brown, and Terra Cotta.

I wanted to feature the entire gorgeous flower on my card so I trimmed the finished piece to 5-¼" square and adhered it to a 5-½" card base.  FYI, there's a fabulous coordinating die that's available too!

I stamped the bee from the Lemon Queen Sunflower set with medium brown ink, colored it, and fussy cut it out.  I stamped the sentiment in the same medium brown ink.  Then I added foam tape to the sentiment and bee to pop them up onto the card.

Stay tuned, as I have two more cards to share with more new products from Picket Fence!  I'll be sharing them later this week, so be sure to subscribe to my blog by adding your email in the box to the left.

Thank you so much for stopping by today!  I hope you'll pop over to my Instagram and leave a comment there too!  You will have a chance to win the more stops that you comment on!

Friday, July 21, 2023

Stitched For Christmas - Christmas Cards with Stitching!

Happy Friday!!  Today I'm sharing two cards I made with two products from Spellbinders new Stitched For Christmas Collection.

This first card is a cute sweater shaped card that was super fast and easy to make!

This adorable sweater is from the Stitched Christmas Sweater die set.  In addition to the snowflake I used, the set also has a little Christmas tree and an ornament to embellish your sweater with.  I die cut two of the snowflakes from 80# Neenah and used glue to adhere them together.  

Having a double layer adds a lot of stability to the piece as you stitch.  I used DMC #3755 to stitch in the die cut openings.  Be sure to check out Spellbinders shop to see the nice selection of embroidery thread they have.

To create the card, I die cut the sweater in the Stitched Christmas Sweater set two times from Glacier cardstock (all cardstock is linked below).  I scored one piece just above the base of the collar (about ¼") and adhered the two with glue on the scored tab.  To give the back a finished look, I die cut the sweater once more from 80# Neenah and adhered it to the back with the "pretty" side out.

I die cut the sweater trim pieces from a white Flock Transfer Sheet.  (This can be used with a laminator, or just used as I did by die cutting).  I love the soft fluffy look it adds to the sweater!

I found a Christmas sentiment from a retired set that would fit inside the card and stamped it in a coordinating blue ink.

I used the third smallest Matting Basics B die to cut it out.  I made it fit by doing partial die cutting to shorten the rectangle.

My second card features the beautiful Stitched Poinsettia & Holly die set.  Had I just used one of the flowers, this card would have been pretty quick to make too!

I die cut the poinsettia flowers from Wild Berry cardstock and the holly leaves from Rainforest.  I decided to make the stitching close to the same color as the cardstock and used DMC #335 and #906.

I embossed some 80# Neenah with the Tufted 3D embossing folder and added it to a layer of Wild Berry cardstock and an A2 card base.

I used glue to assemble the flower layers.  I die cut the poinsettia centers from matte gold cardstock and added them to the flower centers.  To adhere the poinsettias and holly leaves to the card, I used a combination of glue and foam dots.

I used my Glimmer Hot Foil System to create the gold sentiment found in the Glitter Wishes Hot Foil Plate & Die set.  I added more sparkle by adhering some gems in my stash to the card layer and onto the center of the poinsettias.

I'm very happy to have two very pretty Christmas cards ready for mailing in December.  I hope you've been inspired to give stitching on your cards a try.  These small die cuts are a great way to try it out!  Thanks so much for stopping by!

Thank you for using my affiliate links to shop (never any additional cost to you)!

Wednesday, July 19, 2023

Birds and Blooms Birthday Card

Hello crafty friends! It is so very hot where I am, and I'm longing for those cooler temperatures we had earlier in the year! That was definitely the influence for my card today with Honey Bee Stamps beautiful Lovely Layer: Winter Birds and the Lovely Layers: Dogwood in these cool, pretty colors!

First I created my card base and layers by embossing 80# Neenah with the Dogwood Blooms 3D embossing folder. I used Bee Creative glue to adhere the panel to an A2 card base. Then I die cut white cardstock with the largest Stacking Art Deco Labels die. I added foam tape to the back and adhered it to the card.

Next I die cut the pieces of one of the birds in the Lovely Layers: Winter Birds set. I die cut the main body piece from light yellow cardstock, two pieces from black cardstock, and the others from white cardstock. I used Detail Blender brushes to add Distress Inks to the pieces to color them. I used these Distress Inks: Scattered Straw, Wild Honey, and Lost Shadow. I used glue to assemble the sweet bird and then added a dot to the eye with a white gel pen.

I don't know if there is a pretty yellow bird like this in real life, but hey, with paper we can make our birds any color we'd like! LOL!

Next I added a Tear Tape Sheet to a piece of 80# Neenah. Then I die cut all of the pieces in the Lovely Layers: Dogwoodset twice from this piece. Again, I colored the pieces using blending brushes and Distress Inks. The colors I used are: Salvaged Patina, Peacock Feathers, Squeezed Lemonade, Mowed Lawn, and Rustic Wilderness. I used a brown Copic marker to color the branches of the die cut.

Since I added the Tear Tape sheet to the cardstock before die cutting, next all I need to do was just peel off the backer to adhere each flower and leaf to the branch. That makes it so easy!! I used glue to adhere the branches to the Art Deco Label. I trimmed off the excess of the branch that hung over the edge.

I stamped the sentiment from the Be Still stamp set with black ink. Then I cut it out with the coordinating die. I added a strip of narrow foam tape to the back to pop it up on the card. I added a couple thin foam dots to the back of the bird to adhere it to the card.

This card was super fun and easy to make, and I'm happy to have another birthday card for my stash! Thank you so much for stopping by today! I hope your week is good and filled with lots of crafty time!

Thank you very much for using my affiliate links to shop (never any additional cost to you)!

Saturday, July 15, 2023

Three Beautiful Christmas Cards with Spellbinders Classic Christmas Collection

Today I'm sharing three beautiful Christmas cards I made with four of the products from Spellbinders newest release called Classic Christmas.  I honestly can't choose a favorite!  Let me know which one you like the best!

This first card featuring the Vintage Ornaments 3D embossing folder with the Classic Merry Christmas dies would be easy to mass produce!

The Vintage Ornaments embossing folder is so beautiful and I think it would stand out with any color cardstock.  On this card I used a brushed gold metallic cardstock.

I die cut the Classic Merry Christmas dies from 80# Neenah and more brushed gold cardstock two times.  (I saved the second set of layers for another card.)  After I adhered the layers together, I added strips of foam tape to the back to pop it up.  You definitely could save time by just gluing the sentiment directly to the card.

This next card takes a bit more time, but overall was pretty quick to make.

First I embossed a piece of Fern cardstock with the Vintage Ornament embossing folder.  I trimmed it to 4" x 5-¼" and then took a metallic gold ink pad a very lightly swiped it over the raised portions of the embossed piece.  Then I layered it onto gold mirror cardstock and added the layers to an A2 card.

Next I added Distress Oxide inks with blending brushes through each of the stencils in the beautiful Christmas Florals stencil set.  The colors I used are in the supply list below.  Next I used the coordinating Christmas Florals die to cut the image out.

Then I did something I rarely do!  I cut the piece into two pieces.  It's trimmed just a bit more than half way.  I added foam tape to the back to adhere it to the card.  I used one of the three sentiment dies included in the Christmas Florals die set to die cut the sentiment from gold mirror cardstock.

My final card took the most time, but I think it's my favorite!  I don't usually use these colors for greenery in florals, but I really like this!

I used the Christmas Florals stencils again with Distress Oxide inks.  This time though, with stencil #5 (yes, they are numbered!) I wanted to add pretty gold texture paste.  After I positioned the stencil and secured it with removable tape, I inked all areas but the pinecones, berry and flower centers.  Next I masked off areas I wanted to protect from the gold paste.  This did take a bit of time!  I spread the gold texture paste through the openings, removed the stencil, and set the piece aside to dry.  Don't forget to clean the stencil and tools immediately!

I adhered the dry panel to an A2 card and then I popped the Classic Merry Christmas sentiment up with foam tape.

The extra time this card took was worth it to me!  Thank you for stopping by today.  I hope you have a fun and crafty weekend!!!

Thank you so much for using my affiliate links to shop (never any additional cost to you)!