Friday, August 30, 2019

Honey Bee Stamps Autumn Blessing Blog Hop Day 1


Welcome to Day 1 of the Honey Bee Stamps Autumn Blessing Blog Hop!  Autumn Blessings is, once again, another amazing release from Honey Bee Stamps!  The design team has so much beautiful inspiration to share with you, so you won't want to miss a single stop!  You should have come from the so talented Channin Pelletier.  Today's entire lineup is at the end of my post in case you get lost.  Be sure to comment on each stop along the way--there are TWO $50 gift certificates to be given away, chosen from each day's commenters!

This release has something for so many occasions--back to school, encouragement, fun Halloween and beautiful autumn sets.  These first two cards are fun sets to use for encouraging words throughout the school year.  I've included links for the Honey Bee Stamps products as well as any other main supplies I used with each photo.


Brilliant Day stamps & Honey Cuts; Over The Rainbow 6x6 paper pad;
Crystal Gem Stickers: Ocean Breeze & Perfect Petals

This next card is SO fun!  You slide out the insert for the main sentiment and can write a personal note on the back of it!


  Crayon Box Honey CutsBrilliant Day stamps & Honey Cuts;
Crystal Gem Stickers:  Ocean Breeze, Perfect Petals


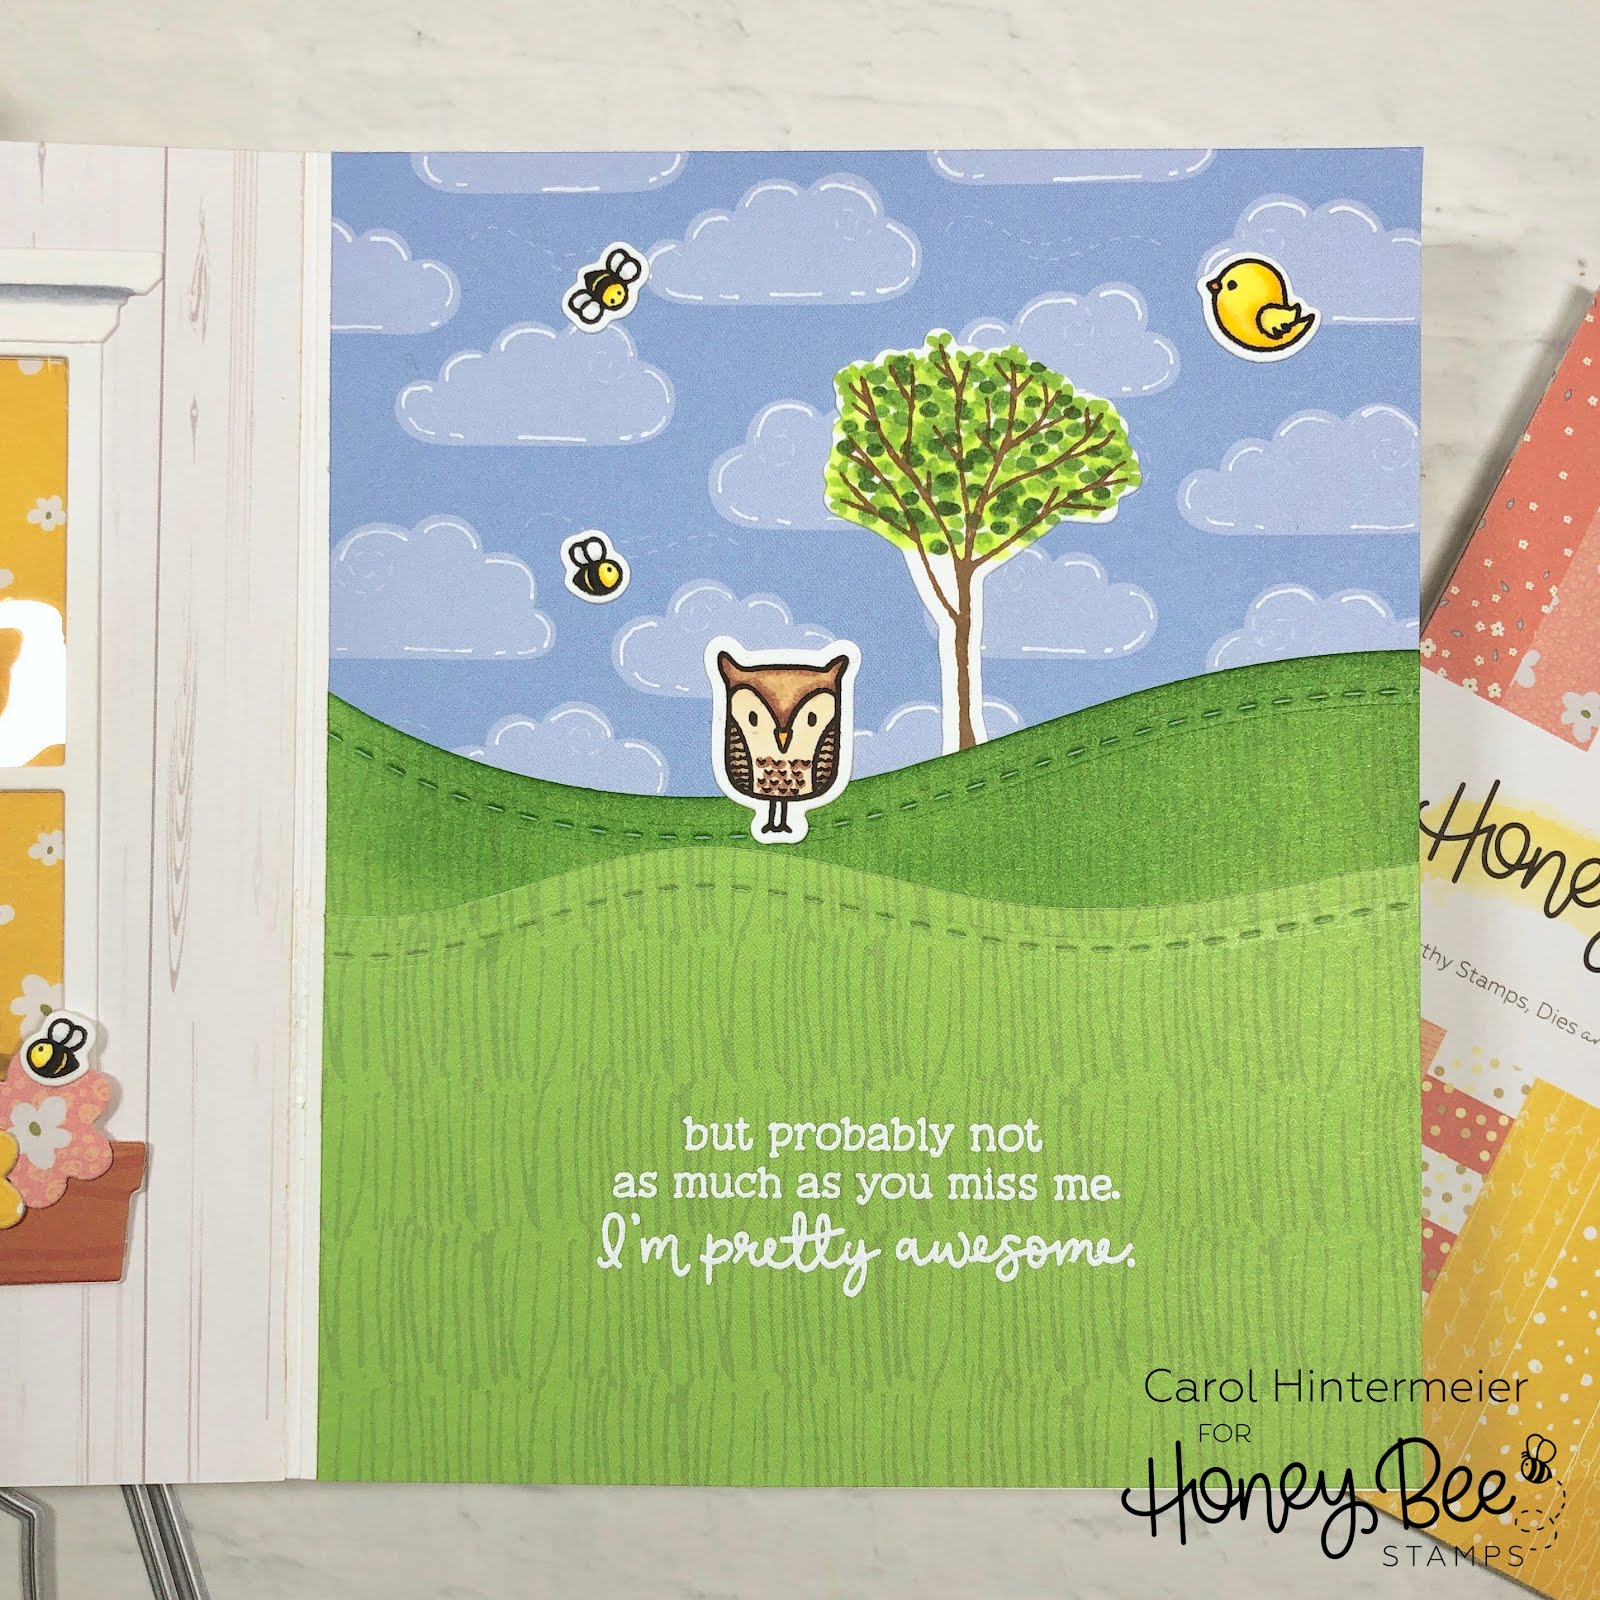
In case you missed it, I did a blog post HERE for these next two cards where you will find all the details and supplies.  I used the House Builder Card Base Honey Cuts, Haunted House Add On, and FaBOOlous Sentiments for these sweet cards.


One last card for you that I shared Wednesday on my Instagram using the adorable Hope The Hedgehog stamps and Honey Cuts along with one of the set of two Confetti Background Stencils.  I used Thermo Web Deco Foil Transfer Gel through the stencil with the small confetti and foiled it with light purple foil.  For the foil on the pompoms I used the Deco Foil Adhesive Pen and Shattered Rainbow foil.  This pen is sticky enough that you don't need a laminator--just run it through  your die cutting machine with the foil.


I hope you've enjoyed my cads and I thank you so much for stopping by!  Next up is the amazing Kelly Latevola!  Be sure to check out each stop of this hop for much more awesome inspiration from the team!  Don't forget to leave a comment at each stop for more chances at the prizes.  Carol :)


Honey Bee Stamps
Channin Pelletier
Carol Hintermeier <<< that's me
Kelly Latevola
Lisa Cisneros
Kelly Martin
Bobbi Lemanski
Jill Hawkins
Galina Filippenko
Alba Castejon

Monday, August 26, 2019

Let's Talk Soon!, Art Impressions

Happy Monday!  Today I'm sharing this card over on the blog at Art Impressions that features the super fun Texting BFFs set.  This is just perfect to send to a friend to let them know you're thinking about them!


I stamped the image and the sentiments in Copic safe ink.  I colored them with the Copics listed below.  I then used a Rectangle Double Stitched die to cut it out.  


I layered the die cut image onto some gray cardstock, a piece of patterned paper and then onto the A2 top-folding card base.


I fussy cut the sentiments out and popped them up with foam squares.


This card was so fun and quick to make and I hope it's given you some inspiration to give this cute set a try!  Happy crafting!


Copic markers:
B93, B95, B97, C1, C2, C3, E11, E21, E30, E34, E53, E55, E57,
N0, N2, N5, N7, N9, R14, R20, R21, R22, W0, W1,
YR21, YR23, YR32, YG63, YG67

Supplies:
Art Impressions Texting BFFs
Art Impressions Rectangle Double Stitched Dies
Ink on 3 Blackout Detail Ink
Neenah Solar White 80# cardstock
Simon Says Stamp Slate Gray cardstock
Pebbles Woodland Forest 6x6 paper pad
Scrapbook Adhesives 3D Foam Squares

Thursday, August 22, 2019

NEW House Builder Card with Haunted House Add On | Honey Bee Stamps

Hello friends!  I'm on the blog at Honey Bee Stamps today to share two cards using these awesome new House Builder Card Base Honey Cuts and the Haunted House Add On.  The House Builder, as well as the Haunted House Add On, is SO fun to create a unique card with.  Every last detail is there to enable to you customize your house the way you'd like!


This first card is what I made right after I got the House Builder Honey Cuts.  I wanted to play around and see how all of the pieces worked together.  Except for the main house piece and roof, all of the other pieces are made with scraps of cardstock that I've saved.  Anyone else have a drawer full of scraps like me?  Haha!  


I wanted some texture/dimension on the roof and after pondering what to do for a bit, I remembered a Fiskars paper crimper tucked away in a drawer, long unused!  I die cut the roof and ran it through the paper crimper--just right!  For the main house section I used a round-tipped stylus and my Scor-Board to add in lines for a wood panel look.  If you want to create a house shaped card like I did, you will need to always cut two of the main house piece.

See the top edge of the roof in the photo above?  That is the hinge that I added for another detail element on the roof.  This hinge is intended to be used on the inside as I did on my second card below.  I think it works great either way!

The details are amazing!  Just look at that door knob!  I cut it out of some silver mirror paper and used Ranger Multi-Matte Medium to adhere the little pieces.  I did add some acetate to the windows for a more realistic look.  


This next card features the House Builder along with the Halloween House Add On.  Just like the House Builder set, all of the adorable detailed dies help to create a fun and spooky house.  You just need the main House die and the hinge from the House Builder set to create a Halloween House.


I used die cut the house from gray cardstock and used Weathered Wood and Black Soot Distress Oxide inks to add smudges here and there to age the house.  I also used some white pigment ink.  The Halloween Add On has its own roof that embosses the lines you see in it.  I die cut it and the other sparkly elements from some adhesive-backed glitter foam.  I do love me some sparkle!!  These dies cut the foam like butter!!  


The ghosts are cut from some regular glitter paper.  After I die cut the wood planks and tree, I used a couple of brown Copic markers to add a bit more detail.  I also added tiny drops of Nuvo Crystal Drops on the planks where nails would be.


In the next photo you can see where I used the hinge on the inside.  I stamped a sentiment from the new Faboolous Sentiments in Versamark and heat embossed it in white embossing powder.


Both of these sets are SO fun and you are only limited by your imagination as to what your house will look like!  You can use colored paper to die cut the shapes.  Or, you can cut them from white paper and color them with markers or inks.  


So, what kind of house will you create?  I can't wait to see!  Thank you so much for stopping by!  Carol:) 

Hey Pumpkin! | New Flip Card by Art Impressions

Hello friends!  Today kicks off Week 2 of Art Impressions Gotta Gingham! challenge.  My card today features the newly released Pumpkin Mice Flip Card set.


These cards are fun and easy to make.  The measurements and directions are on the back of the Flip Card Die packaging.  I decided to create a fun nighttime, glowing-pumpkin scene.  Since this is the first time I've done a scene like this, I worked on the background first.  I used my Copics to color it as well as the other images.  I've listed the markers I used below.


When you flip the card open, you see the back of the mice in the pumpkins!  So cute!  Both sentiments are included in the set.


I trimmed some deep blue paper (it's not as dark as it looks in the photos) to fit on the card card front and layered gingham paper on top.  In order to help the image on the front stand out better, I used a frame die to cut three frames.  I glued them together for some dimension and adhered it to my colored panel.  I used a  white gel pen and a clear sparkle pen to add stars to the night sky.  I also added sparkle to the pumpkins and the mice's hats.


We hope you will enter the Gotta Gingham! Challenge at Art Impressions.  Find all the details HERE.  Thank you so much for stopping by!


Copic markers:
B97, B99, E19, E44, E47, E70, E71, E74, E77,
N0, N2, N4, N5, N6, R20, V12, V15, V17,
YG01, YG05, YG09, YG17, YG67, YG99, G99,
711, Y13, Y15, YR12, YR14, YR18

Supplies:
Neenah Solar White 80# cardstock

Monday, August 19, 2019

Hello Sunshine!, Art Impressions

Happy Monday friends!  I'm on the Art Impressions blog today with a card using the fun Produce Stand MTF (mini TryFold) set.  It is definitely summer here in Texas with the temperatures over 100º!!  Who is ready for fall?!!  I've only used these stamps once before--it was last summer!--so I thought I'd pull it out and make this cute notecard to send to a friend.


As with all of Art Impressions' TryFold cards, the instructions for the card size, scoring, and where to place the stamps are on the back of the packaging.  Makes it so easy!  I stamped everything using my new favorite Copic-safe ink: Ink on 3 Blackout Detail ink.  This ink stamps the lines a nice and crisp black and is quick to dry.  I haven't had any smudging at all with my markers!  

I colored the images with my Copic markers (listed below--I was shocked at how many I used! LOL!).  I used a black Micron 005 pen to draw some lines on the front of the produce stand.  And also, to create a frame on the final image, in the photo below.  


If you use alcohol markers, you know that they will bleed through to the back of your cardstock.  To hide that, I used some gingham paper on the two inside panels.


To finish up, I stamped the greeting included with the stamp set on the inside panel using Versafine Onyx black ink.  (I need to do a comparison of that and the Ink on 3!)  I used a sentiment from the Art Impressions Sentiment Set 2 and stamped it on the card front.  I thought it fit perfectly with the one on the inside.  


Thank you, as always, for stopping by and taking a look.  Have a wonderful, and crafty, week!


Copic markers:
B21, B23, BG0000, BG000, C0, C1, C3, C5, 
E31, E33, E37, E53, E55, E57, E70, E71, E74, E77,
N0, N2, N4, N6, N8, 
R14, R17, R21, R22, R24, R27, R35, R37, R39, 
Y02, Y13, Y15, Y17, Y19, YG0000, YGG01, YG11, YG13,
YG17, YG21, YG23, YG25, YG61,
YG61, YG53, YG67, YR01, YR02, YR07, YR65, YR27

Supplies:
Micron 005 black pen

Monday, August 12, 2019

Never Too Old!, Art Impressions

Happy Monday friends!  For my post on the Art Impressions blog today I've used the so fun Never Too Old Laugh Lines set.


I stamped this gal in Copic safe ink onto a piece of 3-¾" x 5" white cardstock and then colored her with the Copic markers listed below.  I also stamped her onto some masking paper and fussy cut it out.  I used a brick stencil and a mask for the grass to create the background.  I have more details with photos on the Art Impressions blog, if you'd like to check it out.

I stamped the sentiment in Versafine Onyx Black ink and used a die from the Tag Stitched Die set to cut it out.  To get the rectangle shape instead of a tag shape, after I cut it the first time, I flipped the paper around so the triangle shape was below the bottom of the tag cut line.   I used a few foam squares to pop it up.


I decided that she needed flowers and presents for her birthday, so I used two of the Holiday Mansion accessory sets along with the included dies to add these.  The presents are from the HM Birthday Set and the flowers from the HM Garden Set.  These are also popped up with foam squares.  I used a clear sparkle pen on these and the balloon which also has some Diamond Glaze added to it.  Her earring and hat pompom has some Nuvo Glitter Drops on them.


I know I say this every time, but it's so true that I appreciate you for stopping by my blog to take a look at my cards!  Have a wonderful week!


Copic markers:
BG13, BG15, BG32, BV20, C00, C1,  E23, E50, E51, R53, E93,
N0, N2, N4, RV14, Y11, Y13, Y15, Y19, YG23, YG25 

Supplies:

Thursday, August 8, 2019

Coffee With You, Art Impressions

Hello friends!  It's week two of the Coffee Card Challenge over at Art Impressions.  My card today uses the Coffee BFFs set, and I made a scene!!!  


I stamped the girls in Copic safe ink and colored them with the markers listed below.  I also stamped the bottom portion of the image onto some masking paper and fussy cut just the leg portion of the chairs out.  I added it to the stamped image and then stamped the floor (all products listed below) in the same ink.  I extended the lines of the floor with a Memento marker.  


Here are a couple photos of the bead board wall I drew in with a pencil and ruler.  (You can also spy the mysterious smudge in the upper left!  Have NO idea how that happened!)  After I drew the pencil lines, I used a couple gray markers to add some shading.  I did this before I drew in the permanent lines because I wanted to use the finer tip of a Micron 005 pen and didn't know if it's Copic safe or not.  Then I used two blue markers to color in the rest of the wall.


To cover the smudge, I stamped the sentiment on some scrap paper and used a ruler and pencil to draw a frame around it.  Once I was satisfied, I went over the pencil lines with the Micron pen, fussy cut it out, and adhered it with glue.  I added the finished panel (cut to 3-¾" x 5") onto a gray layer, and then added that to a top-fold A2 card base.


We hope you will join in the Coffee Card challenge over on the Art Impressions blog.  Thank you so much for stopping by!


Copic markers:
Hair: E25, E29, E35, E51 AND E31, E33, E37
Skin: BV20, E0000, E50, E51, E53, E93
T-shirts: W00, W1, W3
Chairs: E23, E57, E59
Pants: B93, B95, B97 AND YG61, YG63, G94
Jackets: R14, R22, R32 AND E42, E43, E84
Coffee cups: C1, C00
Floor:  C5, C3, C1, C00
Wall: B000, B0000
Frame: E23, E25, E29

Supplies:
Memento Dual Marker
Micron 005 black

Cottage Window Scene, Honey Bee Stamps

Hello!  It's my turn over on the Honey Bee Stamps blog today.I had so much fun last week with Honey Bee's 6x6 paper pads that I made another card that uses at least one sheet from each of the four pads!

For this card, I used the Cottage Window Honey Cuts and left off the shutters and created a "looking from the inside out" window.  This cute little bunny is looking out the window at his owl friend leaving and missing him already!  That's my story!  Haha!


The patterned papers on the card front are from the Spring Fling pad.   I liked these two florals for the "wallpaper" and the curtains.   To have the curtains double sided, I die cut four of each; and since they are symmetrical, I could adhere them back to back. I stamped and Copic colored the bunny, owl, and tree that are from the Silent Night stamp set (yes, a Christmas set can also work anytime!)  The sentiment is from the Missing You stamp set, and I layered the sentiment onto a leftover strip of yellow paper.


Here is a look at the scene inside.  I layered a piece of acetate between the two window pieces and used a wood-look patterned paper from The Bee's Knees pad for the outside around the window.  I die cut the hills with the Hill Borders Honey Cuts from paper in the Over The Rainbow pad.  I lightly inked the hill in the back for some dimension.  The cloud paper is from Over The Rainbow.  I used a white gel pen to add some accent lines on the clouds.


Here you can see the cute little bunny's nose peeking through the window.  I mirror stamped him and just colored that tip that was showing.  For the flower box I used the Bunch of Bouquets Honey Cuts. I used three of the flower dies a die cut some of the flowers on a piece of paper from the Spring Fling pad.  The window box paper is from the Great Outdoors pad.


I just love this sentiment that's also from the Missing You set.  That surely would make anyone smile!  I stamped it in Versamark and heat embossed it with white embossing powder.  I didn't really plan on what size to make this card--somehow it turned out to be 6" x 5"!


Here are a couple different views of my card.


The two bees and the bird are from the Birds and The Bees stamps and Honey Cuts.


I totally love how this card turned out!  I hope you do too!  Thank you so very much for stopping by! Have a wonderful, crafty rest of your week!  Carol :)

Supplies:
Honey Bee Stamps products:
Other supplies: