Wednesday, May 31, 2023

Make A Fun See Through Card with Dies!

Happy first of June crafty friends!! Today I'm sharing my see-through Father's Day card featuring the awesome Honey Bee Stamps new Lovely Layers: Lures! I haven't decided who for sure will get this card, but I know they won't mind the less than traditional guy colors! And I think that this card would be great for lots of occasions by just changing the sentiments!

First I created the card base. I took a folded A2 card base, opened it up and trimmed all but 1" off the top panel. I used the cut off piece to cut another 1-½" strip. Then I added some removable tape along the score line to mask off the back portion of the card. I placed the Fish Net stencil over the 1" flap and the 1-½" strip. I used a Detail Blender brush to ink on Salvaged Patina ink.

Next I cut a piece of acetate to A2 size. I place a strip of Bee Creative Double-Sided Sticky Red Tape on the back of the 1" flap. Then I added some tape to the back of the 1-½" stenciled piece to adhere at the bottom of the acetate. To hide the adhesive when the card is open, I cut two strips of white cardstock at 1" and 1-½" and used the tape to adhere them to the inside of the card front.

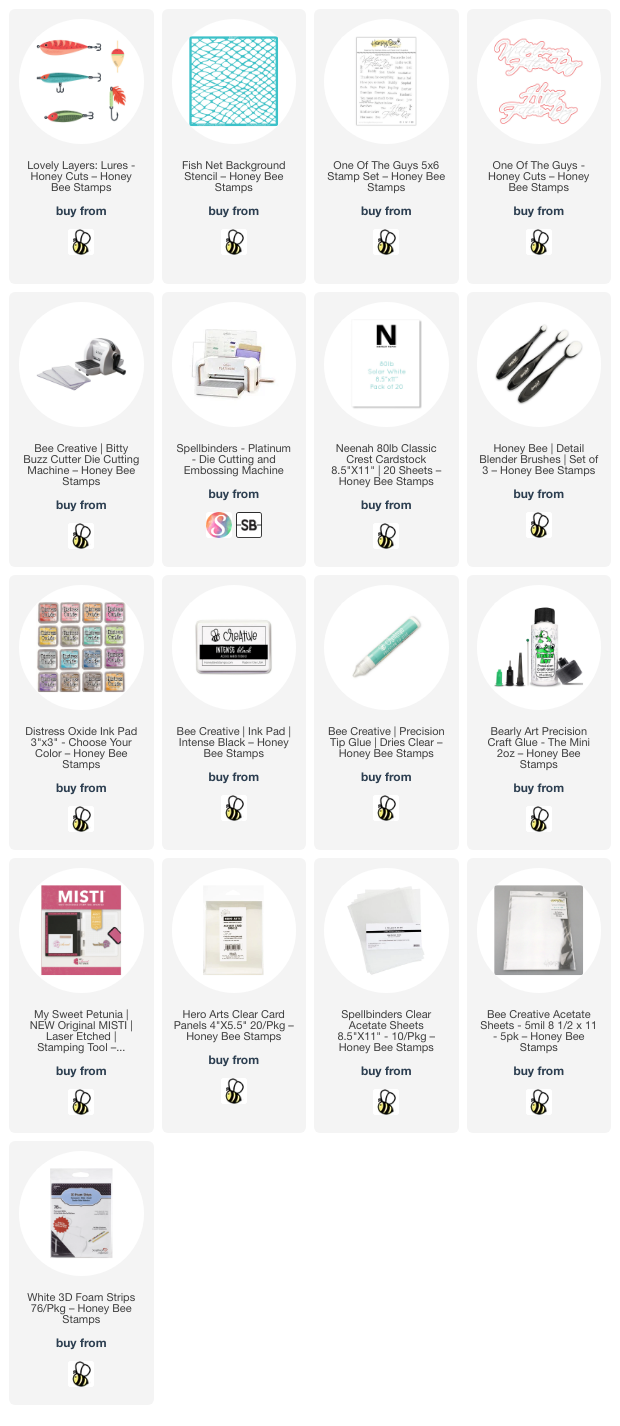
I die cut the Lovely Layers: Lures from 80# Neenah and then used blender brushes to color the pieces with Distress Oxide inks. These are the colors I used: Spun Sugar, Picked Raspberry, Scattered Straw, Dried Marigold, Bundled Sage, and Wilted Violet. I die cut the eyes from black cardstock and the hooks from silver metallic cardstock.

I used Bee Creative glue to adhered the layers and pieces. There is a handy layering guide in the product description on the website too! I used just a few tiny drops of glue to adhere them to the card front.

I stamped the sentiments from the One Of The Guys stamp set with Intense Black ink. After I cut the large sentiment out with the coordinating die and trimmed the other into a strip, I added foam tape strips to the back to pop them up on the card.

I truly did not mean to make this guy card with these less-than-traditional masculine colors! Haha! But sometimes you just have to go with the colors that are calling you, right? I like it, and sure hope you do too! Thank you so much for stopping by today--you are so appreciated!

P.S.: If you are on Instagram, I will have a reel on my Instagram posted sometime this morning! Stop by to take a look at a bit of my card making process!

Thank you so much for using my affiliate links to shop (never any additional cost to you)!

Tuesday, May 30, 2023

Birthday Filled With Sunshine, Rainbows, Love and Laughter Card

Hello crafty friends!  How is is at the end of May already?!!  It's already getting hot where I'm at so my birthday card I'm sharing today has those warm sunshiny colors!  I had lots of fun layering the colors for  Rubbernecker Stamps beautiful Like A Wildflower stencil.  I have a couple of good tips for stenciling first, then getting your outline stamp lined up just right. Read on for the details!

The card base is A2 size and has a 3-¾" x 5" piece that was die cut with the Diamond Pierced Cover die.

I went ahead and stamped the sentiment from the Like A Wildflower stamp set and then die cut it with the smallest Nested Rectangle Small Stitch die.  I added foam tape to the back and set it aside while I worked on the flower.

First I followed the layering guide on the Like A Wildflower stencil package to add Posey, Scarlet, Lemon, and Custard inks through the stencil.  (Color Fuse set numbers 4 and 1.)  I used small round ink blending brushes that I've linked below along with links for the Color Fuse inks.

I added Posey and Lemon for layer 1.  Then I switched to the slightly darker Scarlet and Custard inks for layers 2 and 3.  I let the pinks and oranges overlap to add small touches of orange to the petals.  The leaf and stem are colored with Grass and Basil inks (set numbers 10 and 11).

Die cut the image with the coordinating Like A Wildflower die.  Save that negative from your die cutting!

Next I set up my MISTI to stamp the outline by first stamping the outline image of the Like A Wildflower  onto a piece of printer paper.  DO NOT move the stamp or the image stamped on the printer paper!  Then I took the negative die cut and positioned it over the stamped flower and secured with removable tape.  Like this:

Now all you need to do is pop in the die cut image, re-ink your stamp, and then stamp it onto the stenciled flower.  Look at what a difference it makes!

This is the easiest way ever to get a perfectly aligned outline on your stenciled pieces!  I love this because it seems that if I stamp the image first, then stencil, the ink always smears no matter how long I've let it dry.  I also love how the black ink looks so crisp!

I cut out a few of the Flower #6 die and used the same green inks to color them.  Then I assembled the elements and sentiment onto the card front.  I did trim a branch or two from one of the Flower #6 die cuts to tuck in to fill a spot or two.

I hope I've given you some good tips for stenciling, then stamping.  If you have any questions, please use the "contact me" box in the left column of my blog.

Thank you so much for stopping by! Have a wonderful and crafty week!

I so appreciate it if you choose to use my affiliate links for shopping  (never any additional cost to you).

Friday, May 26, 2023

Friends Like You -- Lovely Layers: Water Lily

Happy Friday crafty friends!  Today I'm sharing my card that's part of an Instagram hop to celebrate Honey Bee Stamps new Adventure Awaits release!  I've used another gorgeous set in the Lovely Layers line called Lovely Layers: Water Lily!

(THIS HOP HAS CONCLUDED.)  I hope you'll pop over to the Instagram hop where I have the complete hop list.  There will be two commenters chosen to receive a $50 gift card to Honey Bee's shop!!

First I created my inky water-like background.  I smooshed Salty Ocean and Mermaid Lagoon Distress inks onto my craft mat.  I spritzed the ink with water and smooshed a piece of watercolor cardstock into the ink.  I dried it with my heat tool, and repeated the steps until I had the look I wanted.

Next I ran the piece through my die cutting machine with the Waves Pierced A2 Cover Plate die.  Then I trimmed it to A2 size.  I decided to add more of a watery look by first sprinkling on water drops then blotting them up with a clean paper towel.  Next I added some small splatters of white paint that I diluted with water.

TIP:  I recently discovered white paint that even when diluted will NOT pick up the Distress Ink (or any other ink) colors.  I've tried gouache, acrylic, and gel pens and those would all eventually pick up the blue shade.  This fabulous paint is called Dr. Ph. Martin's Bleed Proof White and I've found it on Amazon and at Blick art supplies (who I trust for this type of product much more than Amazon).

When I was all dry, I used double-sided tape to adhere it to my card base.

Next I die cut all of the pieces in the Lovely Layers: Water Lily die set from 80# Neenah.  I used my ink blending brushes to add color to each piece with Distress Inks and Parsley green ink from Concord & 9th.  The Distress Inks I used are:  Picked Raspberry, Spun Sugar, Rustic Wilderness, Squeezed Lemonade, and Mustard Seed.

I used some of Honey Bee's thin foam strips to adhere each layer of the flower and bud together.  This adds a lot of beautiful dimension, but doesn't make it too thick.  I used Bee Creative glue to adhere the flowers to the greenery and then to the card.

I stamped the sentiment from the Be Still stamp set with black ink and cut it out with the coordinating die.  I popped it up on the card with narrow foam strips.

I so enjoy creating inky backgrounds like this!  And the Lovely Layers: Water Lily is super easy and quick to color and put together!  I sure hope your Memorial Day weekend is a good one as we remember those who gave everything for our country.  

Don't forget to stop by our inspirational Instagram hop!  Thank you so much for stopping by!

Thank you for using my affiliate links to shop (never any additional cost to you)!

Wednesday, May 24, 2023

Beautiful Lakeside Scene Card

Hello crafty friends! Have you seen the new Adventure Awaits release by Honey Bee Stamps? This is such an awesome release and one of my favorite products of this release is the Lakeside Scene Builder Honey Cuts! After I made this card I wanted to find a cabin at the lake to stay at this summer!! It looks so calming and peaceful.

Before I get to my card details, I want to let you know that there will be an Instagram Hop on May 26 and a YouTube hop on May 27 with lots more inspiration from the Adventure Awaits Release. Both will be posted at 9 am CST on the respective days, and there will be two prizes for each hop of two $50 gift certificates to Honey Bee's shop.  Just hop along and the more comments you leave, the greater your chances of winning.  You can find the hops by going to my Instagram page and Honey Bee's YouTube channel.

First I created a 5-½" square card base by scoring a 5-½" x 11" piece of 80# Neenah cardstock at 5-½". Then I used the At The Lake stencil set to begin my coloring. Each of the six stencils have the description etched on it. I found the stencil for the Sky and Lower Tree Bank and used removable tape to hold it in place over my card base. I used a couple of blue inks to stencil the sky directly onto the card base.

Then I die cut the Lakeside Scene Builder die from 80# Neenah. I place the same stencil over the die cut and stenciled the lower tree bank. I used several shades of green inks from my stash to complete each layer of stenciling. I used the same blue inks for the lake that were used for the sky. The small Detail Blender Brushes and some of these brushes are awesome for all of the stenciling.

If you're curious about what green inks I used, I've listed the ones available below. Evidently, Altenew has discontinued their Crisp Dye Ink line (that I used four green and two blue of) for the newer version, which I don't have.

I love how the Lakeside Scene Builder cuts slits in the lake to insert the oar and canoe! This smaller canoe and oar are found in the Lucky Lures stamp set. I stamped them in brown ink and lightly blended on more brown ink over it all. I fussy cut both out but there are coordinating dies for the Lucky Lures images. I used a couple of brown Copic markers to add simple shading to the canoe. I inserted both into the slits and used Bee Creative glue to hold them in place. The larger canoe and oar are in the Lakeside Scene Builder die set. I popped that one up with foam tape.

I added a few extra trees from the Summer Cabins Honey Cuts. After I cut them out, I used a couple of the green inks to color them.

I finished the card by adding a sentiment from the Be Still stamp set stamped in Intense Black ink. I cut it out with the coordinating die and popped it up with foam tape.

I absolutely love the peaceful serenity this card evokes! I hope you've found some inspiration today for your cards. Thank you so much for stopping by!

Tuesday, May 23, 2023

Vintage Gift Card Box with Lucky Lures Stamps

This is the coolest gift card holder I made with the Vintage Gift Card Box dies!  It's new from Honey Bee Stamps from the Adventure Awaits release!  The Lucky Lures stamp set lets you stamp different elements onto the box--it's so clever!  (And don't tell, but I heard there may be some add-on stamp sets for upcoming seasons for the gift card box!)

I used some light cream colored cardstock from my stash to die cut the Vintage Gift Card Box.  Then I stamped some images from the Lucky Lures stamp set onto the top and sides of the box with Rustic Wilderness Distress Oxide ink.  I used some removable tape to mask off the center of the framed area.

Next I used Faded Jeans Distress Oxide to stamp the waves.  I created a little mask for the waves and stamped the canoe in Lumberjack Plaid.  I stamped the oar on a scrap piece in Walnut Stain and fussy cut it out.  There are coordinating dies, but I didn't want the edge around the stamped portion.

I used a few Copic markers to add color to the image on the top of the box.  I kept my coloring very simple with minimal shading.  I used these Copics:  G28, G46, Y35, R39, and R27.

Now it's time to fold on the score lines.  I used my bone folder to crease along the lines left from the dies.  I folded portions of the box and ink blended Walnut Stain here and there along each side of the box for a more vintage look.  Then I used Bee Creative glue to assemble the box.

I love how this turned out!!  It easily holds a gift card and there's room to put some small candies, or even a fishing lure inside!  See the lure in my photos?  It's a sneak peek at one of the lure in the Lovely Layers: Lures die set!

I really appreciate it if you stopped by today for a look!  I hope your day is awesome!

Thank you if you choose to use my affiliate links to shop (never any additional cost to you)!

Monday, May 22, 2023

Vintage Is In! A Totally Masculine Birthday Card

Do you need a quick and easy masculine card?  This one is totally masculine!!  It features several of Honey Bee Stamps new products from the Adventure Awaits release.  This card did not take me long to make and that's always a bonus for me!

First I made two pieces using the new Patina Stencil.  I die cut brown cardstock (all product links are below) with the A7 Double Stitched Frames die.  The stencil doesn't cover the entire piece but you can't tell that at all.  The Clear Embossing Ink I stenciled through is very subtle.  (I used a new Paper Pouncer to add the clear ink through the stencil!  Makes it SO easy!)

Next I added more embossing ink through the stencil onto teal cardstock.  I added rose gold embossing powder and heat set it.  I die cut that piece and the striped paper (the new Pinstripes & Polka Dots: Outdoors paper pad) with dies from the Shield Layering Frames set.  I blended on some Brushed Corduroy Distress ink around the teal layer for more of a vintage look.

I added the layers to an A7 card base.  Then I stamped the motorcycle and the sentiments with clear embossing ink and heat set the rose gold embossing powder.  These are found in the Dad's Garage and Take A Ride stamp sets.  There are coordinating Dad's Garage and Take A Ride dies to cut them out!  Be sure to check out all of the awesome sentiments in the Take A Ride stamp set.

I added foam tape to the motorcycle and sentiments to pop them up on the card.


And just like that, you have a fabulous masculine card!  Be sure to check out all of the other amazing things in the Adventure Awaits release.  Thank you so much for stopping by!

Thank you very much for using my affiliate links to shop (never any additional cost to you)!

Sunday, May 21, 2023

Happy Birthday, To The Wise One -- New Lovely Layers: Owl

Have you seen the latest Honey Bee Stamps Adventure Awaits release?  Let me tell you, this release is all about the outdoors (which I love) and has lots of new sets to make creating masculine cards SO much easier!!

I'm going to be sharing lots of cards for your inspiration this week, so I'm keeping my blog posts brief.  All of the supplies I've used are linked below for you to check out.  If you have questions, please use the "contact me" box in the left side of my blog.

My card that I'm sharing today features the absolutely beautiful new Lovely Layers: Owl die set.

This Lovely Layers: Owl die set is so very detailed!  After you die cut the layers, you will see many embossed lines from the dies that add so much interest.  Be sure to download the very helpful layering guide found in the product description!

I put my owl perched on a stump from the new Lovely Layers: Slice & Stump.  All of my images were colored by blending a few Distress Inks with blending brushes.  I used these colors:  Owl: Ground Espresso, Antique Linen; Stump: Gathered Twigs, Antique Linen.

He is peering through an oval created with the new Sweet Stacks: Ovals die set.  By the way, this set has 18 ovals!

And how can you not notice the beautiful background around the owl?!!  Well surprise, it is paper from the new Adventure Awaits paper pad!!  I've used lots of the papers already and will be ordering another (for hoarding? LOL).

I used the backside of the patterned paper to heat emboss the sentiment from the new To The Wise One stamp set.  I love how this coordinates with the theme of the card.  I cut the sentiments out with the coordinating To The Wise One dies.

Be sure to check back each day for more inspiration from this wonderful release.  Also, if you are on Instagram, find the #HBSAdventureAwaits to see lots more from the team.

Thank you so much for stopping by!  I'll see you back here tomorrow with a totally masculine card!

I so appreciate your using my affiliate links for shopping (never any additional cost to you)!

Thursday, May 18, 2023

Simon Says Stamp Dear Friend 2023 Release - A Set of Three Cards with the Caring Thoughts Stamp Set

It's time for Simon Says Stamp's new release!  I'm sharing three sweet cards I made with the oh so adorable Caring Thoughts stamp set.  This sweet set is part of the Dear Friend release and is filled with lots of sentiments for many occasions along with two additional images!

Y'all, the images in the Caring Thoughts are all so sweet, and I couldn't choose just one!  So I made a set of three cards with three of the five adorable images!

I stamped all of the images with black Copic safe ink and colored them with Copic markers.  I have the markers I used listed below for most of the colors I used.  Where I could, I used the same colors throughout each card for a cohesive look for the set.

All three images were die cut with the same scallop square die (all products listed below) and mounted with foam tape.  I added a panel of soft purple dotted patterned paper to A2 card bases.

All of the sentiments are from the Caring Thoughts stamp set and were die cut with various dies to fit.  I also popped up the sentiments with foam tape.

There are lots of other styles of stamp sets and other products in the Dear Friend release.  Be sure to check  it out by clicking this graphic:

Thank you so much for stopping by!  Have a wonderful day!

These are the Copic markers I used:

  • purple:  V17, V15, V12, V01, V000
  • green:  G85, G94, G24, G43, YG61
  • blue sky:  B0000
  • brown: E23, E55, E31, E42
Thank you for using my affiliate links to shop (never any additional cost to you)!

Wednesday, May 17, 2023

Make Three Easy and Beautiful Cards from One Stencil!

Hello crafty friends! Today I'm sharing how you can make three cards with one stenciled piece that features Honey Bee Stamps beautiful Folk Art Daisy Stencil set! There are so many possibilities for different card types by adding whatever sentiments fit the occasions.

First I taped the Small Flowers stencil of the Folk Art Daisy stencils to a 6" x 6" piece of 80# Neenah. (The names for the stencils are etched on each stencil.) I used a Detail Blender brush to add Tumbled Glass and Blueprint Sketch through each opening of this stencil. (Distress Oxide inks were used for all of the stenciling.)

I replaced the first stencil with the Large Flowers stencil. This time I just added Blueprint Sketch ink. The next layer I stenciled with Rustic Wilderness was the Stems layer. Then finally, the Leaves were inked with Mowed Lawn.

I used my paper trimmer to trim the extra paper around the edges. Then I cut that piece into three strips measuring 1-¾" x 5-½".  I inked up a piece of scrap white cardstock with Blueprint Sketch and cut three narrow strips.

Then I adhered each stenciled strip to three A2 sized pieces of cardstock that I had embossed with the Daisy Field 3D embossing folder. Next I adhered the narrow blue strip. I used Bee Creative glue for these steps and also to adhere the panel to top-folding A2 card bases.

Next I chose three different sentiments. Two from the Big Time Kindness stamp set and one from the Miss You Big Time stamp set. I used my MISTI to stamp each sentiment with Blueprint Sketch Distress Oxide ink. Then I cut them out with the coordinating Big Time Kindness and Miss You Big Time Honey Cuts.

I cut the sentiments dies two more times each from 80# Neenah. I used Bee Creative glue to adhere the layers together. I also stamped three sub-sentiments with Blueprint Sketch and trimmed each one into a strip. I added foam tape to the back of these for dimension.

I did add some thin foam tape to the large sentiments. I use these foam squares and cut them into strips to use! Makes it so easy to add dimension to your sentiments. I thought about adding some gem stickers for some sparkle, but decided that with the stenciling and embossed background that was enough. What do you think?

I love how these turned out! Now that you've seen how easy it is to make three beautiful cards, I hope I've inspired you to give it a try. Thank you so much for stopping by! Have a wonderful and crafty day!

Thank you for using my affiliate links to shop (never any additional cost to you)!

Tuesday, May 16, 2023

Life Was Made for Camping!

Today I have a fun card to share that's perfect for all of the people that love camping!  Personally, for me, the sentiment would need to say "glamping"!  LOL!  This features Rubbernecker Stamps fun Camping stamps and coordinating dies.

First I created the background by ink blending green Basil and Juniper for the ground.  (See all of the product links at the end.)  Next I used the Clouds stencil and Arctic ink for the sky.  I kept all of the ink blending and stenciling closer to the center of the A2 card panel.

Next I used the largest Nested Deckle Rectangle die to cut out the inked background piece.  Then I stamped the images from the Camping set with Copic safe black ink.  After I finished my coloring, I cut them out with the coordinating Camping dies.

I chose a sentiment from the Camping set and stamped it with black ink.  I glued on the tent and tucked one tree behind it before the glue dried.  I used thin foam squares to pop up the other two trees.  I decided to add a bird to the sky.  I chose a bird in flight from the many that the Birds Die cuts.  After I colored it with brown Copics, I popped it up with a foam square.

And that's it!  A super quick, but fun and easy card to make!

I so appreciate your stopping by today to check out my card!  I hope your week is wonderful and filled with lots of crafty time!

Thank you so much for using my affiliate links to shop (never any additional cost to you).