Wednesday, July 28, 2021

The Market Cart is on the Beach | Honey Bee Stamps

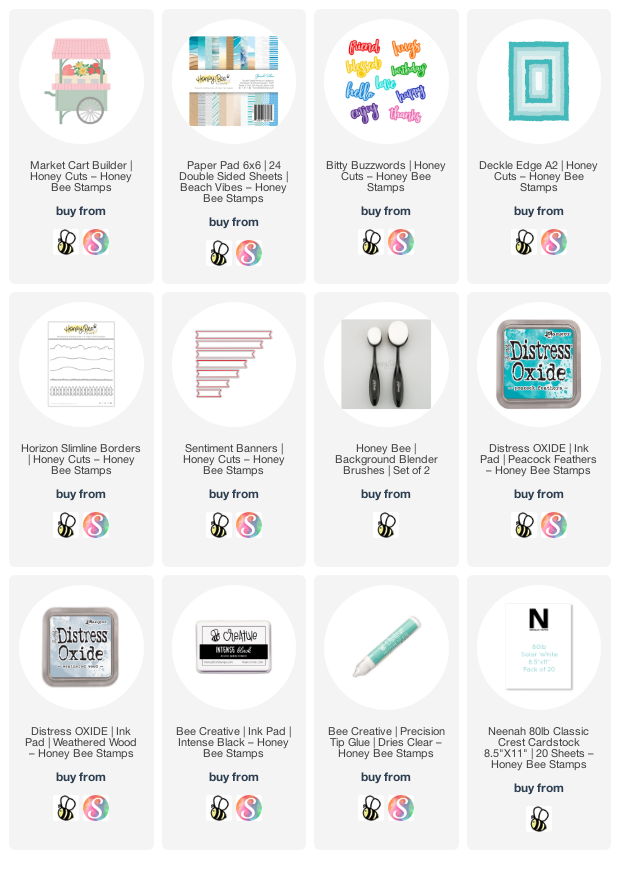
 Hello crafty friends!  Today I have a fun card using Honey Bee Stamps Market Cart Builder Honey Cuts! I've moved the market cart from the flower market to the beach to sell some sea shells!  Anyone thinking of the old tongue twister "she sells seashells by the seashore..."?  Good!  Now it'll be stuck in your brain like it has been mine--LOL!

For the card's background I chose a pretty pattern paper from the Beach Vibes 6x6 paper pad and die cut it with the largest Deckle Edge A2 Honey Cut.  I had a scrap of paper left (it looks like sand) and I die cut it at the bottom of the Deckle Edge die.  Then I used a hill die from the Horizon Slimline Borders die set to cut the top.  I glued the layers together with Bee Creative glue and then glue them to a top-folding A2 card base.

Next I used more of the beautiful Beach Vibes paper to die cut the Market Cart.  I just placed the die at the top edge of the paper so that I would not have the awning it normally cuts.  Then I used a background blender brush to add a bit of Peacock Feathers Distress Oxide ink around the edges.

Then I die cut the wheel and tire from some Distress Woodgrain card stock and added Peacock Feathers and Weathered Wood Distress Oxide inks to them with a blending brush.  I adhered them together with glue and added them to the cart.

I die cut the bottom awning from the Market Cart die set from white card stock.  Next I chose some images from the awesome Hello Summer stamp set and inked them up with Bee Creative Intense Black ink (the umbrella, grass, and shells.)  Then I colored them all with my Copic markers.  I die cut the Hello Summer images with the coordinating Honey Cuts.

To finish up the cart, I adhered all the pieces together with Bee Creative glue, added foam tape to the back and adhered it to the card.  I also popped up the grass pieces with foam tape for more dimension.

Then I used the same BG Copic markers that I used on the umbrella and colored a scrap of white card stock in an ombré pattern.  I used the hello from Bitty Buzzwords Honey Cuts and die cut the top layer of the sentiment.  For some extra dimension I die cut the top layer twice more and the shadow layer once from white card stock.  I adhered all of the layers together with Bee Creative glue.  I stamped the rest of the sentiment in some coordinating teal ink, die cut it with a Sentiment Banners Honey Cut and added foam tape to the back of both sentiments.

Of course, I had to add a bit of sparkle!  I used a clear glitter pen to add that pretty sparkle and shine to the "hello" and also all of the seashells.  I sure wish photos would capture how pretty it is!

I love this Market Cart set so much!  I can see it filled with pumpkins in the fall--what ideas do you have? Thanks, as always, so very much for stopping by!  Stay crafty!!


If you choose to use my affiliate links (at no extra cost to you), I thank you so much!

Tuesday, July 27, 2021

Frosty Fun | Rubbernecker Stamps

 Hello friends!  We are still having fun with Christmas in July over at Rubbernecker Stamps!  Today I've used another snowman favorite set called Snowmen with Presents!!

This was quite an easy card to make!  First I stamped the images from the Snowmen with Presents set in Copic safe ink.  Then I colored them with my Copic markers and used the coordinating dies to cut them out.

Next I die cut 80# Neenah Solar White card stock with the largest Nested Rectangle Scallop die.  Then I stamped the tree from the Woodland Animals #1 Set in Copic safe ink and colored it.  I used Copic BV20 to sketch in a couple of trees, then blended the lines out with C1, B0000, and C0.  Then I used a foam ink blender and Arctic ink to add some color to the sky.  I didn't bother with any masking.

Then I stamped the sentiment from the Snowmen with Presents in black ink and matted the layer onto red card stock I die cut with the largest Nested Rectangle Small Stitch die.

I added foam tape to my images to pop them up on the card front.  Then I added some sparkle to the hill tops with a clear glitter pen.

Thank you so much for stopping by!  Have a wonderful, and crafty, week!

Click the product links for more details:

Thursday, July 22, 2021

Altenew Paint-A-Flower: Fashion Monger Dahlia Outline Stamp Set Release Blog Hop + Giveaway


I'm thrilled to be joining the the Altenew Paint-A-Flower: Fashion Monger Dahlia blog hop!  You should have arrived here from the blog of the awesome Erum Tasneem!  If you need to start at the beginning, head on over to the Altenew Card Blog!

This is a beautiful outline stamp featuring a bouquet of Fashion Monger Dahlias that can be colored with any medium you like!  It's also available to purchase three different ways:  1) purchase just the Paint-A-Flower: Fashion Monger Dahlia stamp set; 2) The stamp set + Watercolor Essential 24 Pan Set Bundle; or 3) subscribe to the Paint-A-Flower Subscription Plan and never miss out on these beauties!

Oh my, I had so much fun watercoloring this beautiful image in some bold colors!  Read on for the details.

I began by stamping the floral image in black pigment ink onto Bristol Smooth card stock.  I added clear embossing powder and heat set it.  Then I used various paints from the Artists' Watercolor 24 Pan Set to color the flowers.  This was my first time to use these watercolors, and I have to say that I love the beautiful colors in this set!  I also added diluted colors around the image for a colorful background.

When it was dry, I added splatters of Jet Black Ink Spray to the background.  TIP:  To cover the painted flowers, I just laid the stamp on top of my painted flowers.  I was sure to wipe the black ink spray off before it dried!

I chose a sentiment, stamped it in black pigment ink, and heat embossed it with clear embossing powder.

I sure hope I've given you some inspiration on using this gorgeous set!  Be sure to leave a comment before you head over to the next stop!

Your next stop on the hop is the lovely and so talented Virginia Lu!

Giveaway Prizes:

$200 in total prizes! To celebrate this release, Altenew is giving away a $50 gift certificate to 2 lucky winners and a $20 gift certificate to 5 winners! Please leave a comment on the Altenew Card Blog and/or each designer’s blog post on the blog hop list below by 07/28/2021 for a chance to win. 

Altenew will draw 7 random winners from the comments left on each stop of this blog hop and announce the winners on the Altenew Winners Page on 07/30/2021.

Blog Hop Order:

Altenew Card Blog

Jaycee Gaspar

Amanda Baldwin

Erum Tasneem

Carol Hintermeier <<< that's me!

Virginia Lu

Jenny Colacicco

Tenia Nelson

Sandhya Iyer

Nathalie DeSousa

Terri Koszler

Emily Midgett

LauraJane

Norine Borys

Verity Biddlecombe

Seeka

Daniel Diaz

Nenette S. Madero

Bridget Casey

Tina Smith

Justine Hovey


Thank you so much, if you choose to use my affiliate links!

Wednesday, July 21, 2021

Wildflower Surprise Box Birthday Card | Honey Bee Stamps

 Hello friends!  Today I'm sharing a fun Surprise Box card featuring Honey Bee Stamps A2 Surprise Box Card Base with the Wildflower Stamp set and coordinating Honey Cuts.  It's been quite a while since I've created a surprise box card, and this was so fun to make, I don't know why I've waited so long!

First I created my box by die cutting the A2 Surprise Box Card Base from some light gray card stock.  Then I used the included scalloped layering dies to cut some white card stock and green gingham patterned paper (from the Summer Stems paper pad).  I adhered these layers to the box flap with Bee Creative glue.  Next I cut the pretty purple floral paper and purple layer from paper in the Playful Pastels paper pad.  I cut the purple paper into four rectangles measuring 1-7/8" x 2-5/8".  I also cut the floral paper into four rectangles measuring 1-5/8" x 2-3/8".  I adhered these to the outside of the box.  See the photo below that shows the card in my 5" x 7" envelope.

Next I used the die for the box inserts and cut it three times from white card stock.  I folded the ends along the scored line and glue them to the inside of the box.  I set it aside to dry while I worked on the flowers and sentiment.

I stamped the flowers from the Wildflower stamp set with Bee Creative No Line Coloring ink.  I stamped the butterfly with Bee Creative Intense Black ink as I didn't know how I would show the details in no-line ink.  I colored the images with my Copic markers.  Here are the Copics I used:  purples: V05, V04, V12, V01; yellows:  Y35, Y13, Y00; greens: YG17, YG25, YG23, YG03, YG01.  Then I die cut the images with the coordinating Honey Cuts.

Next I used Bee Creative glue to adhere the flowers and greenery to the box inserts.  For the butterfly and sentiment, I cut three strips of heavy acetate from some packaging I'd saved.  Then I used double-sided tape to adhere the butterfly to the acetate strips and also to adhere the strip to the box insert.

I used the Bitty Buzzwords stamp set and coordinating Honey Cuts for the sentiment.  I die cut "birthday" twice from white card stock and once from the same purple paper in the Playful Pastels paper pad.  I glue the layers together with Bee Creative glue.  I die cut the shadow from white card stock and adhered the top layer.  Next I stamped "happy" with some coordinating purple ink and trimmed it to a rectangle.  I adhered it to the shadow layer with glue.  Then I added double-sided tape to the acetate strips, adhered it to the sentiment and to the back off the inside of the box.

If you don't go crazy (like I did--LOL!) with your decorative pieces, the box is made to fit in an A2 sized envelope.  This is such an adorable Surprise Box die set that you can use for any occasion you need!  I hope you've found some inspiration here today!  Thanks so very much for stopping by!


Here are my affiliate links to the products I've used today:

Friday, July 16, 2021

Altenew/Scrapbook.com Shrub Rose Layering Stamp Set

 Have you seen the new Shrub Rose stamp set designed by Altenew for Scrapbook.com?  It's a beautiful layering stamp set that Altenew is so well know for!

This set also includes several different holiday sentiments.  As you will see in my card, I used a holiday sentiment, but the card is in non-traditional holiday colors!

I love this non-traditional colored Christmas card!  It was very quick and easy to create too!

First I die cut white card stock with the Moroccan Lattice Cover die.  Then I used blending brushes to ink on the Rose Petal Crisp Dye inks.  I adhered this to a top-folding A2 card base.

Next I stamped the the outline of the Shrub Rose and leaves in Jet Black ink, twice.  Then I used the layering guide and stamped the various layers with inks from the Puffy Rose Crisp Dye ink set.  After I cut out the images, I adhered them to the card front.  The bottom flower and leaves are popped up with foam tape.

I chose a sentiment from the stamp set and stamped it in Jet Black ink.  I trimmed it into a rectangle and popped it up with foam tape.  I added a few sparkly gems here and there for a bit of bling!

Thank you so much for stopping by!  Be sure to check out more inspiration in the Scrapbook.com store!


Thank you so much, should you use my affiliate links.

Wednesday, July 14, 2021

You're My Favorite Flower! | Honey Bee Stamps

 Happy Wednesday friends!  Today I'm sharing this A7 sized card that features Honey Bee Stamps adorable Sandie and Sis stamp set and the coordinating Honey Cuts.   I had lots of fun tucking little Sis into the wheelbarrow of flowers and dressing her and Sandie in some paper pieced hats and apron!  Read on for the details!

To begin, I die cut the largest A7 Doubled Stitched Frames Honey Cut from 110# Neenah Solar White card stock.  I added some purple tape to mask off the edges, then I used the Background Blender Brushes and Hexagon Palm Blender brush (which I love for its flat surface when blending larger areas) to blend on the sky and grassy background.  I used Salty Ocean, Mowed Lawn, and Rustic Wilderness Distress Oxide inks.

Next I die cut a fence with the fence die found in the Horizon Slimline Borders Honey Cuts.  This slimline die set is such a great one to have on hand since you can use the die cuts for any size card!  I adhered the fence to the background and added the penal to a top-folding a& card base with Bee Creative glue.  I set this aside to work on my card elements.

I stamped the images from the Sandie and Sis stamp set with Intense Black ink, which is alcohol marker friendly.  I truly love this ink!  I have tried several other black alcohol friendly inks and this one is definitely my favorite!  I colored all of the images with my Copic markers and then used the coordinating Honey Cuts to cut them out.

Next I stamped the little hats and apron with Bee Creative Intense Black ink onto some patterned paper from the Summer Stems 6x6 paper pad.  I die cut them with the coordinating Honey Cuts  but decided to fussy cut up to the black stamped line.  I used my Memento Tuxedo Black markers to go around the edges to hide the white core of the paper--it really gives them a more finished look.  Next I adhered the hats and apron to the bears with Bee Creative glue.  I adhered little Sis in the wheelbarrow after I trimmed off the bottom of the image so it wouldn't show.  I wend ahead and glued a few flowers in the wheelbarrow and one for each bear to hold.

I stamped the sentiment from the My Favorite Flower stamp set and die cut it with the coordinating Honey Cut.  Then I added foam tape to the bears, wheelbarrow, sentiment, bees butterfly, and a few of the flowers and added them to my card.  To finish it up, I used a white gel pen to add details to the hats, apron, and wheelbarrow just for fun!

I just adore this sweet set and can see using it many different ways!  Thank you so much for stopping by!

Links to products I used, if you'd like more information.

Tuesday, July 13, 2021

Christmas in July with Rubbernecker Stamps

It's Christmas in July over at Rubbernecker Stamps and we are getting a head start on our Christmas cards!  I absolutely love snowmen stamps and this one by Rubbernecker is no exception!  It's a single red rubber stamp (don't you love the crisp lines from this type?!) and also has a coordinating die.  I decided to color this adorable image with my Copic markers in some non-traditional Christmas time colors.

The steps for this card are fairly simple.  I have some photos of my coloring progression for you below.

  • Stamp the image in Copic safe ink.  I always use Neenah Solar White 80# card stock.
  • I stamped it at the bottom of the card stock piece, thinking I would use the coordinating die.  As I progressed into my coloring, I decided I wanted a scene.
  • I'm not a Copic coloring expert, however, I have learned that when an object is white, don't leave it totally white!  Even white objects have shadows and shading.  Here is a collage of my shading progress.  I hope these show you what a difference the shadows make.


Also, I colored the tree and rabbit in darker colors.  I think that helps to highlight the adorable snowmen even more!

  • After I finished the coloring, I used the fourth largest Nested Rectangle Small Stitch Die to cut the image out.  Then I masked the edges with some removable tape.  I colored in the background with dark blue Copic markers to create a night time scene.  I used B69, B28, B18 and FB2.
  • Next I added shadows under the snowmen.  I used BV20, C1, and B0000 adding 0 colorless blender along the edges.
  • Next I pulled away the masking tape.  I love the white edge!
  • However, there was some bleeding of the darkest blue around the edges.  Normally I would use a white gel pen.  I have found that, especially with dark Copic colors, the color will bleed up through the gel pen when I try to cover those bleeds.  The pen I used, and love, is a Posca white pen (I found mine at my local Michael's).  I went around the edges and cleaned them up.  I also used this pen on the pink striped scarf and yellow scarf to add in the white stripes and dots.
  • Next I used the white pen to add in dots for the snow.

  • Next I added the snowman panel to a black card stock layer.  Then I added foam tape to the back.
  • I used the largest Nested Rectangle Small Stitched die and dry embossed the front of my card base.  I just used the embossing sandwich for my die cutting machine.
  • Then I adhered the matted panel to the card front.
  • I used a sentiment from the Snowmen with Presents stamp set and stamped it in black ink.  I trimmed it into a strip, matted it with black card stock and adhered it to the card.
  • Of course, a Christmas card needs all the sparkle (at least I think so!)  So I added sparkle with a clear glitter pen to the snowmen and the snow on the ground.  In real life, it's so pretty and sparkly!

I hope I've inspired you to get out your holiday sets and get started on the cards before the rush of Christmas comes!  Thank you for stopping by!

Product links for items used in my card:

Monday, July 12, 2021

Altenew Craft Your Life Project Kit: Seasonal Blooms Release Blog Hop + Giveaway

 Welcome to my stop of the brand new Altenew Craft Your Life Project Kit!!

You should have arrived here from the blog of the awesome Bridget Casey.  If you need to start at the beginning, head over to the Altenew Card Blog.

Monthly Subscription Description:

Get early access to our NEW Craft Your Life Project Kit before it is released on our store by subscribing to our Craft Your Life Project Kit Monthly Subscription Plan (you will save 14%)!

Don't worry if the project kit goes out of stock! When you are subscribed to the monthly subscription, you are guaranteed a spot in our New Craft Your Life Project Kit each month.

The Craft Your Life Project Kit comes with a 6 x 8 Stamp set and its coordinating Die Set, Stencil, and Embossing Folder. Note that the items included in this kit are not sold separately.

The price of the subscription is $49.99/ month plus shipping and tax (calculated based on the location of the shipping address). This will Auto-renew every month until it is canceled.

Product Description:

This beautiful first-ever Craft Your Life Project Kit includes everything you see in the following photo.  It is my honest opinion that this Kit is absolutely stunning!  Click the photo to go to the Altenew shop where this amazing kit is available now!

**************************************************

I have to say that I enjoyed coloring the Seasonal Blooms stamp with the Seasonal Blooms Simple Coloring stencil so much!!!  And then, oh my, the die that cuts it out along the top edges is perfection!

I stamped the Seasonal Blooms stamp in Jet Black ink.  Then I used the Ink Blending Tools and the Detail Blending Brushes with the Simple Coloring Stencil to color the flowers and leaves.  All of the inks I used, and other products, are linked at the end of this post.

Then I used the coordinating Seasonal Blooms die to cut it out.  I adhered it to a a white card panel that I embossed with the Areca Palm 3D embossing folder.  I love the extra interest it adds to the background.  I heat embossed the sentiment from the stamp set with black embossing powder onto vellum.  To adhere it without the adhesive showing here's a tip!  Use mini glue dots, roll them up, and then place in various areas behind the embossed sentiment!


This next card uses the gorgeous Blooming Through the Seasons 3D embossing folder!  I have to admit, I wanted to keep this card much lighter in the colors, but it really is so difficult for me to do!  Haha!

I used the Seasonal Blooms Simple Coloring stencil set to help me color the raised portions.  Now, to be honest, the stencils do not line up exactly with the embossed images, and that's okay!  It was super easy to just place the stencil for each section and then move it slightly to color the next!

I added the hello sentiment from the Seasonal Blooms coordinating die set.  I love that it has the shadow layers for the sentiments!

I sure hope you've found some inspiration on my stop on this amazing hop!  Be sure to leave a comment for your chance to win before you hop on.

Your next stop in the hop is the so amazingly talented Daniel Diaz!

Blog Hop Order:

Altenew Blog

Jennifer McGuire

Amanda Baldwin

Jaycee Gaspar

Terri Koszler

Vicky Papaioannou

Michelle Short

Norine Borys

Jenny Colacicco

LauraJane

Emily Midgett

Tina Smith

Laurie Willison

Dana Joy

Virginia Lu

Sandhya Iyer

Tenia Nelson

Nathalie DeSousa

Verity Biddlecombe

Linda Westfall

Lilith Eeckels

Simon Hurley

Agnieszka Małyszek

Maryam Perez

Bridget Casey

Carol Hintermeier <<< that's me!

Daniel Diaz

Keren Baker

Nenette S. Madero

Preeti Chandran

Seeka

Erin Thompson


Thursday, July 8, 2021

Spellbinders - July 2021 Card Kit of the Month - Damask Daydream

 Hello friends!  It's time for another gorgeous Spellbinders' Card Kit of the Month!  I'm truly amazed at the quantity you get in each kit!

I created three cards to share with you, but there are supplies for so many more!  Also, I'm definitely saving the extra die cut pieces to use in my scrapbooking (when I get back to it, that is!)  These are just perfect for your layouts in any style of scrapbook!

Except for a couple of additional Spellbinders dies (which are linked at the end) you don't need any additional products to create your cards!  So I'll leave you with photos of the gorgeous cards with a brief explanation, where needed.

This card uses some of the included pretty patterned paper along with one of the dies in the kit.  I backed the patterned paper with some of the included purple card stock.


This next card uses more patterned paper and some die cut shapes one of which I popped up with the foam squares.

I used the stamp set and stamped the sentiment in black ink (not included) and die cut it with the coordinating die.  The papers are cut with the A2 Matting Basics dies.

For my third card, I just had to use more of the beautiful butterflies!!  It's very hard to tell in the photos, but the butterflies have a clear acetate overlay with just a bit of sparkle on them.  So pretty!

I die cut the white card stock with an Elliptical Oval Etched die and popped it up after I stamped the sentiment.

The elements in this kit are absolutely beautiful and I would've created more cards, if only I had the time!  I hope I've inspired you to check out the Spellbinders Card Kit of the Month!  Thank you so much for stopping by!