Monday, October 31, 2022

Elegant Floral Frames Holiday Card & Instagram Hop

Hi crafty friends!  I'm sharing my card here that is part of Honey Bee Stamps' Instagram Hop to celebrate the release of their beautiful Make it Merry release!  Honey Bee is giving away TWO $50 gift cards to two lucky commenters over on Instagram!  This card features the beautiful Elegant Floral Frames and Home for the Holidays sets.


This card really was quick to make! I used the Snow Day background stencil to add texture paste to pink cardstock.  The pink cardstock is 4" x 5-¼".  I set that aside to dry, which didn't take very long as the dots are very small.

I stamped the ornament, topper and bow from the Elegant Floral Frames set in clear embossing ink.  I also stamped the sentiment that's from the Home For The Holidays set.  I sprinkled silver embossing powder over the stamped images and heat set it.

Then I used a few Copic markers to color the poinsettia, berries, and leaves.  I was careful to not color over the embossing, but it was easy to do! (There are coordinating stencils for this set to use as another easy way to color the images.) I used coordinating dies from the Elegant Floral Frames and Home for the Holidays die sets to cut everything out. 

I added foam tape to the back of the images, then decided I wanted some vellum in the center of the ornament.  I used the die for it to cut the vellum and stuck it to the foam tape.  Some dots of glue helped to adhere it to the card.

Thanks so much for stopping by today!  I hope you'll join me over on Instagram for the hop.  I have all of the hop details in my post.  Click HERE to get there!  Have a wonderful week!

Wednesday, October 26, 2022

Grandma's Christmas Tree - New 3D Embossing Folders & Coordinating Stencils

 Hello crafty friends! Are you loving the Honey Bee Stamps' Make it Merry release as much as I am? There are so many wonderful products that it's so hard to choose what to make next! I couldn't wait to have a play with Honey Bee's new product: the 3D embossing folder that coordinates with the Grandma's Christmas Tree Honey Cuts and stencils. There are so many possibilities with this set!

The first thing you need to do is die cut your tree with one of the dies in Grandma's Christmas Tree Honey Cuts. I chose the tree die that cuts the little slits to use with the lights, as I did here, and also the candles and birds. After I die cut the tree from 80# Neenah, I placed the die cut in the Grandma's Christmas Tree 3D embossing folder. I turned it face down and used a couple pieces of removable tape to hold it in place over the recessed side of the embossing folder.

I use a Spellbinders Platinum for my die cutting and found that I didn't have a plate to work for the 3D embossing folder sandwich. NO worries! Just play with creating your own sandwich! What worked for me was a couple pieces of thick chipboard along with a few layers of printer paper. The main thing is you don't want to force it through your machine.

Next I used the coordinating Grandma's Christmas Tree stencil set to add some Bundled Sage and Rustic Wilderness Distress Oxide inks with a couple of detail blending brushes. For the final stencil, I added iridescent glitter gel and then set it aside to dry. I also added white splatters with some diluted white gouache and a paint brush. Then I adhered some white and green pearls from the new Holiday Pearl Stickers set.

After I die cut the light bulbs (x 3) I added drops of White Blizzard Nuvo Glitter Drops. While those were drying I added Metallic Silver ink to the star with a sponge dauber. I used Bee Creative glue to adhere the lights after slipping them into the little slits.

I stamped the sentiment from the Home For The Holidays stamp set with Rustic Wilderness Distress Oxide ink. Then I cut it out with the coordinating die.

The A2 card base is layered with some beautiful paper from the Make It Merry paper pad and a white layer that has the Winter Gems A2 Cover Plate embossed onto it. I used a Sweet Stacks: Rectangles die to trim the white layer down. Then I finished up by popping up the tree and sentiment with foam tape.

This was such a fun card to make and the 3D embossing folder adds so much beautiful detail!! Thank you so much for stopping by today! Have a wonder, and crafty week!!

Tuesday, October 25, 2022

Floral Friendship Card with New Patterned Paper!

Hi crafty friends!  How can October be almost over?!!  You know that means Christmas cards are next, but I'm still loving making autumn themed cards!  My card today features Rubbernecker Stamps beautiful Warm Sunset stamp set along with the gorgeous paper from the Autumn Leaves paper pad.

First I made the card base by running the Diamond Pierced Cover Die and some A2 80# Neenah through my die cutting machine.  Then I trimmed the panel into two strips measuring: 5-½" x 1" and 5-½" x 1-¾".

Next I trimmed a gold piece of paper from the Autumn Leaves paper pad into two narrow strips.  Then I adhered these to the die cut panels.  I added foam tape to the back, but don't adhere these yet!!

I trimmed the pretty patterned paper into a strip that is 5-½" x 2" and placed it on an A2 card base, using the die cut white strips for a guide to know where to adhere the patterned paper.  Then I removed the backing from the foam tape and adhered the white panels to my card.

I stamped the flowers and leaves from the Warm Sunset stamp set with black ink.  Next I stamped the flowers and leaves with the following Color Fuse inks:  Apricot and Citrus (set #2) and Clover and Basil (#10).  I used the coordinating die to cut out the flowers, and I fussy cut the leaves.  I adhered these with glue and with a few foam squares on the part over the recessed area.

To finish up, I stamped the sentiment from the Kitty Says Friends stamp set in Versafine Onyx Black and trimmed it into a strip before popping it up with foam tape.  I added a few coordinating gem stickers for a bit of sparkle.

I always appreciate you very much for stopping by to check out my cards!  Thank you!  I hope you are having a wonderful, and crafty, week!

These are the Rubbernecker products I used for my card:

Saturday, October 15, 2022

3D Vignette Pet House by Spellbinders

Hello friends!  Today I'm sharing a beautiful and fun kind of project.  This features the new 3D Vignette Pet House die set by Becca Feeken for Spellbinders.  This fun project folds flat to fit into a padded envelope for a fun and unique surprise for the recipient!

I followed the included layering directions (downloadable PDF on the Spellbinders' site) and die cut the pieces from a few shades of teal cardstock using my Spellbinders Platinum die cutting machine.  I die cut the little dog in white (after our sweet Maltese, Baxter) and also the bowl and bone.  I Copic colored the bowl with a few gray markers.  That is the only piece that I colored!!

Here's a helpful photo showing the pieces before assembly.  The roof and roof trim is already glued onto each piece as well as the dog's collar and tail.  (There's also a die for a cat for the cat lovers!) You can cut little teal scraps to fit behind the bone and the sentiment to coordinate with the other pieces!

Here's a view of the side.

This folds totally flat for mailing!  I will use a larger and padded envelope when I mail it.

I used pieces of foam tape to adhere the grass strip, bone, and the sentiment.

I hope you've enjoyed this unique project!  It's super cute and a special treat for your friends with fur babies!  Thanks so much for stopping by.  I hope you have a wonderful, and craft, weekend!

Products used for this adorable project (affiliate links, never additional cost to you)

Wednesday, October 12, 2022

Hocus Pocus, A Cute Halloween Shaker Card

Hello friends!  Today my cute, not spooky Halloween card features Honey Bee Stamps Perfect Potions Shaker Jars Honey Cuts and the Hocus Pocus stamp set and coordinating Honey Cuts. I love creating cute cards for Halloween!

First I created the background for my card. I ink-smooshed some Distress Oxides onto a panel of watercolor cardstock. You know what ink smooshing is, right? If not, it's where you press the ink pad onto a craft mat, lightly spritz it with a water spritzer, then use a piece of acetate (I used a piece of a stamp package) to pick up the ink and "smoosh" it onto the watercolor card. The key is: not too much water, don't over work it, and use a heat tool to dry before adding more color! I used Dusty Concord, Kitsch Flamingo, Twisted Citron, and Mowed Lawn Distress inks.

When the piece was dry, I splattered drops of Bee Shimmery liquid shimmer watercolor onto the panel. I dried the droplets and adhered it to an A2 panel that I first inked the edges of with Kitsch Flamingo.

Next I die cut the pieces for the Perfect Potions Shaker Jars, once from white cardstock, then just the jar dies from adhesive foam sheets. (The foam sheet I used has adhesive on both sides.) I used the same Distress Inks and ink blender brushes to color the jar frames. The "cork" stoppers are die cut from Neenah Desert Storm cardstock with edges inked in Gathered Twigs.

You will need two pieces of acetate for each shaker jar. First I peeled off the adhesive backing of one side of the foam, added the acetate covering, replaced the backing, flipped it over, and filled it with bling from my stash. Then I added the second piece of acetate to hold the bling in the shaker. I adhered the inked shaker jars die cut to the front after I removed the backing. Just repeat for each of the jars. I used Bee Creative glue to attached the cute shakers to my card.

I stamped the sentiment from the Hocus Pocus stamp set in Kitsch Flamingo Distress ink, then in clear embossing ink. I sprinkled on clear sparkle embossing powder and heat set it. Then I die cut it with the coordinating Honey Cut and popped it up with foam dots.

Whether you're team spooky, or team cute, I hope you've enjoyed my card today!  Thanks so much for stopping by!

Thank you for choosing to use my affiliate links (never any additional cost to you).

Tuesday, October 11, 2022

Friends Forever Floral Card with Stenciling

 Today I'm sharing my card using Rubbernecker Stamps' new Friends Forever set and the coordinating coloring stencils.  This is a beautiful set with several fun sentiments to choose from!

First I created my card base by die cutting some paper from the new Harvest Time paper pad with an Outside Frame Scallop die.  I adhered the pieces to an A2 card base.  I intentionally did not match up the center rectangle paper because I thought it added more interest and dimension.  What do you think?

I die cut the next smaller Outside Frame Scallop die with some woodgrain cardstock.  I colored the frame portion with a couple of brown Copic markers.  I added some gold metallic splatters to the white rectangle and then adhered the pieces to my card.

Next I stamped the Friends Forever image in a no-line coloring ink.  Tip:  Leave the stamp on the MISTI door!  The reason for this is that I'm just using this stamped image to line up the coordinating coloring stencils.  It keeps from dulling or smearing a black outline stamped image and you can still see how to line up the stencils.

I used Color Fuse inks from set #'s 6 and 7 to stencil the blue-voilet flower.  Then I used Scarlet, Posey, and Crimson (set #4) and Clover and Basil (set #10) to finish the other flower and leaves.  I fussy cut the image out, but there is a coordinating die to use too.

I added foam tape to the back of the flowers and sentiment.  The sentiment is in the Friends Forever set and stamped in Versafine Onyx Black ink.  I hand trimmed it and added it to the card.

I added a few gem stickers for a bit more sparkle!

Thank you so much for stopping by!  Have a great, and crafty, day!

Check out the products here: (affiliate links--never any additional cost to you).

Friday, October 7, 2022

So Thankful For You -- Acorn Branch Digital by Graciellie Design

 Happy Friday crafty friends!  Today I have an autumn card featuring the new digital stamp, Acorn Branch, by Graciellie Design.

I used Word to upload my acorn branch image, duplicated it, then repositioned both to fit the background of an A2 sized card.

I use an Epson XP-7100 with a rear feed tray to print it on 80# Neenah Solar white cardstock.

I colored this gorgeous image with my Copic markers.  Here are the colors I used:

  • leaves: G07, YG25, YG23; E07, YR27, YR23, YG21, E07
  • acorn: E59, E57, E35
  • acorn tops:  E44, E87, E31, E43
  • background:  B01
I used a stitched rectangle die to cut out the card panel and a square stitched rectangle for the sentiment.  I wrapped  twine around the card, added foam tape to the back and adhered it to an A2 card base.  The sentiment is also popped up with foam tape.


That's it!  If you haven't tried digital stamps, I highly encourage you to visit Graciellie Design and check out her beautiful images.  Also, I'm most happy to assist you with the uploading and printing.  Just use the "contact me" form on the right side of my blog.

Thank you so much for stopping by today!  Have a wonderful, crafty, weekend!

Wednesday, October 5, 2022

Simon Says Stamp Cozy Hugs Release -- A Christmas Card with the Let It Snow Stamp Set

 Hello friends!  I'm super happy to be sharing a card featuring the awesome Let It Snow stamp set from Simon Says Stamp's new Cozy Hugs release!

I created my card base by embossing teal cardstock with the beautiful Sizzix Winter Snowflakes 3D embossing folder.  Then I took my white ink pad and lightly brushed it over the raised portions.  I trimmed the piece to 4" x 5-¼" and adhered it to an A2 card base.

Then I began stamping the layers of Simon's CZ Design Let It Snow stamp set.  Before I started stamping, I used a white eraser to "condition" the stamps.  This really helps to get an even stamping! Then I stamped the large letters of snow with dark teal ink.  I positioned the second layering stamp and stamped it with a lighter teal ink.  I made sure the inks were dry before stamping the final layer with clear embossing ink.  Then I sprinkled on silver embossing powder and heat set it.

I trimmed the piece to 2" x 4-¼".  I layered this on top of silver mat and teal cardstocks with glue and added it to the card base.

The snowflakes and sentiment are also in the Let It Snow set and are heat embossed with silver embossing powder.  

This super fun set also has several more sentiments and another separate snow globe image to make more cards with.  Be sure to head over to Simon Says Stamp's blog to see more of the Cozy Hugs release and fabulous inspiration!  

Hello, My Friend -- Watercolored Leaves and Stenciled Frame

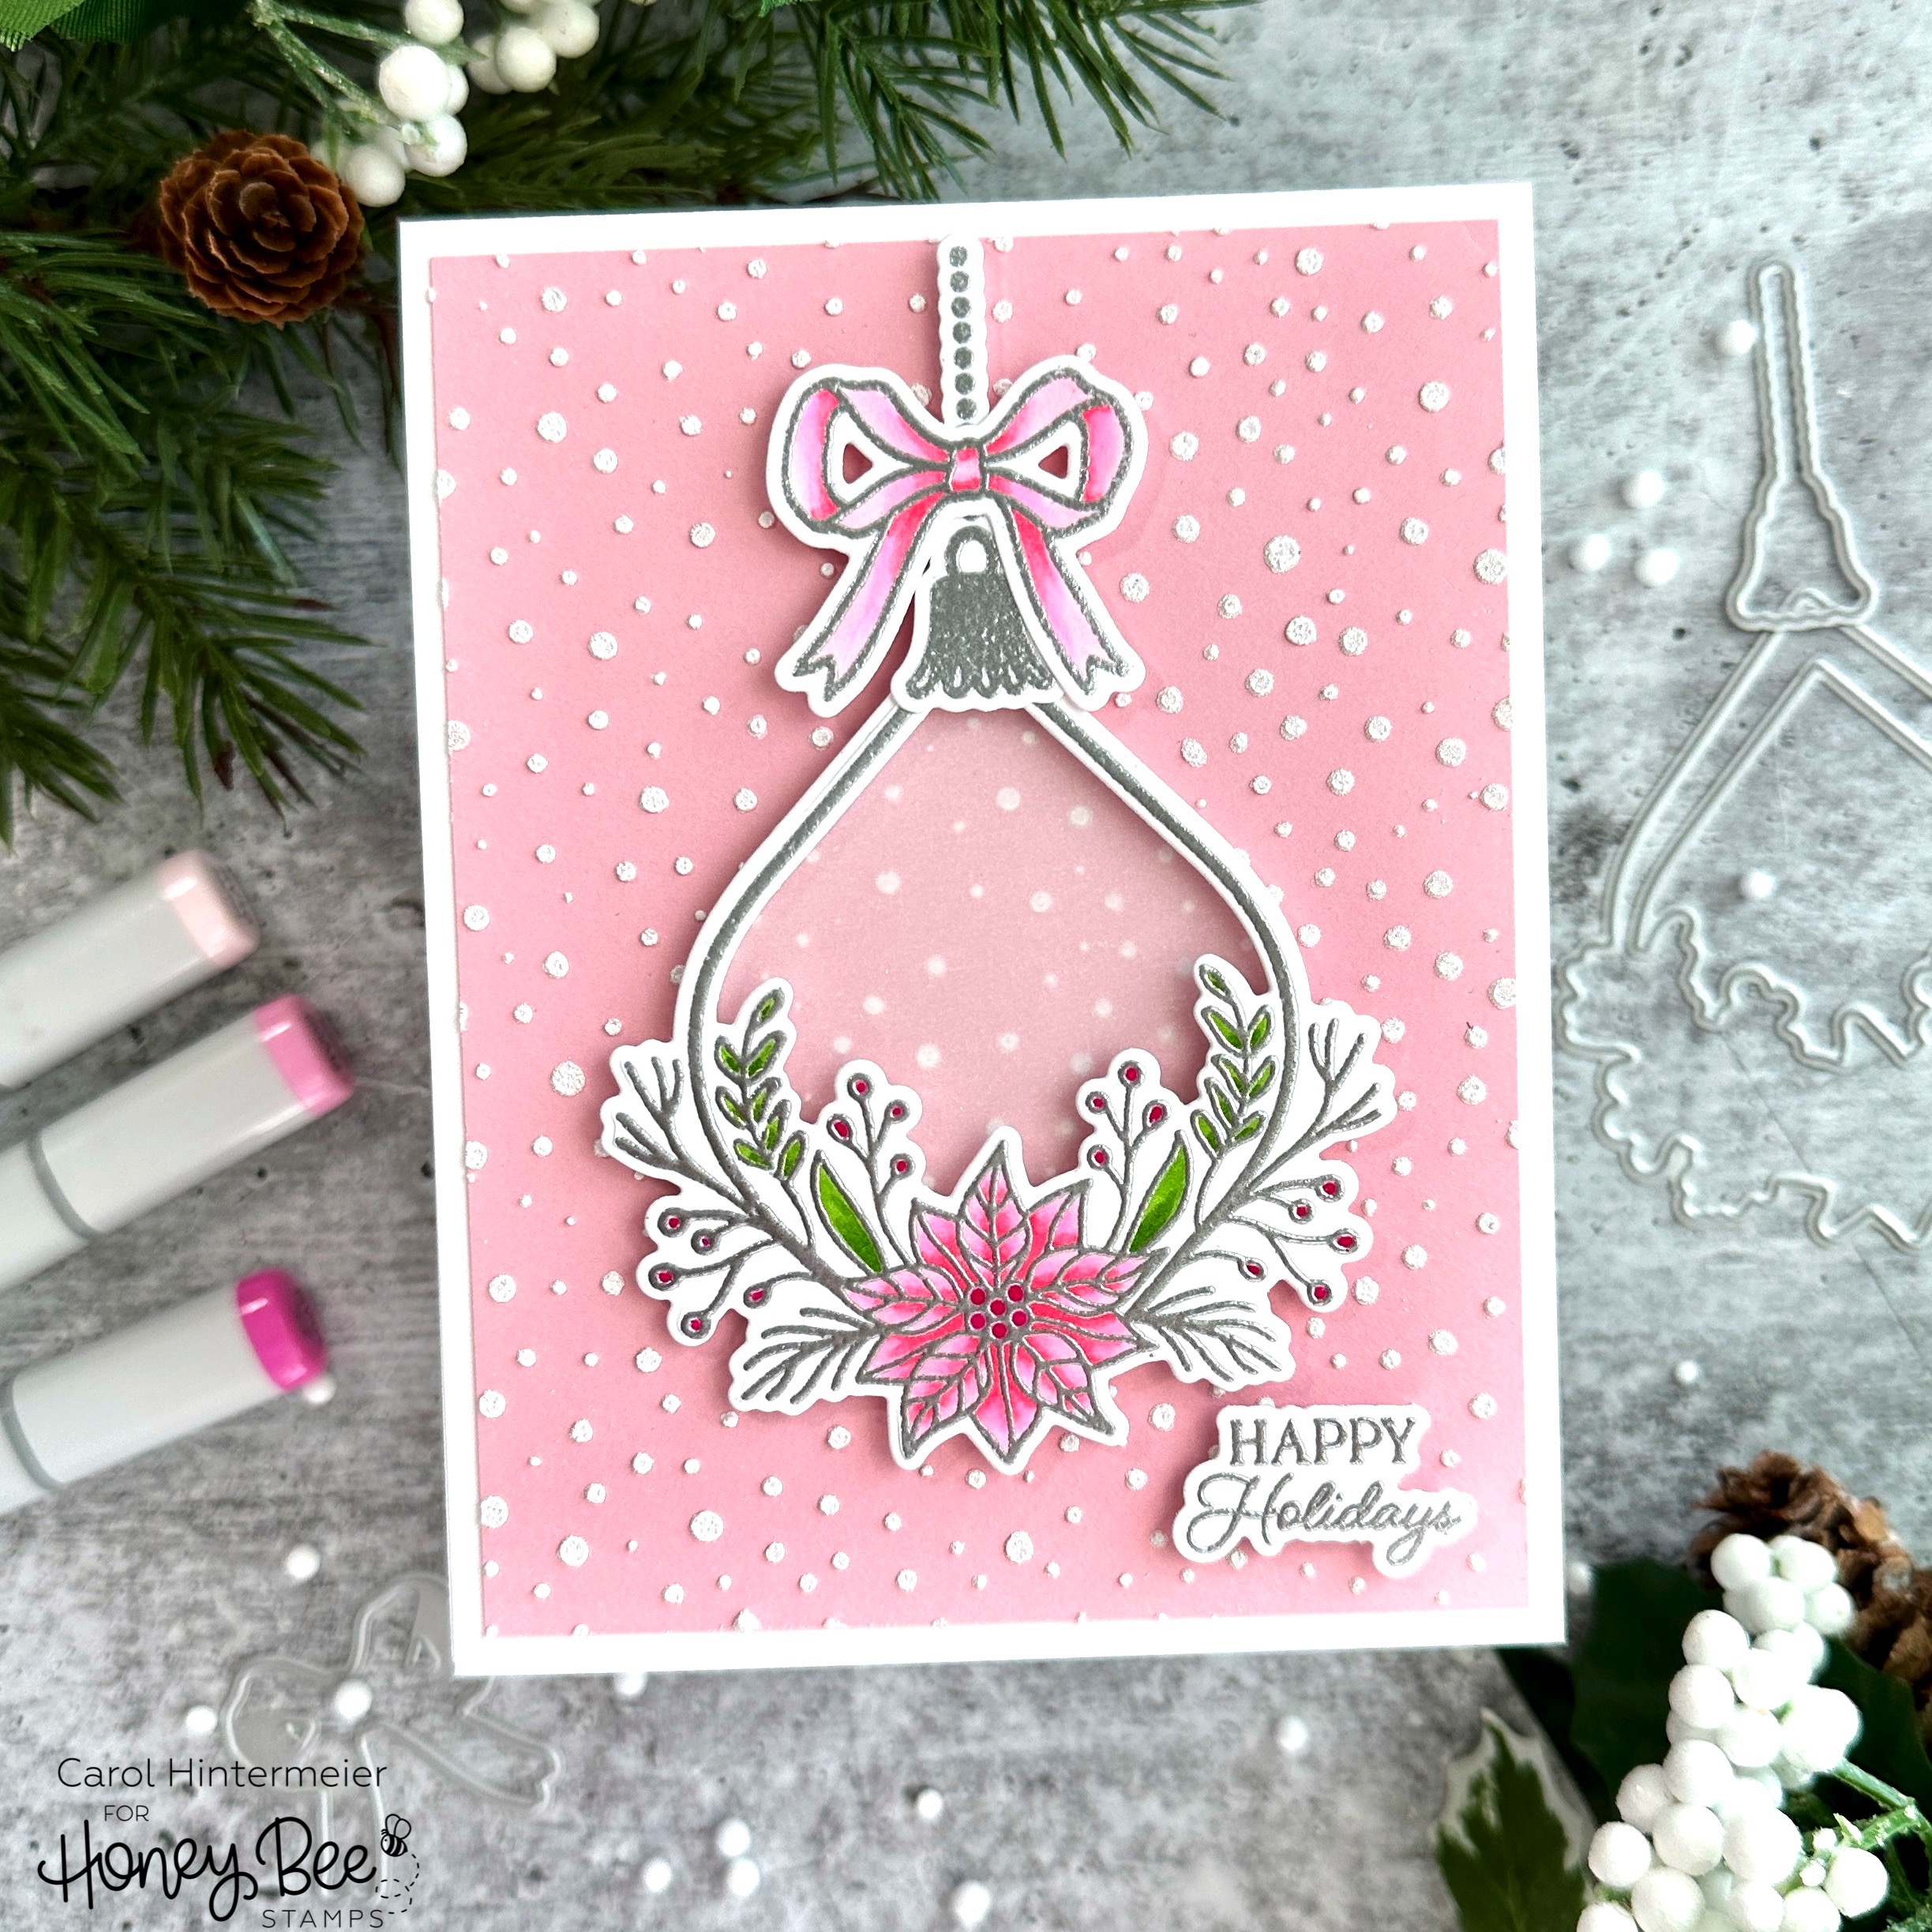
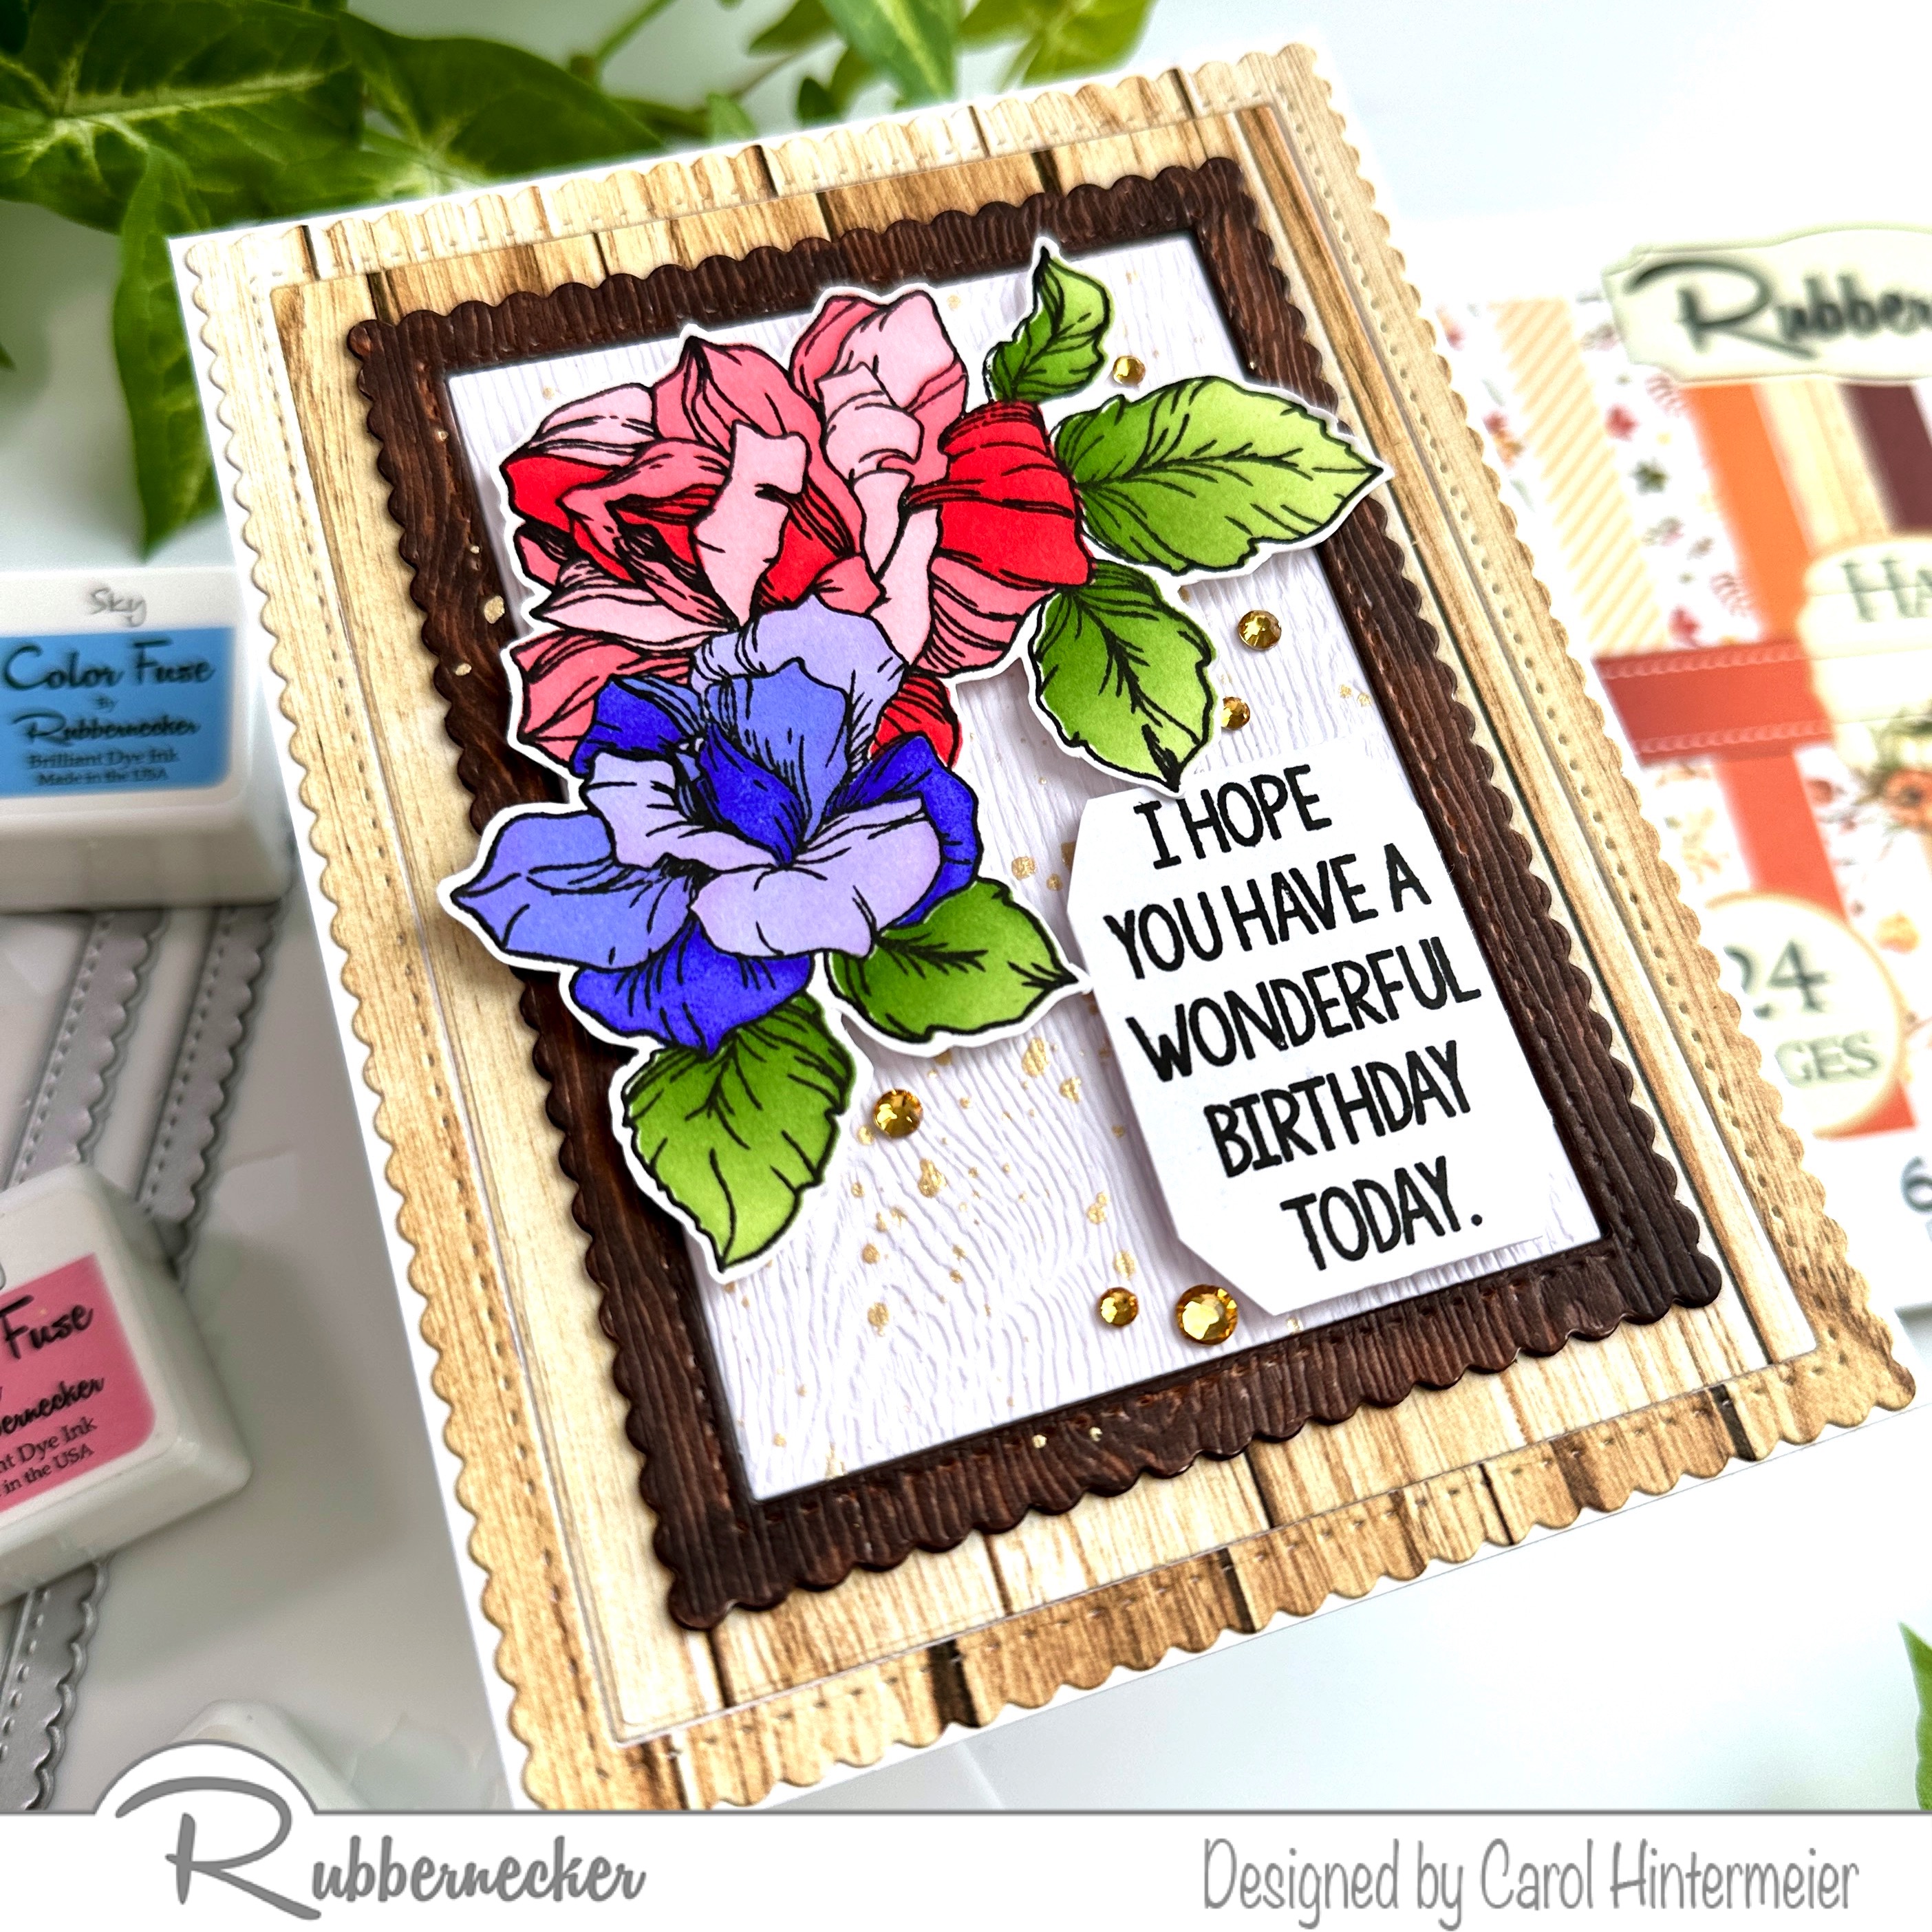
Hello friends!  I am really enjoying making autumn cards!  I love the colors since we don't get much fall color here in Texas.  For my card today, I've combined Honey Bee Stamps' beautiful Fall Foliage Frame stampsHoney Cuts and Layering Stencils, with previously some release products! I've added in the Lovely Layers: Maple Leaf and the A7 Double Stitched Frames Honey Cuts for a gorgeous autumn card!

I made the A7 card base from 80# Neenah cardstock. Then I trimmed some gold metallic cardstock to 6-¾" x 4-¾". Next I die cut some woodgrain paper from the Grain and Grunge paper pad with the largest A7 Double Stitched Honey Cut. I adhered all of the layers to the card base with Bee Creative glue.

Then I used a sticky mat and adhered an A7 piece of 80# Neenah to it. I began with the stencils from the Fall Foliage Layering stencil set and sponge daubers to add Distress Ink colors. I used Crackling Campfire, Fired Brick, Fossilized Amber and Mowed Lawn.

I placed the cardstock, still on the sticky mat, into my MISTI. Then I positioned the Fall Foliage Frame stamp over the stenciled image. After treating the paper with an anti-static tool, I used Clear Embossing ink to stamp it a couple of times. I sprinkled on gold metallic embossing powder and heat set it.

Then I used the coordinating Fall Foliage Frame Honey Cuts to die cut the image.

To create my leaves, I misted watercolor cardstock with water, and then just dropped in various autumn colors of watercolor paints. I misted it a bit more, used my heat tool to dry it, and continued to add colors until I was satisfied. Tip: The finished result may not look totally pleasing, but when you die cut the leaves, it will be beautiful! When my watercolored panel was dry, I added some gold metallic watercolor splatters.  Then I die cut the solid Lovely Layers: Maple Leaf four times from my favorite spots on the watercolored panel. I die cut the top detail layer of the Lovely Layers: Maple Leaf four times from metallic gold cardstock. I used glue to adhere the layers together.

As you may be able to tell from the photos, I had also die cut the center of the frame out. After playing around with the sentiment from the Fall Foliage Frame set, (embossed with gold metallic embossing powder) I decided I wanted that center piece! So I added foam tape to the back of the center to adhere it to the card. I used Bee Creative glue to adhere the other elements to the card.

I hope you've found some card making inspiration here today!  Thank you so much for stopping by today!

Thank you, if you choose to use my affiliate links for shopping (never any additional cost to you).

e glue to adhere the elements to the card. A few gem stickers from the Spooktacular Gem Stickers set adds a bit more bling.

Sunday, October 2, 2022

Spellbinders October 2022 Glimmer Hot Foil Kit of the Month

 What a gorgeous Glimmer Hot Foil Kit by Spellbinders has this month!!  Spellbinders has created this lovely poinsettia spray hot foil plate for the kit and it includes three sentiments with the most beautiful font!

I used my Glimmer Hot Foil System and blush foil with the poinsettia hot foil plate to foil it onto 80# Neenah.  I also foiled all three sentiments with the blush foil.  I love how there are coordinating dies for all of the pieces!

Next I used the largest Essential Duo Lines Glimmer Rectangles to add blush foil to red cardstock.  I adhered this piece to an A2 card base.

Next I used some Copic markers to color in the poinsettias and other flowers and leaves.  TIP:  If you get a marker color onto the foil, use the very tip of your 0 Colorless Blender to remove it--frequently scribbling it onto white scrap paper to clean the tip.  It took the red marker right off of the foil!

I popped up the sentiment and image with foam tape.  For a bit more bling, I added some clear gem stickers around the image.

These hot foil plates in the Glimmer Kit of the Month make creating a beautiful card very quick and easy! Thanks so very much for stopping by!  I hope you have a fabulous, and crafty, week ahead!

Product links for more information (thank you for checking out my affiliate links--never any additional cost to you).