Tuesday, February 28, 2023

Happy Birthday Card with Custom Floral Background

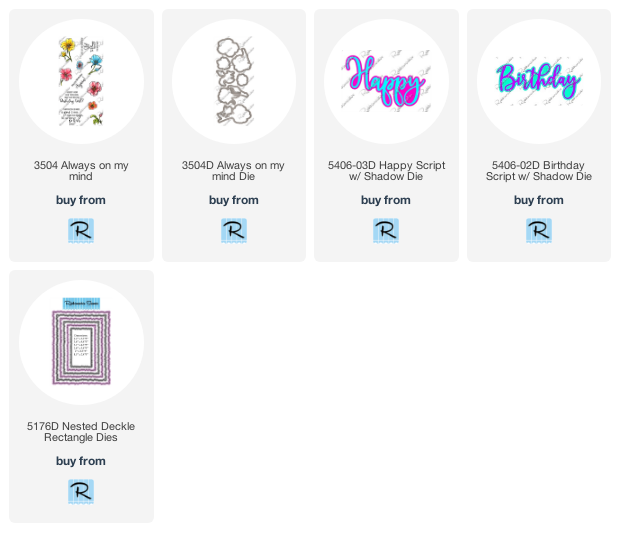
 Happy Tuesday crafty friends!  Today I'm sharing a card where I've used Rubbernecker Stamps' gorgeous Always On My Mind set that's full of lots sweet flower stamps and several sentiments!

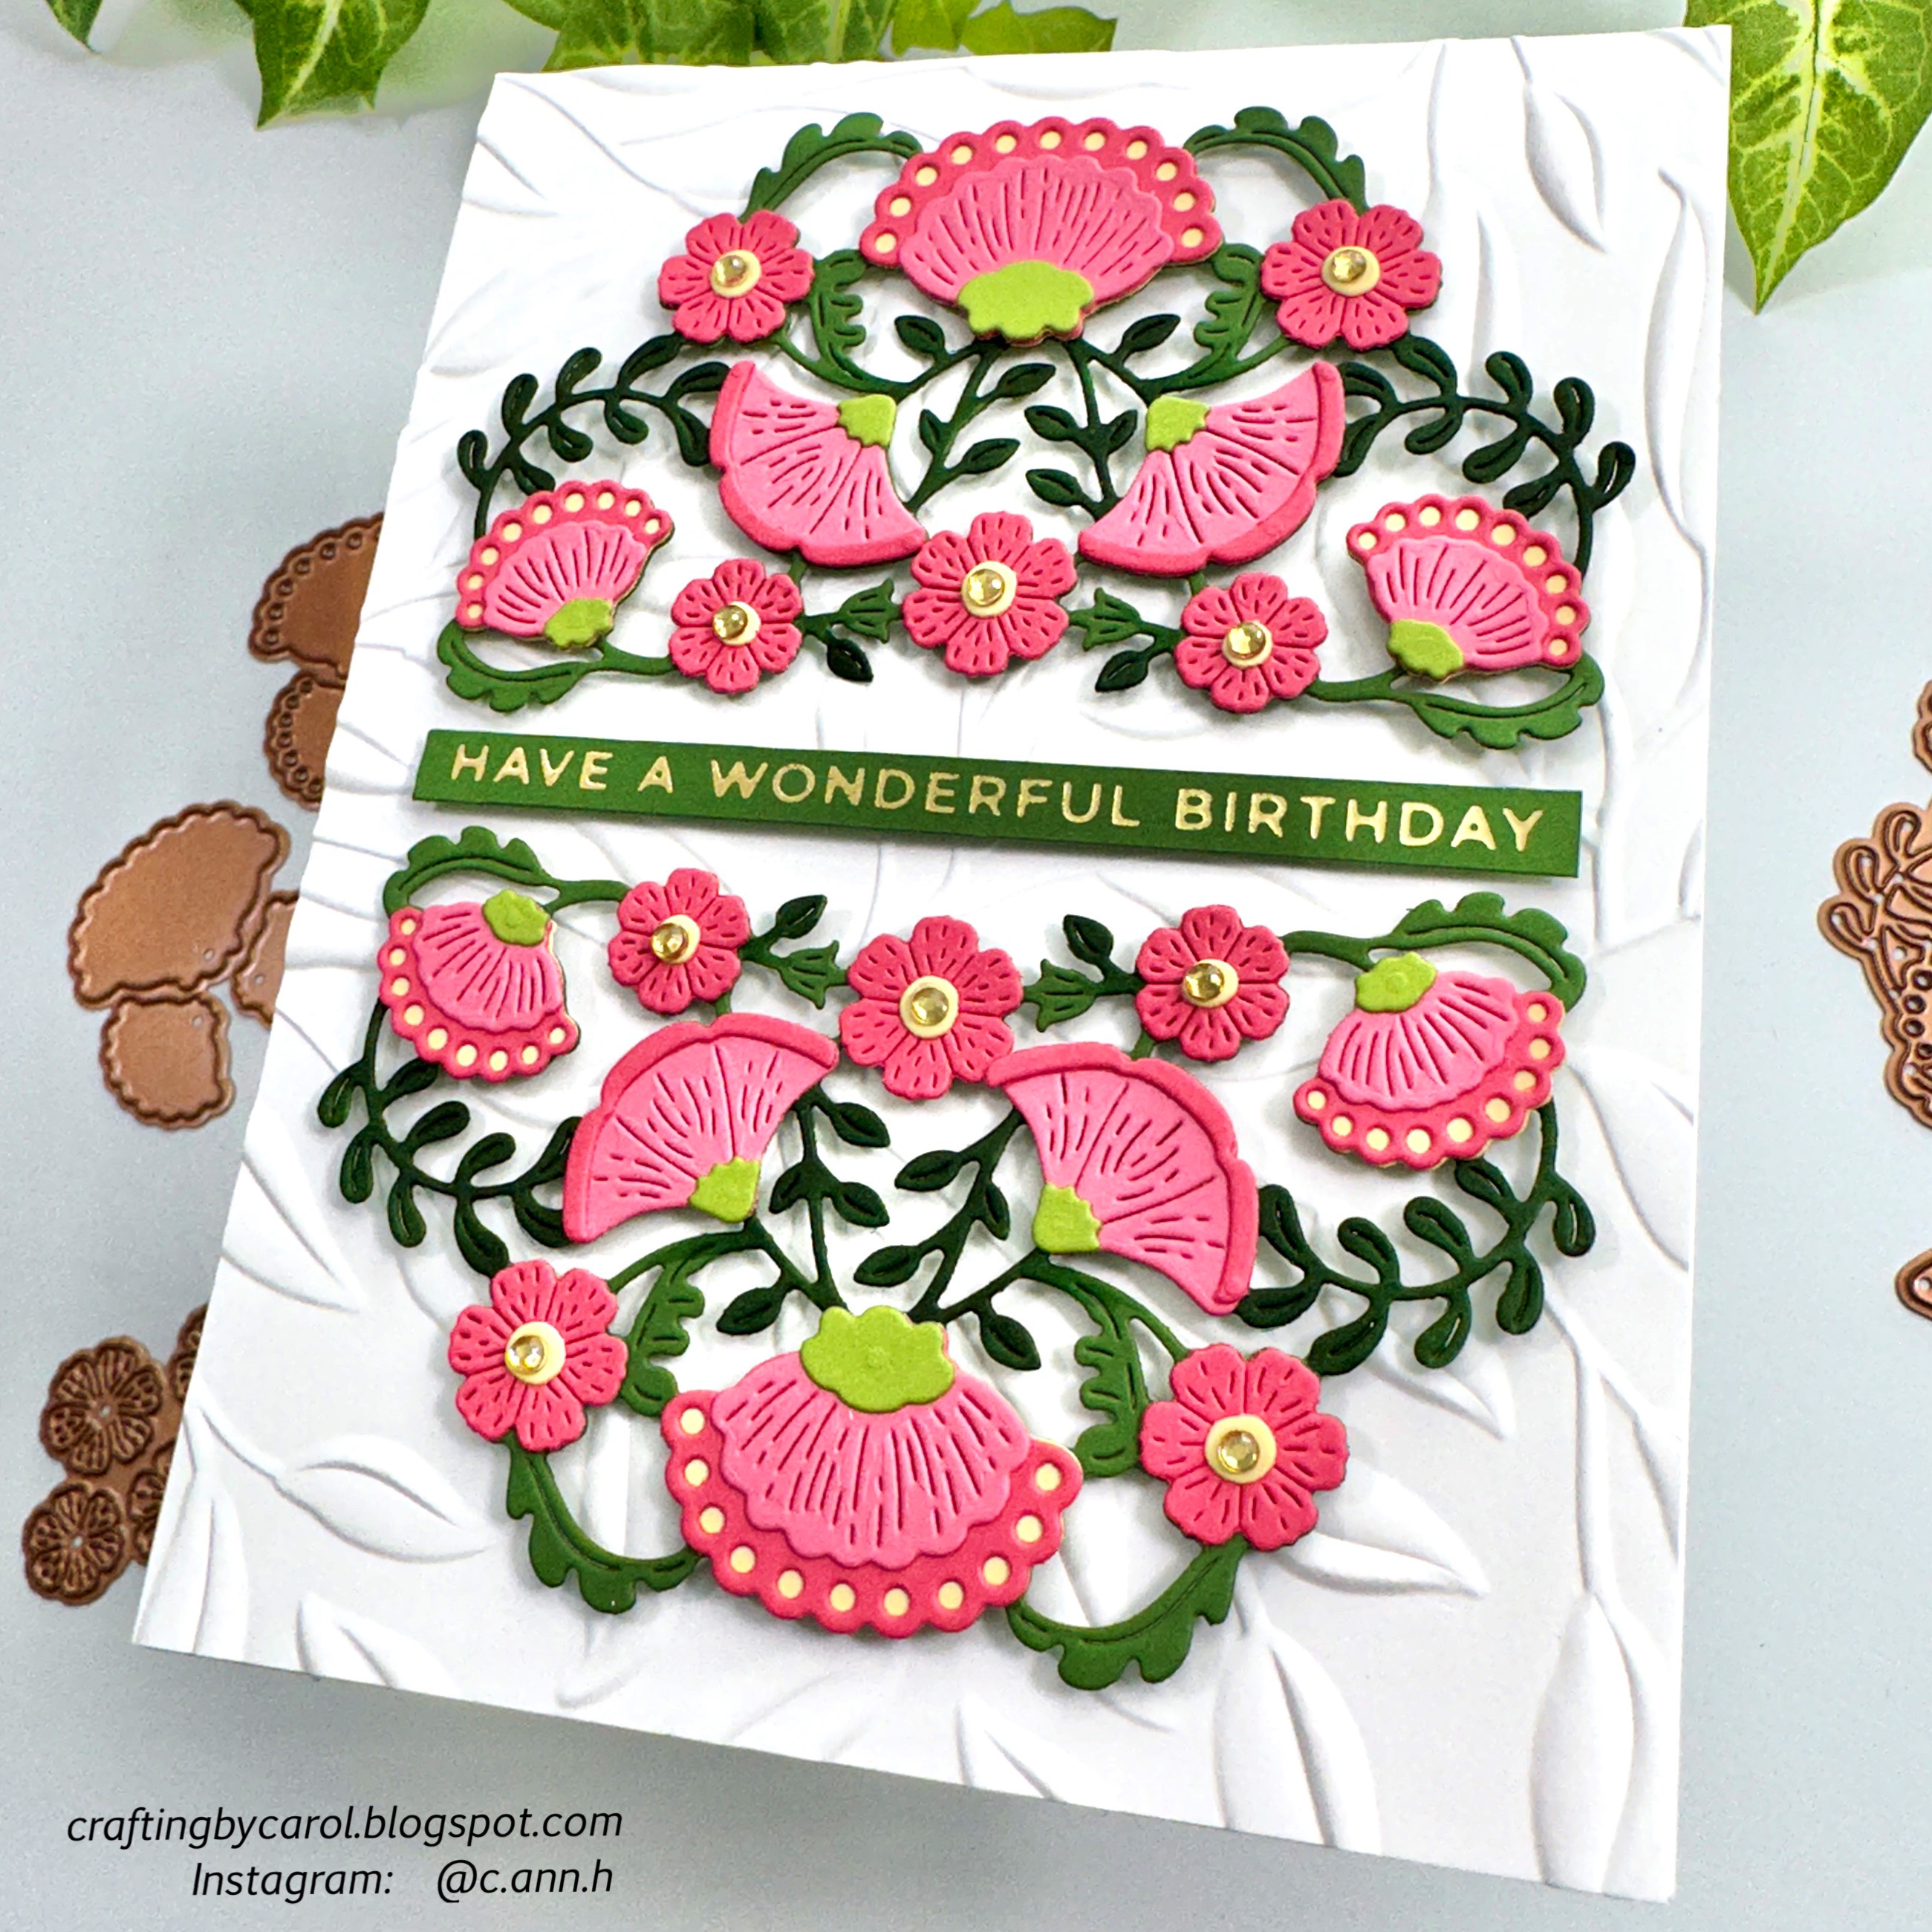
First I used my MISTI to stamp several of the floral images from the Always On My Mind set in Copic safe black ink.  I arranged them first near the center of the 80# A2 sized cardstock panel and worked my way out to the edges.  I let some of the stamps hang off of the edge of the paper to create a more organic look.

Here's a photo that shows which Copic markers I used to color the flowers.

Not shown are C3, C1, and C00 that I used to add a shadow around each image.  When I finished my coloring, I used the largest Nested Deckle Rectangle die to cut the panel out.


I die cut the words three times from the Happy Script w/Shadow die set and the Birthday Script w/Shadow die set using 80# Neenah solar white cardstock.  I adhered the layers of each word together with glue.  Using a glue with a fine tip applicator makes it extra easy!  Then I die cut the shadows and glue the words to each one.  I used the RV04 Copic marker to color the top of each sentiment.

I added foam tape to the back of the sentiments to adhere them to my card.  I finished up by adding some gem stickers in groups of three here and there on the card.

Thank you so much for stopping by!  I hope I've given you some inspiration for using the Always On My Mind set!  Have a wonderful, crafty day!

I so appreciate you using my affiliate links (never any additional cost to you).

Wednesday, February 22, 2023

Get Well Wishes Card with Springtime Strawberries

 Hello crafty friends! Today I'm sharing a card to send that, depending on what you put on the inside, could work for a get well, a birthday, or any "well wishes" occasion! I have a friend that I'm going to send it to as she will need a get well card. I've used the beautiful Lovely Layers: Strawberries as the main element with some pretty paper and layering dies in the background.

First I die cut two each of the strawberries and other pieces in the Lovely Layers: Strawberries set. To make it easy to ink blend the die cut pieces, I left them in the negative space and added removable tape to the back to hold them in. I used ink blending brushes to add these Distress Inks: Aged Mahogany, Lumberjack Plaid, Barn Door, Abandoned Coral, Mowed Lawn, Rustic Wilderness, and Squeezed Lemonade.

I adhered the strawberry layers together with Bee Creative glue and set them aside to work on my card base.

I cut a piece of gingham paper from the Gingham Happy Hearts paper pad to 4" x 5-¼" and adhered it to an A2 card base. Then I die cut a vellum layer and white cardstock layer with two dies in the Opulent Layering Frames Honey Cuts. I added adhesive to the center of the vellum piece and foam tape to the white cardstock layer to adhere them to the card. Then I cut a label with the smallest die in the Opulent Layering Frames. I stamped a sentiment from the Get Well Soon stamp set with Intense Black ink.

To adhere the elements to the card I added foam tape where the strawberry bunches hung off of the label. I used a few thin foam squares here and there behind the other strawberries and then adhered it all with a dot of glue in the center of each bunch. I trimmed off the overhanging pieces with some scissors. The sentiment is also popped up with thin foam squares.

For a bit of shine, I added some clear enamel stickers from the Shimmer and Shine Enamel Stickers set.

There's nothing like sweet strawberries to remind us that spring is just around the corner! Thank you so much for stopping by today. I hope you have a wonderful and craft day!

Thank you so much for choosing to use my affiliate links (never any additional cost to you).

Wednesday, February 15, 2023

SSS Be Creative 2023 release

 Hello crafty friends!  Today I'm sharing my card that features the oh, so awesome new Big Old Birthday stamps set!  This set is in Simon Says Stamp's new Be Creative 2023 release! 

First I stamped the Pretty Peonies Background stamp with clear embossing ink.  I stamped it onto 80# Neenah and used my anti-static tool on the cardstock before stamping.  Then I sprinkled on white detail embossing powder and heat set it.

Next I used the Pawsitively Saturated Ink in the colors of Cherry, Watermelon, and Guava to ink over the embossing with ink blending brushes.  I used a dry paper towel to wipe away excess ink from the white embossing.  I used a stitched rectangle die to cut it out before adhering it to my A2 card base.

Next I stamped the sentiments from the awesome new Big Old Birthday stamp set.  Using my MISTI makes this technique so easy!  I used the same inks listed above to create the ombré look.  Just use a paper towel to dab at the harsh line from the ink pad, stamp it, then move on to the next color, and repeat.  To add shine to the sentiment, I stamped it once more with clear embossing ink.  Then I added clear embossing powder and heat set it.

I die cut the sentiment with another stitched rectangle die.  I did some partial die cutting by placing the die at the top of my stamped sentiment.  After I ran that through my die cutting machine, I moved the die so that the bottom of the die aligned with the bottom of the sentiment.  Die cut again, and voila!  A matching stitched die cut!

After I popped up the sentiment with foam tape on the card, I decided I wanted a few embellishments.  I used the Flickering Butterflies and the Stitching Butterflies dies to cut a piece of vellum.  Before I die cut the butterflies, I inked on some Watermelon ink with a blending brush.  I used glue to assemble the large butterfly and then adhered them all to the card.  I added some sparkly gem stickers for some pretty sparkle.

Be sure to check out the entire release over in the Simon Says Stamp shop!  Thank you so much for stopping by today!

Thank you for using my affiliates links to shop (never any additional cost to you).

You Bring A Smile to my Face -- Heart Hugs Bear

Hello crafty friends! Today I'm sharing a card with the sweet bear from the Heart Hugs Honey Cuts set. He's surrounded by daisies I made from a few dies in the Spring Bouquets Honey Cuts. Now that Valentine's day is past, all I can think of is springtime with all of the flowers and trees leafing out!

First I die cut the bear from the Heart Hugs die set from 80# Neenah. I used the new Lost Shadow Distress and Distress Oxide inks to color him with a couple of detail blender brushes. Then I glued on the eyes and nose die cut from black cardstock and the ear inside that I colored with a Copic marker.

Next I stamped the sentiment from the Best of Everything stamp set with black ink. I stamped it near the bottom of an A2 sized piece of white cardstock. I added a strip of removable tape to mask off the sentiment. I blended on some Tumbled Glass Distress Oxide in the center of the panel. I occasionally placed the bear on the card while I was inking to make sure I had the ink out far enough beyond the bear. Here are a couple photos for you:


Then I placed the Lazy Daisy Pierced A2 Cover Plate die onto the panel keeping the bottom edge of the die at the line of the inking. The previous photo shows the details of this step.

I die cut a bunch of the daisy like flowers from white cardstock with the dies in the Spring Bouquets Honey Cuts. I die cut some leaves and leafy stems from green cardstock and added a bit of shading with a couple of green Copic markers. I adhered the yellow flower centers to the daisies. Then I shaped the flower petals a bit with a stylus from the Flower Shaping Essentials Kit. I glued one of the daisies to a leafy stem and placed it in the bear's paws with a small foam dot.


I played around with the flower arrangement and when I was happy with it, I used Bee Creative glue to adhere the floral elements in place. I added some Glimmer and Shine Enamel Stickers to the flower centers.

I could not resist drawing in a little smiley face with a black pen on the flower center in the bear's paws! I used the same black pen to draw him a mouth and a white gel pen to add details to the eyes and cheeks.

I have always had a "thing" for all the bear dies and stamps, and this cute little guy is no exception!! There are so many ways to use the bear and other adorable critters in the Heart Hugs Honey Cuts set and I hope I've given you some inspiration today! Thank you so much for stopping by!

Check out the supplies I've used (affiliate links--never any additional cost to you).

Tuesday, February 14, 2023

Happy Birthday To You!! & Creating Colorful Cards with Die Cuts

 Hello crafty friends!  Today my card features Rubbernecker Stamps' beautiful Birthday Cake Die!  It's a one piece die that makes it so easy to cut all of the cute pieces and parts of this birthday cake.  Check out the details below!

First I heat embossed the background layer with the Happy Birthday #1 background stamp and some sparkle embossing powder.  You can see it in the photos, but in real life, it's so sparkly and pretty!

While I had my MISTI out for the stamping, I stamped the sentiment in the Happy Birthday #1 set with Versafine Onyx black ink.  I used the third smallest Nested Oval Scallop die to cut it out.  I added foam tape to the back and set it aside.

Next I die cut 80# Neenah Solar white cardstock with the Birthday Cake Die set.  You can totally use this fun die with colored cardstock.  It would be perfect to use with your scraps by placing each color over that section of the die.  I used some Copic markers to color the layers of the cake.

I also stamped and Copic colored a few of the smaller flowers found in the Always On My Mind stamp set.  I fussy cut them out and adhered them to the base of the cake with glue and foam squares.

Thank you so much for stopping by today!  I hope it's a great one for you!

Check out these products I used today (affiliate links-never any additional cost to you)

v

Friday, February 10, 2023

New Spellbinders Four Petals Collection

Today Spellbinders is releasing the gorgeous Four Petal Collection and my card features the Four Petal Blooms Reflection dies.  I have always loved die cut elements and this one is a beauty! 

I used a few different colored cardstocks (in the list below) by Spellbinders.  I have recently tried their cardstock and really love the quality and variety of colors.

After I die cut the various elements from the Four Petal Reflection set two times each, I used reverse tweezers and a pick up tool to glue everything together.  I used glue that has a fine tip and the one in the list is my most favorite that I use!  Using these tools really makes the assembly very easy.

The photo above shows the pieces as they are partially assembled.  I used a darker green Copic marker to color some of the leaves to create more interest.

I adhered both complete pieces to my card base.  The background layer of the card is 80# Neenah embossed with the Leafy 3D Embossing  Folder.

I used my Glimmer Hot Foil System to foil matte gold foil onto Fern cardstock.  The sentiment is from the Just Wanted to Say Glimmer set.  After I trimmed it into a strip, I popped it up on the card with a foam tape strip.  A few sparkly gem stickers adds some pretty bling to the card!

Be sure to check out the complete Four Petal Collection--there are so many beautiful products!  Thank you so much for stopping by!!!

Thank you very much for using my affiliate links for shopping (never any additional cost to you).

Wednesday, February 8, 2023

Two Ombré LOVE Cards with the LOVE A2 Cover Plate Die

 Hello Honey Bee friends! Today I'm sharing two cards, one more clean and simple, and the other not as much, that feature the LOVE A2 Cover Plate Honey Cuts! Even with more details, the second card was still very quick to make! I have the directions for both cards condensed together for you below.

For both of these cards I began by die cutting two pieces of 80# Neenah cardstock with the LOVE A2 Cover Plate die. I kept the die cuts in the negative spaces and added strips of removable tape to the back to hold the letters in place.

With the letters taped into place, I was able to easily blend three shades of pink ink (in the supply list at the end) onto each row of letters. These small blending brushes, and also these brushes, make it very easy to get the ombré look.

Next I smooshed the same pink inks onto my craft mat. I spritzed on some water and dipped in a piece of watercolor cardstock. I used my heat tool to dry the ink and repeated the steps until I liked the look. When the piece was dry, I die cut the base layer of the Lovely Layers: Heart Vine twice from the inked panel. Then I die cut white cardstock with the top layer and adhered them together with glue.

I went back to my ombré LOVE A2 Cover Plate die cuts and put a piece of removable tape on the front before removing the tape from the backside. This kept the letters spaced perfectly as I added strips of narrow foam tape to the back of the letters.

Next I embossed two pieces of white cardstock with the Clover Petals 3D embossing folder. I trimmed both to 4" x 5-¼" and adhered them to A2 card bases with Bee Creative glue. On the first card I adhered the Lovely Layers: Heart Vine die cut on the embossed layer first. Then I removed the backing from the foam tape and adhered the LOVE to the card over the Heart Vine. For the second card I used my t-square ruler to line up and adhere the sentiments to the card.


I adhered the Heart Vine over the sentiments of the second card with glue. Then I stamped two sentiments from the Love Love Love stamp set in black ink and die cut them with the coordinating Honey Cuts. I do love dimension so of course, I added foam tape to the back of the sentiments to adhere them to the cards.

The first card has some coordinating sparkle I added from the Bee Bliss gem stickers set.

I really LOVE (haha!) how these turned out and how easy they are to create! To make them even faster, but still beautiful, you could omit the foam tape pieces on the back of the LOVE die cuts and just use glue to adhere them.

Thank you so much for stopping by today! I always appreciate your kind comments too!

Thanks so very much for using my affiliate links to shop (never any additional cost to you).

Wednesday, February 1, 2023

Sending Hugs & Kisses Card For Crafty Friends

Happy 1st of February my friends! Today I'm sharing a fun card featuring some elements from several new sets including the Just For You stamps and coordinating Honey Cuts, and the Foil Script: Love, and Foiled Fluttering Hearts A2 Cover Plate hot foil plates. I've added in more elements from previously released products to create this sweet card that's perfect for sending to a special crafty friend!

First I stamped images from the Just For You and the Let's Get Crafty set with Intense Black ink. Then I used some Copic markers to color them. Next I cut the images out with the coordinating dies from the Just For You and the Let's Get Crafty Honey Cuts

To create the heart with the images looking like they are part of the heart, I first took the third largest Stacking Heart die, placed it on some 80# Neenah and traced around it with a pencil. Then I added strips of respositionable adhesive. I began by adding the images of the crafty items around the heart making sure to let several of them hang off the edges. Then I filled in with the small floral images. The next photo is of my first arrangement.

As you can see from my final photos, I snipped the stems from some of the floral pieces to have them appear to be tucked behind the larger images. Make sure to have plenty of images around the edge of the heart to make it more visually appealing! Next I took the same Stacking Heart die and placed it over the pencil line and ran it through my die cutting machine. I used an adhesive eraser to remove any visible adhesive. (You could eliminate this step by adding your repositionable tape just to the back of the images.)

Then I carefully lifted up the images of the craft items with my die release tool. (They will be firmly adhered because of the die cutting process, but still removable.) I added foam tape to the back of them and put them back onto the heart.  This adds so much most dimension!

Next I created my background layer by using some Mint Pastel Glimmer Foil and the new Foiled Fluttering Hearts A2 Cover Plate hot foil plate. I used my Glimmer Hot Foil System to add the foil to an A2 sized piece of teal cardstock.  For the piercing around the hearts, I ran the foiled panel through my die cutting machine with the Fluttering Hearts Pierced Cover Plate.

 I used Moon Dust Glimmer Foil for the sentiment from the Foil Script: Love set. I used the included coordinating die to cut out the foiled sentiment and some teal cardstock. I used Bee Creative glue to adhere the foiled sentiment to the teal die cut by placing it slightly offset.

I added foam tape to the back of the heart and the sentiment to pop it up onto the card base. I realized I wanted a little something just to the right of the sentiment. So I remembered this cute little open heart die from the Pierced XOXO Hearts! I die cut it six times from teal cardstock and adhered the layers with glue to create two hearts. I glued them to the card and added sparkle to them with a clear glitter pen.

For a bit more sparkle, I added some Aurora Borealis gem stickers in some of the open spots on the heart.

You can use this technique with any of your basic shaped dies! There are so many possibilities and I hope I've inspired you to give this a try! Thank you so much for stopping by today!

I so appreciate it if you choose to use my affiliate links for shopping (never any additional cost to you).