Thursday, May 28, 2020

Hello Beautiful! - Floral Shaker Card

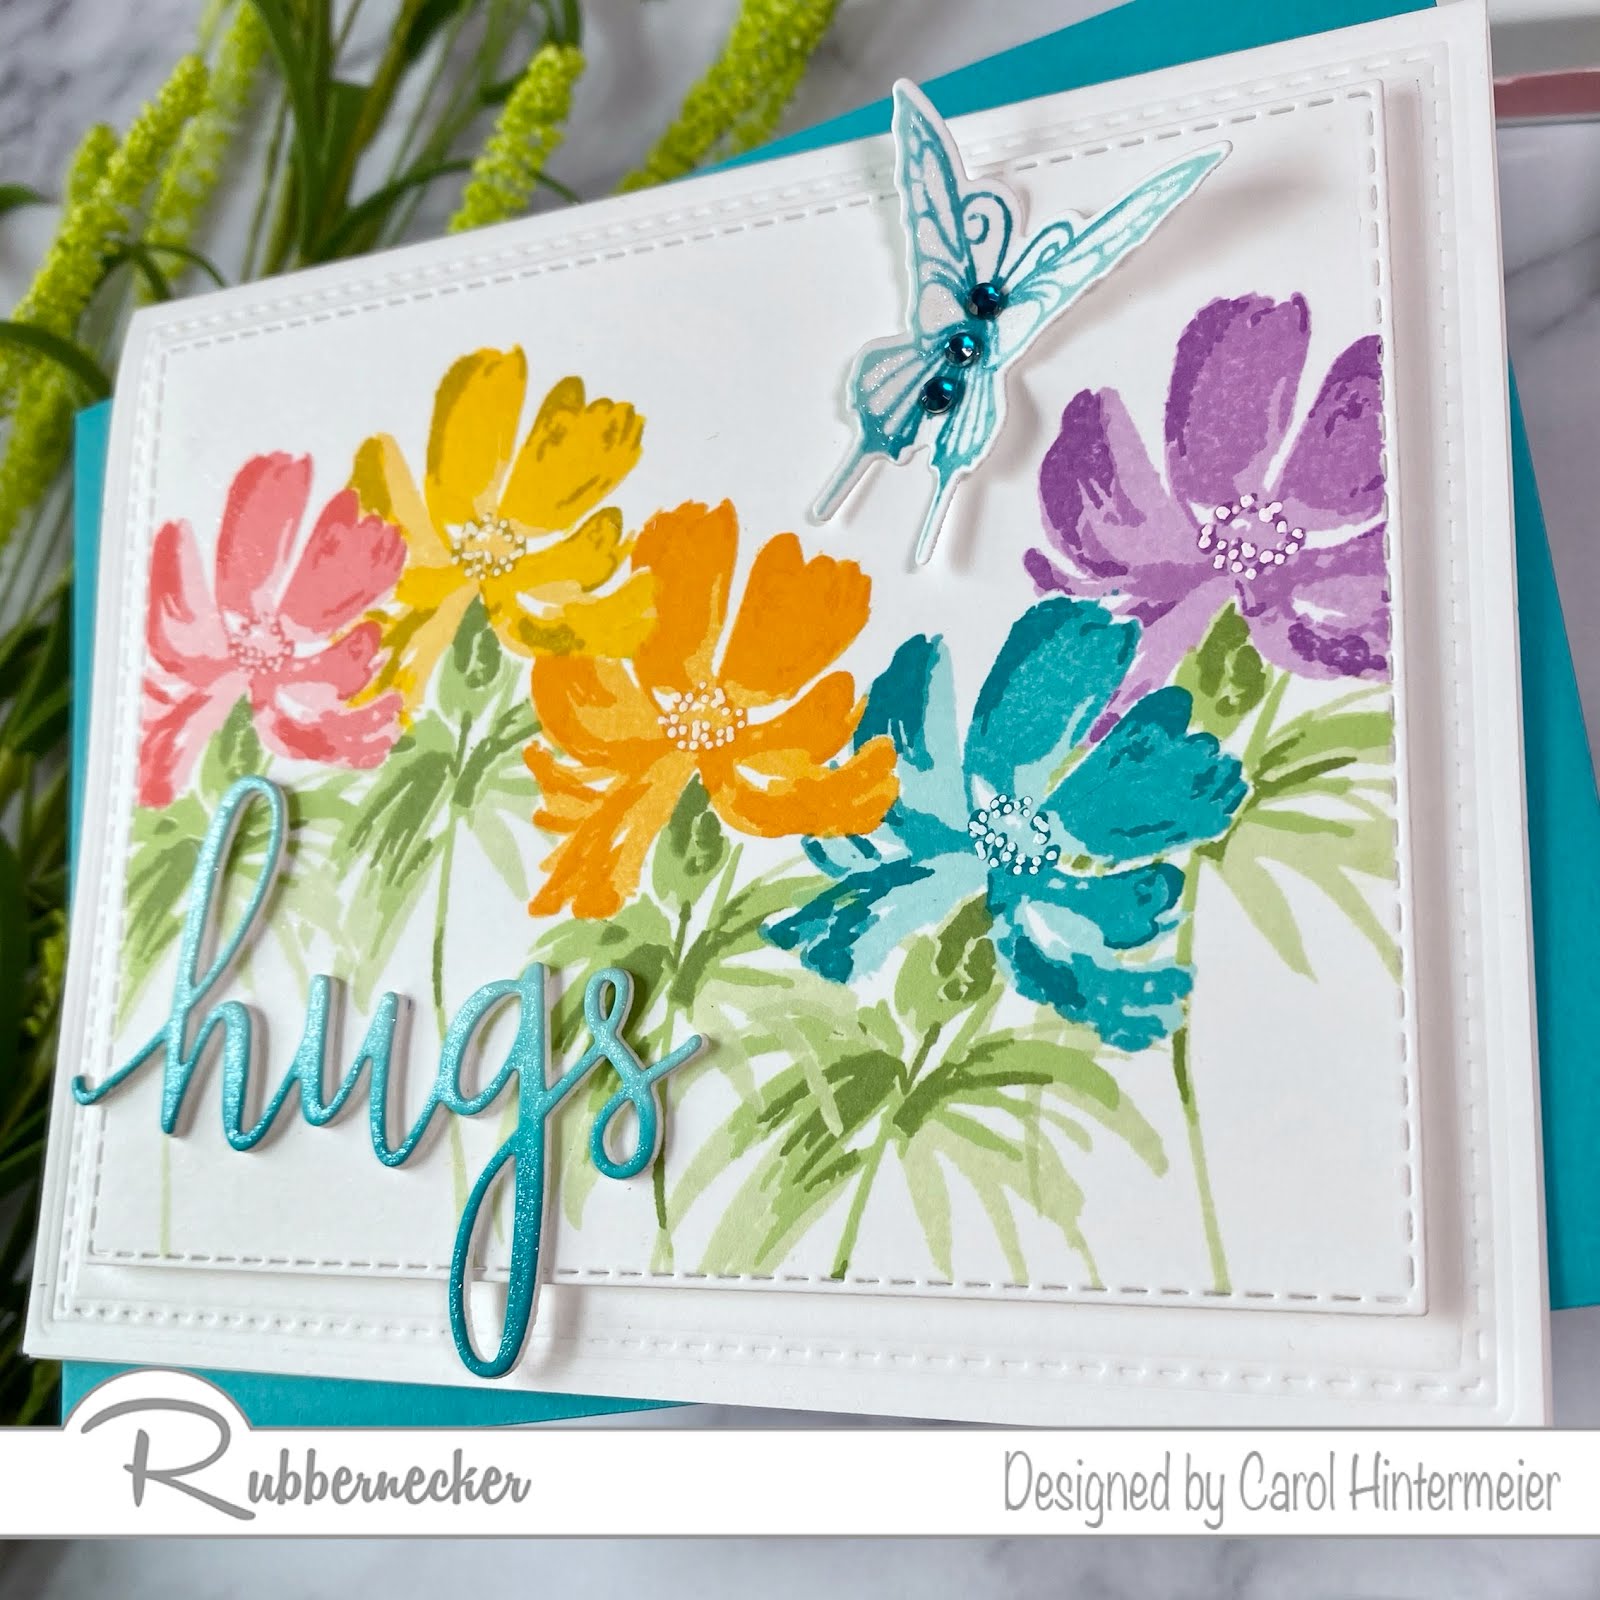
Hello beautiful friends!  Today I have a sweet shaker card using the Honey Bee Stamps Spring Bouquet Honey Cuts along with a few other of their products.  I've also been wanting to use some of the many sequins mixes I've been hoarding, um I mean accumulating!  LOL!


I began by creating the frame for the shaker portion.  I aligned the two largest A2 Double Stitched Frames Honey Cuts together, centering the smaller one inside the larger one.  I taped them together with some purple tape.  I believe I die cut about six of these from white card stock.  The number you need will depend upon the thickness of your shaker bits.  I glued five of them together and put a large stamp block on them to keep the frame flat while the glue dried.  Next I inked up the Woodgrain Background stamp with light gray ink and stamped the remaining frame.

Next I used some heat-resistant acetate and stamped the sentiment in Versamark clear embossing ink. The sentiment is from the Thanks A Bunch set.  I added white embossing powder and heat set it.  Make sure you let your heat gun warm up for about ½ minute and melt the embossing powder by applying the heat for just a few seconds at a time.  Trim the acetate to fit the frame and adhere with some 1/8" Scor-Tape.  Add more Scor-Tape onto the acetate and adhere the woodgrain stamped frame.  Turn the frame over and add the yellow sequin mix from the Rainbow Deluxe Sequin Set.  Next I adhered some patterned paper from The Bee's Knees 6x6 paper pad onto the back of the frame.  Next I adhered the shaker to a top-folding A2 card base.


Next die cut the flowers and leaf branches from patterned paper from the Spring Lullaby 6x6 paper pad.  I decided to color the leaf branches with a couple of Copic markers for some dimension.  The flower centers are from a scrap of patterned paper from The Bee's Knees paper pad.  I also die cut a few flowers from white card stock.  I used the Flower Shaping Kit tools to add dimension to to them.  I used liquid glue to adhere the flower layers together.


To finish up the flowers (and use more "saved" bling) I added some yellow enamel dots from the Spring Fling set to the flower centers.  I just love how Honey Bee's patterned papers and embellishments from different sets can be mixed and matched!  Now all that's left to do is arrange the flowers and branches using liquid glue to adhere them.


So, remember to use all the bling!  That just means you can totally justify buying more bling!  Haha! Thank you so much for stopping by!  I hope your days have been, and will be, safe, happy and crafty!
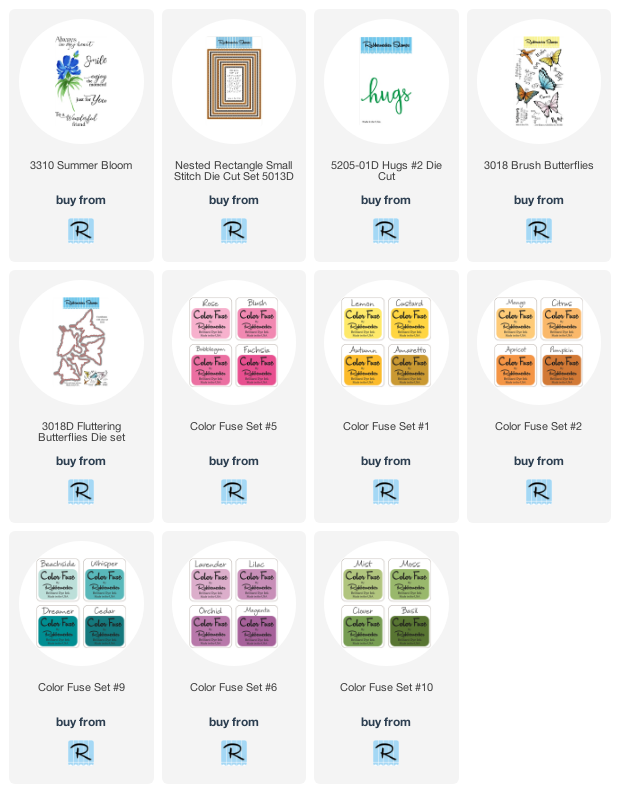

Supplies:

New Tea Circlet Mini Try-Fold | Art Impressions

Hello friends!  We are beginning week two of the All Layered Up challenge over at Art Impressions.  For my inspiration card, I used the so sweet and new Tea Circlet MTF!


I followed the directions on the packaging to create my card base.  Next, follow the directions for stamping and using the included die cuts to cut the openings.  I colored the images with my Copic markers (colors listed below.)  Yes, the Copic coloring does show as the card is opened, but it really doesn't bother me at all.


I added some pretty patterned paper for my layering using a pencil to trace the openings and then die cutting them.  The sentiment on the card front is from the WC Sentiments set.

I thought that sentiment went well with the one that's part of the stamp on the inside of the card.


Thank you for stopping by today!  I hope to see your entry in the All Layered Up challenge over at Art Impressions!!

I'm also entering this card in the Coffee Loving Cardmakers blog hop:


Copic markers:
E11, E13, BG07, BG53, BG000, C00, C0, C1, C2, C3,
R35, R43, R43, RV21, YG25, YG03, YG01, Y15, Y13, Y11

Supplies:

Monday, May 25, 2020

Keeping Christmas Blog Hop - May 2020

Hello friends!  While I may not remember what day it is, time sure does seem to continue to fly by!  It's already time for our inspirational blog hop to help get you going on the Christmas cards you'll need later this year.  Be sure to check each stop on the list I have below--these are some talented ladies!!!


I began with the intention of making one card with WPlus9's Winter Greenery stamps and dies using their Lavinia Layers Background dies.


I die cut four of the Lavinia Layers main die and one of the center.  I used my MISTI to do some multi-layer stamping of the large branch from the Winter Greenery set.  I don't remember what this technique is called, but I really like how this turned out!

I used two Altenew ink cube sets (listed below in the supply list) for my stamping layers, first stamping onto an A2 card base, then one of the Lavinia die cuts, and lastly the center die cut.  I stamped each piece before removing the stamp from the MISTI.  I used black embossing powder for the sentiment.


Now, this next card came about because I had stamped the other branches and die cut them out with the intention of using them on the first card.  As soon as I began to arrange them on it, I realized that these branches totally took away from my multi-layer stamping.   So I pulled out some silver glittered adhesive foam and die cut it out.  I used the lightest green ink to blend onto white card stock to be coordinated with the greenery.


I stamped the sentiment from the Most Wonderful set in Versamark, added silver embossing powder and heat set it.  For the berries on both cards, I added some clear sparkle and Nuvo Crystal Glaze for a bit of bling.


Thank you for stopping by today!  Here is the complete hop list and you sure need to go to each one as I know there will be some beautiful inspiration there for you!


Kelly Lunceford (Creator)
Carol Hintermeier <<< that's me

Supplies:
WPlus9:

Other:

Floral Thank You Card | Art Impressions

Happy Monday friends!  Today I have a sweet thank you card using the new Art Impressions Floral Invites set.  This beautiful set is perfect for invitations, but as you can see from my card, the images can be used for many different occasions!


I began by creating a top-folding A2 card base from 110# Neenah Solar White card stock.  I used the #110 card stock to reduce the warping from my heat embossing.  Next I used an anti-static bag on the card front, stamped the frames with Versamark, sprinkled on silver embossing powder and heat embossed it.

Then I stamped the floral image onto 80# Neenah in Copic safe ink (marker colors are listed below.)  When I finished the coloring, I fussy cut it out and added some foam tape to the back and adhered it on the card front.


I cut a strip of purple striped patterned paper to 4-¼" x 1-½" and adhered it to the card.  I added strips of silver mirror card to either side of the striped paper.  I stamped the sentiment in Versafine Onyx black ink and die cut it with the second smallest Hexagon Double Stitched Die.  Next add some foam tape to the back and adhere it to the front.

Finally, for a bit of embellishment I added some Nuvo Pale Periwinkle Jewel Drops to the berries and here and there around the frame.


Thanks so very much for stopping by today!  I hope you are staying safe, well, and of course--crafty!!


Copic markers:
G02, G07, G29, V000, V12, V15, V17,
YG03, YG25, YG67

Supplies:

Sunday, May 24, 2020

Sending Hugs Card & Stamp Masking Tips | Rubbernecker Stamps

Hello Rubbernecker friends!  Today I'm sharing this pretty floral card using the Summer Bloom stamp layering set.  I did lots of easy masking to make this beautiful card to send hugs to that special person!  This card is also a good example that when things don't go turn out exactly as you had hoped, just roll with it, and all turns out fine in the end!  Read on to see what I mean.


Here are the steps for my card:
  • Create a top-folding 5-½" x 4-¼" card base.  Open the card up and position the largest Nested Rectangle Small Stitched die on the card front.
  • Using the embossing sandwich for your die cutting machine, run this through to create the dry embossed stitched lines on the card.  This is a great way to get even more use from your dies!
  • Die cut white card stock with the second largest Nested Rectangle Small Stitched die.
  • Place this panel into a stamping tool and add some masking tape around the stitched edges.  See my photo below to see my work in progress. (This masking technique is best done with a stamping tool such as the MISTI in case you need to stamp a layer more than once.)
  • First stamp the base layer of the flower onto some masking paper and fussy cut it out.  You will need two masks.  Stamp one of the leaves base layer and fussy cut it.


Okay, now we are ready to begin stamping.  I will list which colors I used and the Color Fuse sets they are from, along with a few notations for you.  I stamped the base layer for all the flowers first so the ink would have time to dry between layers.
  • Three points to remember as you are stamping the layers: 1) "prime" your stamp by either rubbing an eraser or microfiber towel on it to remove the shine; 2) Make sure that each inked layer is totally dry before stamping the next layer; and 3) CLEAN your stamp as you go--I'll let you know soon how I learned this!  Haha!
  • Stamp the first flower using Posey, Scarlet, and Nectar from Color Fuse Set #4.  Place the flower mask onto the flower.
  • Stamp the second flower with Lemon, Custard, and Amaretto from Color Fuse Set #1.  This where I realized that I did not clean the base layer good enough after I stamped the first flower.  I was wondering why the Lemon ink looked so orange!!  I figured out that it picked up some residual pink ink from the first flower.  Oh well, I had to roll with it!  Move the mask to cover this flower.
  • Stamp the next flower with Mango, Citrus, and Apricot from Set #2.  I'm not sure why the third inked layer doesn't show up very well--oh, well, another "just roll with it"!  LOL!  Cover with the mask.
  • Stamp the blue flower with Beachside, Whisper, and Dreamer from Set #9.  Cover with the mask.
  • Stamp the last flower with Lavender, Lilac, and Orchid from Set #6.
  • Finally, stamp the leaves with Mist, Moss, and Clover from Set #10.  You will need to mask off the flowers sometimes using both flower masks.  It just all depends upon how you arranged your flowers as you were stamping them.  Use the mask for the greenery when needed.
  • Add foam tape to the back of the panel and adhere to the card front.
  • For the sentiment I die cut the Hugs four times from white card stock.
  • Leave one die cut in place to make it easier to blend ink in an ombré pattern.
  • I used an ink blending brush and the blues from Color Fuse Set #9.
  • Adhere all four layers together with liquid glue and let dry.
  • Attach it to the card front with glue.


  • I stamped the butterfly from the Brush Butterflies set with the blue ink cubes, again, in an ombré pattern.
  • Cut it out with the coordinating die from the Fluttering Butterflies die set.
  • Add glue just in the center and attach it to the card slightly bending the wings up.
  • Add some crystal gems to the body and clear sparkle to the wings and the sentiment.
  • Add white dots to the flower stamens with a white gel pen.


I really love how this happy card turned out and hope I've inspired you to give these layering stamps and masking a try!  Thank you for stopping by and have a wonderful, crafty week!  Don't forget to just roll with it! :)

Friday, May 22, 2020

When Do You Need Coffee? - Coffee Loving Cardmakers Blog Hop with Rubbernecker Stamps

Hello, and welcome to my blog!  I'm very excited to be participating, with Rubbernecker Stamps, in the Spring/Summer Coffee Lovers Blog Hop!  Also, all coffee themed products are 15% off with code JAVA15 entered at checkout at Rubbernecker!!  


So, when do YOU need coffee? I'm with Preston here and need it every day!  LOL!  For this card I've used the so adorable Preston stamp along with the Dandelion Garden Border stamp.


This was such an easy card to create!  First I stamped Preston in a brown ink to have a no-line coloring look.  Then I Copic colored Preston and cut him out with his coordinating die.  Next, using my MISTI, I stamped the Dandelion Garden Border stamp using Color Fuse Inks Set #10 beginning with the darkest green at the bottom and gradually going to the lighter inks as I got to the dandelion heads.  Then I used a Nested Rectangle Small Stitch die to cut the panel out.  For my green matting layer I used a blender brush and inked up the edges with Basil ink from Color Fuse Set #10 and die cut it with the largest Rectangle Stitched die.  I added the layers to a top-folding A2 card base.


To finish it up, I added foam squares to the back of Preston to pop him up on the card.  I stamped the Ending In Y sentiment in black ink onto the background panel.  For a bit of shine I added Nuvo Crystal Glaze to his eyes and the coffee cup.  I also added Key Lime Nuvo Jewel Drops to the dandelion centers.


Be sure to head back to the Coffee Loving Cardmakers blog to get the information on how to enter to win a prize.  There are SO many prizes so you won't want to miss it!  Thank you for stopping by today!

Supplies:
Rubbernecker supplies:

Other:

Wednesday, May 20, 2020

Floral Birthday Card with Partial Die Cutting | Honey Bee Stamps

Happy Wednesday my friends!  I posted this birthday card over on my Instagram feed and thought I'd give a short description of how I created my card base.  I used Honey Bee Stamps' beautiful Everything Wonderful set and did some dry embossing using a stencil.

I began coloring this beautiful floral spray back in early April during one of Kathy Racoosin's 30-day coloring challenge.  I wanted to color using a few different Copic color combinations that varied from my usual.  At the end I use a black Prismacolor pencil to deepen the shadows in the petals.  I actually just colored....not caring if I liked it or not.  That is so freeing!  To color without any expectations which made me very happy that I liked the end result enough to share!


Here are the steps to create the card base.
  • Cut two pieces of white card stock to 8-½" x 6".  Score both at 4-¼".
  • Adhere the right side of one panel onto the top of the left side of the other panel.
  • Fold the card closed.  Position the River Rock stencil on the top flap of the card base and use temporary tape to hold it in place.  Open the card fully.
  • Run this through your die cutting machine using the appropriate embossing sandwich.
  • Next dry emboss the front of the right side of the folded card in the same manner.
  • Finally, for the partial die cutting, draw a pencil line about 1-¼" from the left fold.  This is where you will stop your die cutting.
  • Position the Everything Wonderful coordinating die using the pencil line as a guide.  Make sure the card is open fully!  Position the top cutting plate edge along the pencil line and over the portion of the die you want to cut.  Run this through your machine.  Trim the bit at the top and bottom of the die cut area with your scissors.


I added some thin foam tape to the flowers and popped it up along the die cut edge on the card front.  I white heat embossed the Happy Birthday sentiment that's from the Buzz stamp set.  The sentiment on the inside is from the Everything Wonderful set.


I added a few gems from the Perfect Petals Crystal Gem Stickers to the card front.


I hope my explanation will help you to make a beautiful floral card with partial die cutting!  I really love how this turned out!  Thanks so much for stopping by!

Copic markers:
RV25, RV34, R83, R43, RV14, R81, RV42,
G07, G29, YG01, YG17, YG23, YG25, Y02, Y18Q

Supplies:
Honey Bee Stamps:


Monday, May 18, 2020

Coffee Gift Card Holder for the Guys! | Art Impressions

Hello my friends!  Today I have a gift card holder for our guys!  I've used Art Impressions' Coffee Gift Card Holder set to create my card.  Raise your hand if you are like me and struggle with those masculine cards!! Haha!  When I ask my husband his favorite color, he responds with brown!!  LOL! So, I created this card with that male perspective in mind!


Here are the steps to make this card:
  • Create a top-folding A2 card base from Neenah Solar White card stock.
  • Die cut patterned paper using the largest Rectangle Double Stitched die and adhere to the card base.
  • I stamped a coffee bean background with a stamp from my stash with Gathered Twigs Distress Oxide ink.
  • Die cut the stamped background with the second largest Rectangle Double Stitched die.  Adhere at an angle on the card front.
  • Die cut the Coffee Gift Card Holder cup, insert, and lid from Neenah card stock.  Ink the edges of the cup and top of lid with Ground Espresso Distress Oxide.
  • Die cut the coffee cup sleeve from coordinating patterned paper.  Adhere to the cup.
  • Stamp the sentiment onto the cup with Ground Espresso.  I used my MISTI and stamped it a few times to make it darker.
  • Next, die cut the included scalloped circle die from white card stock and ink the edges with Ground Espresso.  I used a Circle Double Stitched die to cut the patterned paper center and adhered the two together.
  • Add a foam square to the circle and pop it onto the coffee cup sleeve and glue the cup to the card front.


I don't have a gift card to display, but I did stamp the other sentiment group from this set on the insert.  Then just check the boxes that fit your occasion!  How fun for the recipient when he removes the gift card!


To finish, I embellished the card with some twine, a button, and enamel dots from my stash.  This I call "guy bling!"  Haha!


So, what is your guy's favorite color?  Is it brown too?  I hope I've inspired you with this masculine card today--Father's Day is next month!  Thanks so much for stopping by and I hope you have a wonderful, crafty week!


Supplies:
Distress Oxide inks: Gathered Twigs, Ground Espresso

Sunday, May 17, 2020

See Through Floral Card | Rubbernecker Stamps

Hello my friends! I have a cool technique that I tried for my floral card today!  I've used the beautiful Fragrant Blooms stamps and coordinating dies to create a floral see-through card.  This was so fun and not at all hard to create!


In full disclosure, the technique for this design totally comes from the awesome Jennifer McGuire.  She has some good tips that make this easy to create (see her YouTube here.)

Here are the details for my card:
  • Stamp a lot of the flowers and greenery from the Fragrant Blooms set.
  • Stamp the purple flowers:  Lavender, Orchid, and Magenta from Color Fuse Set #6.
  • Yellow flowers: Lemon, Custard, and Autumn from Color Fuse Set #1.
  • Pink flowers: Rose, Bubblegum, and Fuchsia from Color Fuse Set #5.
  • Greenery:  Moss and Basil from Color Fuse Set #10.  I stamped the lightest color, Moss, on the tops of the greenery.  Then stamped the darker color, Basil.
  • Stamp the flower centers.  I used Apricot from Color Fuse Set #2 for the yellow flowers.
  • Since I stamped the pink and purple flowers third layer with the darkest ink, I needed to think of something for the centers.  I remembered some yellow embossing powder I've had in my stash forever!  I stamped the centers with Versamark clear embossing ink, sprinkled on the yellow embossing powder and heat embossed it.
  • For all of the stamping, I used my MISTI and stamped the layers 2-3 times, depending upon the depth of color I was wanting.
  • Die cut all of the images with the coordinating dies.
  • Arrange the pieces on an A2 sized card stock.  Do not adhere!
  • Let some of the flowers and leaves hang over the edges making sure that the pieces are overlapping as you go.
  • When you have them arranged, take a piece of Press N Seal and put it over your arrangement and press down to stick them all on.  Using the A2 card stock piece as a guide, trim off the flowers and greenery that extend beyond the edges.  (Note: You will be trimming the Press N Seal too.)  
  • Flip this over and remove the A2 card stock piece.  Add dots of glue under the areas that overlap to connect all the pieces.
  • Remove the Press N Seal and add dots of glue to the overlapping pieces on the front side.
  • Die cut more of both flowers from white card stock.  Glue these to the backside of the piece to give it a cleaner look when it's opened.  You can see the overhang on this next photo--trim that off.
  • Cut a piece of white card stock to 4-¼" x 6".  Score it at ½" and fold over.
  • Adhere the flap to the top part of the see-through card front.  See the next photo as more explanation.


I almost forgot--I added some Ripened Pumpkin Nuvo Crystal Drops to the yellow flowers' centers.  They were missing something, I thought, and now they coordinate better with the other heat embossed centers.


I stamped the sentiment that's from the same set in Versafine Onyx Black ink and fussy cut it out.  I added a few foam squares and adhered it to the card front.


I love how this turned out and it's a fun and different way to use die cut florals!  Thanks so much for stopping by today!


Thursday, May 14, 2020

Bright & Cheery Thanks! | Honey Bee Stamps

Hello my friends!  I love bright colors, stenciling and texture paste and this cheerful card sure covers that!  I've used Honey Bee Stamps awesome Flower Builder background stencils for my card, along with a few other stamp and die sets.


These are the steps for the stenciled background:
  • First, I sprayed the back of both stencils from the Flower Builder background stencil set with Pixie Spray.  This makes stenciling SO easy!
  • I put the flower petal stencil onto a piece of Neenah Solar White card stock and blended Squeezed Lemonade Distress Oxide ink through it with a Background Blender brush.
  • Next I lined up the flower center stencil.  These stencils have etched lines on them that are A2 sized and make it very easy to line up the layers.  I inked Ground Espresso Oxide with a Blender Brush.
  • The next step is to put the flower petal stencil back over the flowers and then spread some clear glossy texture paste through the stencil.  I used some that I've had in my stash forever!
  • Set this aside to dry.
  • When the piece was dry, I used a blender brush and green ink to color the background.  How fun is it that the clear texture paste resists the ink?!  Once I finished the inking, I used a dry clean towel to buff the green ink off of the flowers.


For the dimensional flowers I repeated the stenciling steps above with the Distress Oxide inks, but no texture paste this time.  I lined up the Flower Petal Cover Plate die with the flowers and ran it through my die cutting machine.  I picked out a few flowers to use and inked up the edges of them with Mustard Seed Distress Oxide for dimension.  Then I used some flower shaping tools to form them into a cupped shape.  I used a leafy branch die from the Spring Bouquets die set to die cut several branches from white card stock.  I used my Copics to color them to coordinate and shaped them with the flower shaping tools.  I found some brown sparkly stuff in my stash and added it to the centers for a touch of sparkle.


To assemble the card, I trimmed the stenciled piece to a  5-¼" x 4" and die cut a rectangle in the center of it with an A2 Double Stitched Frames die.  Adhere this to a top folding card base.  I die cut a sentiment from the Grateful Heart die set cutting the "thanks" three times and adhered the layers together.  I die cut the shadow for it from black card stock and adhered the letters to it.  I love this die and the beautiful font!  Before I adhered the leaves, flowers and Thanks, I needed to position them all so I could decide where to stamp the rest of the sentiment.  After I arranged them and the Thanks, without gluing, I took a photo of my arrangement to remember it.  Then I did stamp surgery on the sentiment from the Grateful Hearts stamp set, and positioned those.  I set the card into my MISTI, removed the floral pieces and picked up the stamps with the MISTI door.  I used Versafine Onyx Black ink to stamp it.

  Now it's just a matter of using the photo and adhering the flowers, leaves and Thanks into place--I could fiddle with this for a long time--LOL!  I didn't need to since I had taken the photo and need to remember to do this more often!


I hope that you've enjoyed my bright and cheerful card today!  Stay safe--stay crafty!!

Supplies:
Honey Bee Stamps products:
Spring Bouquets dies (for the leafy branch)

Other supplies:
Pixie Spray

Monday, May 11, 2020

Cruisin' By | Art Impressions

Happy Monday friends!  Today I have a card featuring the fun Art Impressions' Enjoy The Ride set.  This stamp reminds me of the warm spring and summer days and enjoying the outdoors.  This is wonderful for sending to someone "just because"!


This card was really quick and easy to make!  I die cut the tag from Neenah Solar White 80# card stock with the tag from the Tag Stitched Dies set.  Next I stamped the bicycle onto it with Copic safe ink and colored it with my markers.  The colors I used are listed below.  When I finished the coloring, I stamped the sentiment (it's one of seven included in the set) in Versafine Onyx Black ink.  

I created my card base with a top-folding A2 card base.  I adhered a floral patterned paper that I trimmed to 4" x 5-¼".


I hand cut a patterned paper layer to go behind the tag.  I did that by using a pencil to trace around the actual die on the patterned paper.  I trimmed the straight edges with my paper trimmer and fussy cut the rounded corners.  I adhered this to my colored image.  I added foam tape to the back of the tag.  Before adhering the tag to the card base, I tied on some ribbon from my stash.


I love how this turned out and I hope I've given you some inspiration for your cards today!  Have a wonderful, safe, and crafty week!


Copic markers:
B0000, B000, B00, B41, B24, B32, B37, B45,
C00, C1, C3, N4, N6, N8, R05, R08, R21,
Y02, Y18, YG01, YG03, YG17, YR27, YR31

Supplies: