Saturday, April 30, 2022

Happy Happy Happy Birthday Cards -- It's Honey Bee Stamps 7th Birthday!

Hello crafty friends!  Today is a fun day as we are celebrating Honey Bee Stamps' 7th birthday with an Instagram hop!  We are showcasing new products from their brand new release called Birthday Bliss!  I have two cards that I created from one fabulous cover plate die.  Read on for the details!

First I die cut the Happy Happy Happy A2 cover plate three times from 80# Neenah cardstock.  I kept all of the pieces of each die cut in place by sticking on a piece of Press N Seal.  Next I blended Distress Oxide inks on one of them.  I used an ink blender brush and Salvaged Patine, Squeezed Lemonade, and Worn Lipstick Distress Oxides.  I liked blending onto the die cut piece as I could better decide how far to bring each color down.

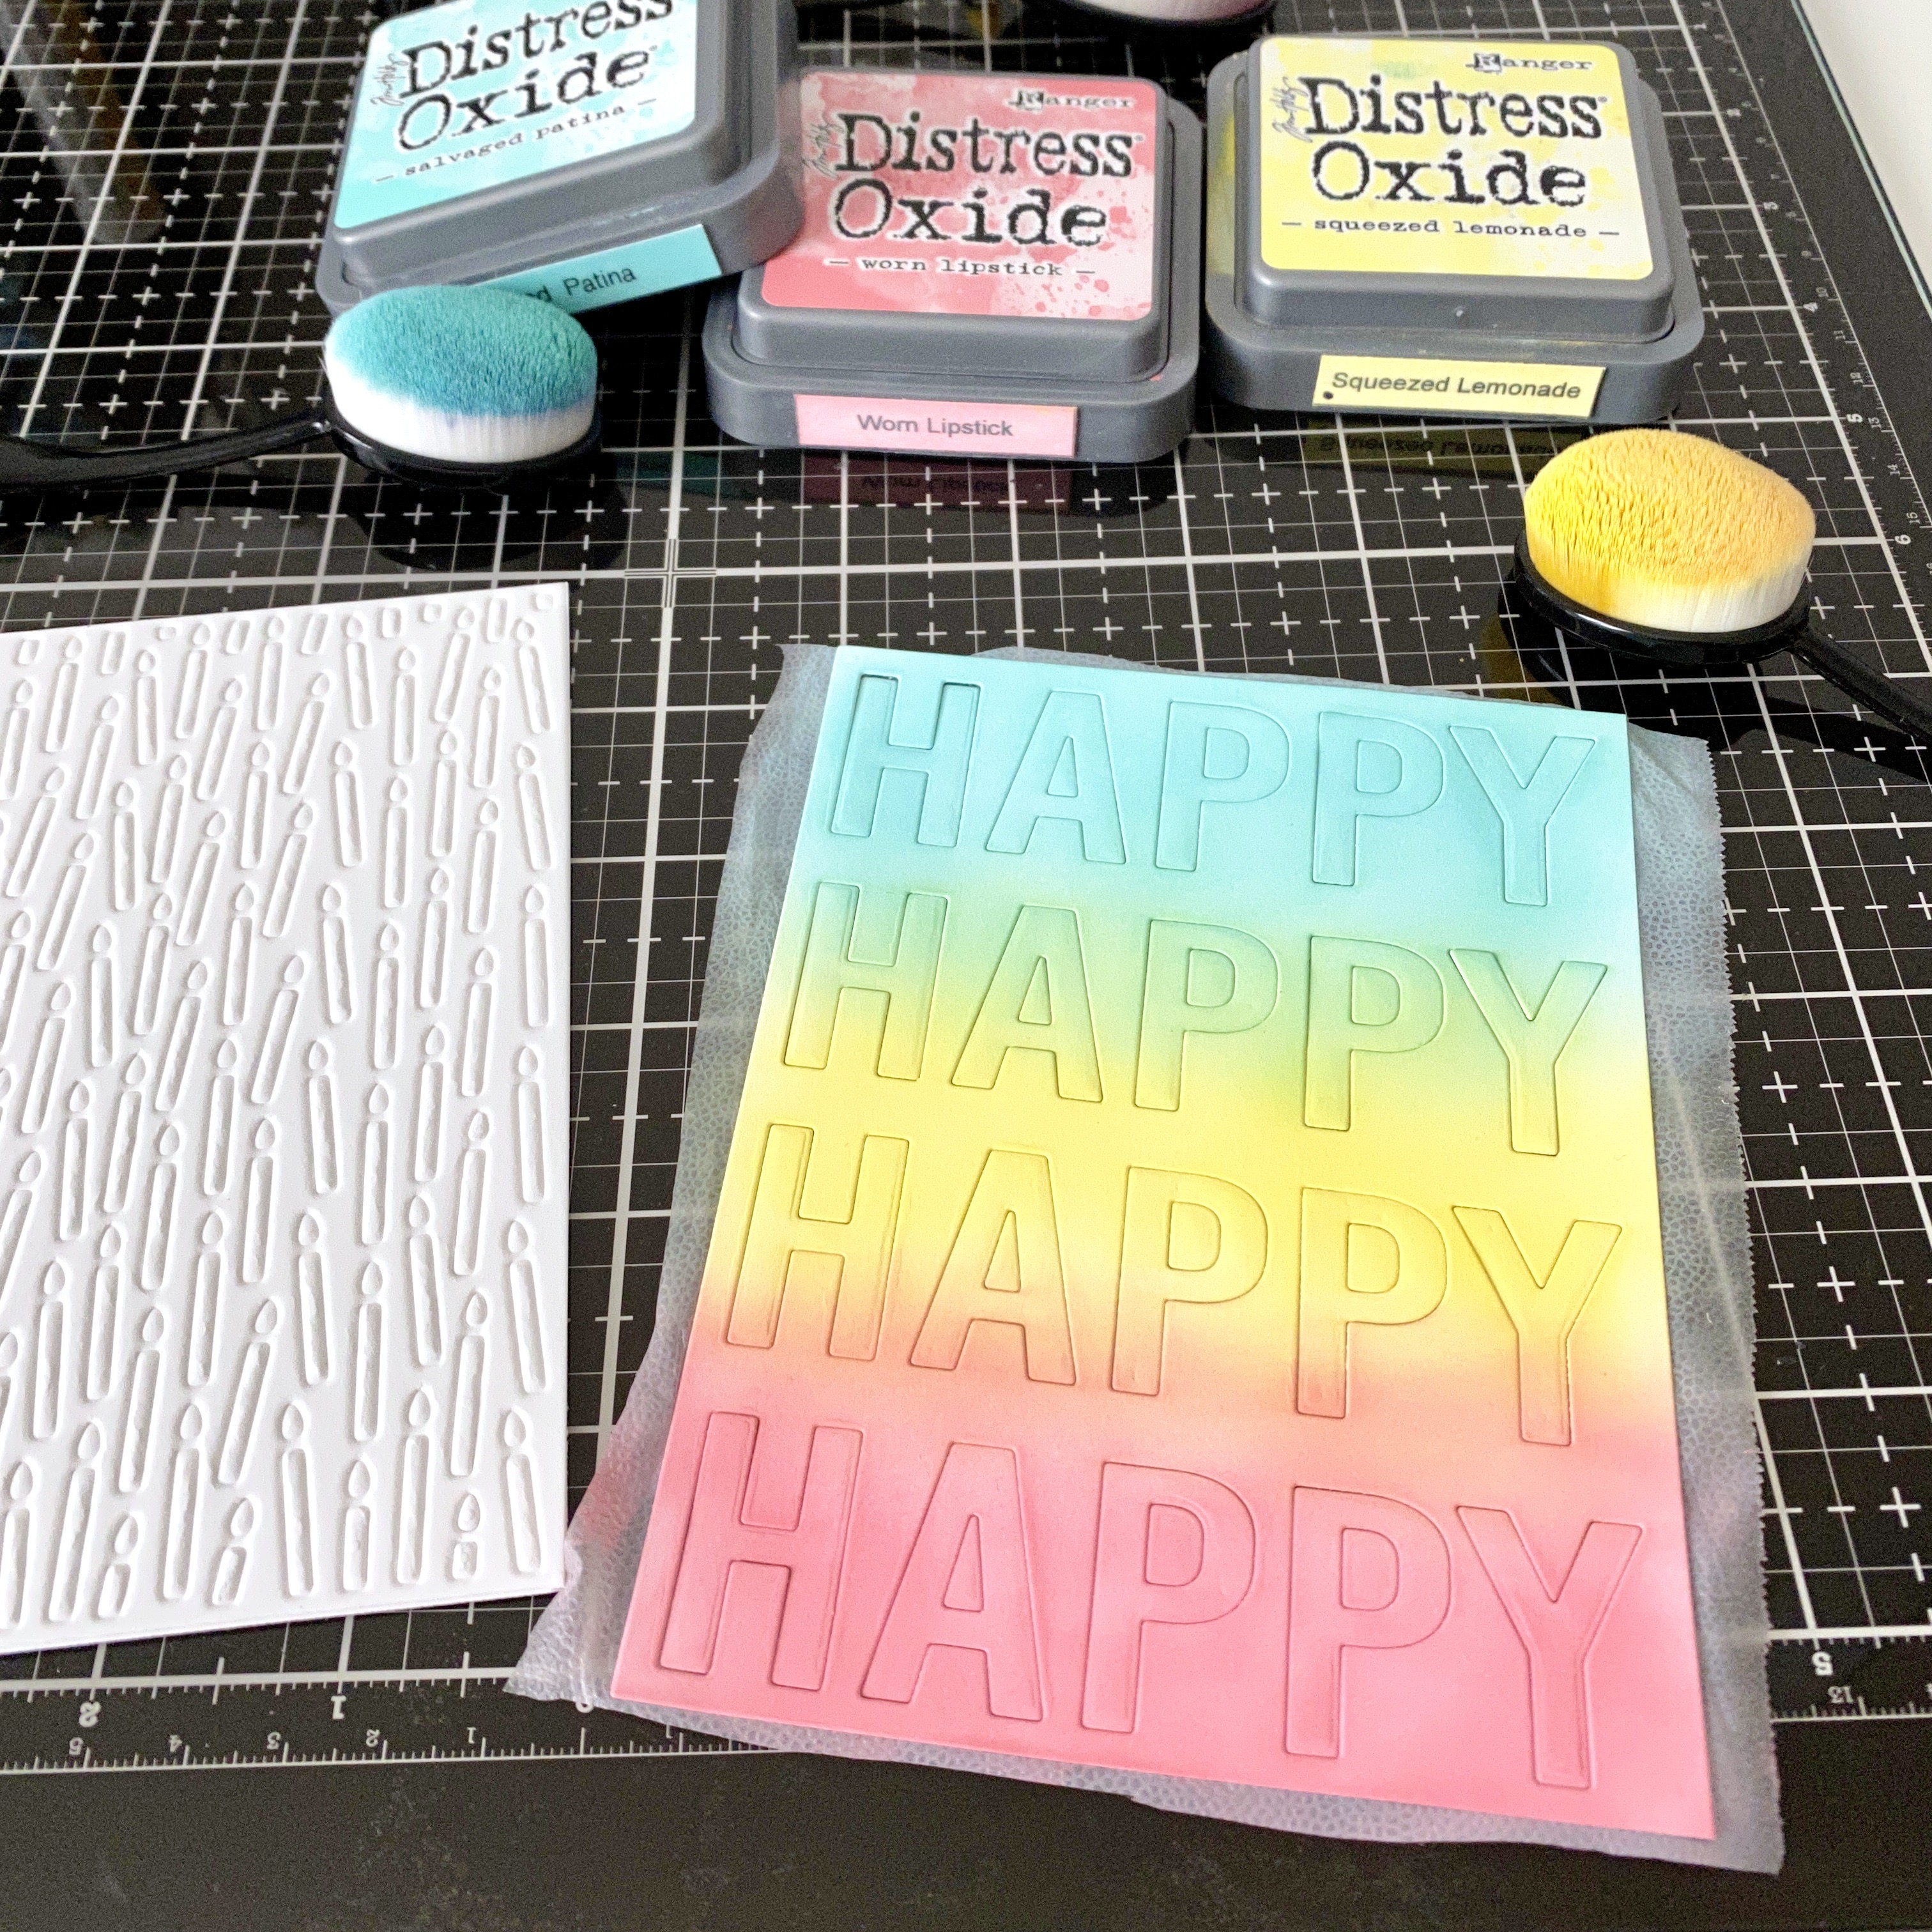
I peeled off the negative pieces of all three die cuts and glued them together.  Be sure to save the center pieces of the letters!!  I set that aside to dry while I began my first card.

First I dry embossed the Candle Cover Plate die onto an A2 sized white card.  (Dry embossing is a fun way to stretch your dies--just use the tan rubber mat and the embossing sandwich for your machine.)  I glued that onto my card base.

Next I adhered all three layers of the letters together.  I used removable tape to temporarily hold the negative Happy Happy Happy cover plate die cut onto the front of my card to be like a template for the letter placement.  Then I used that to perfectly position all of the letters.  When the glue was dry, I removed the negative piece.

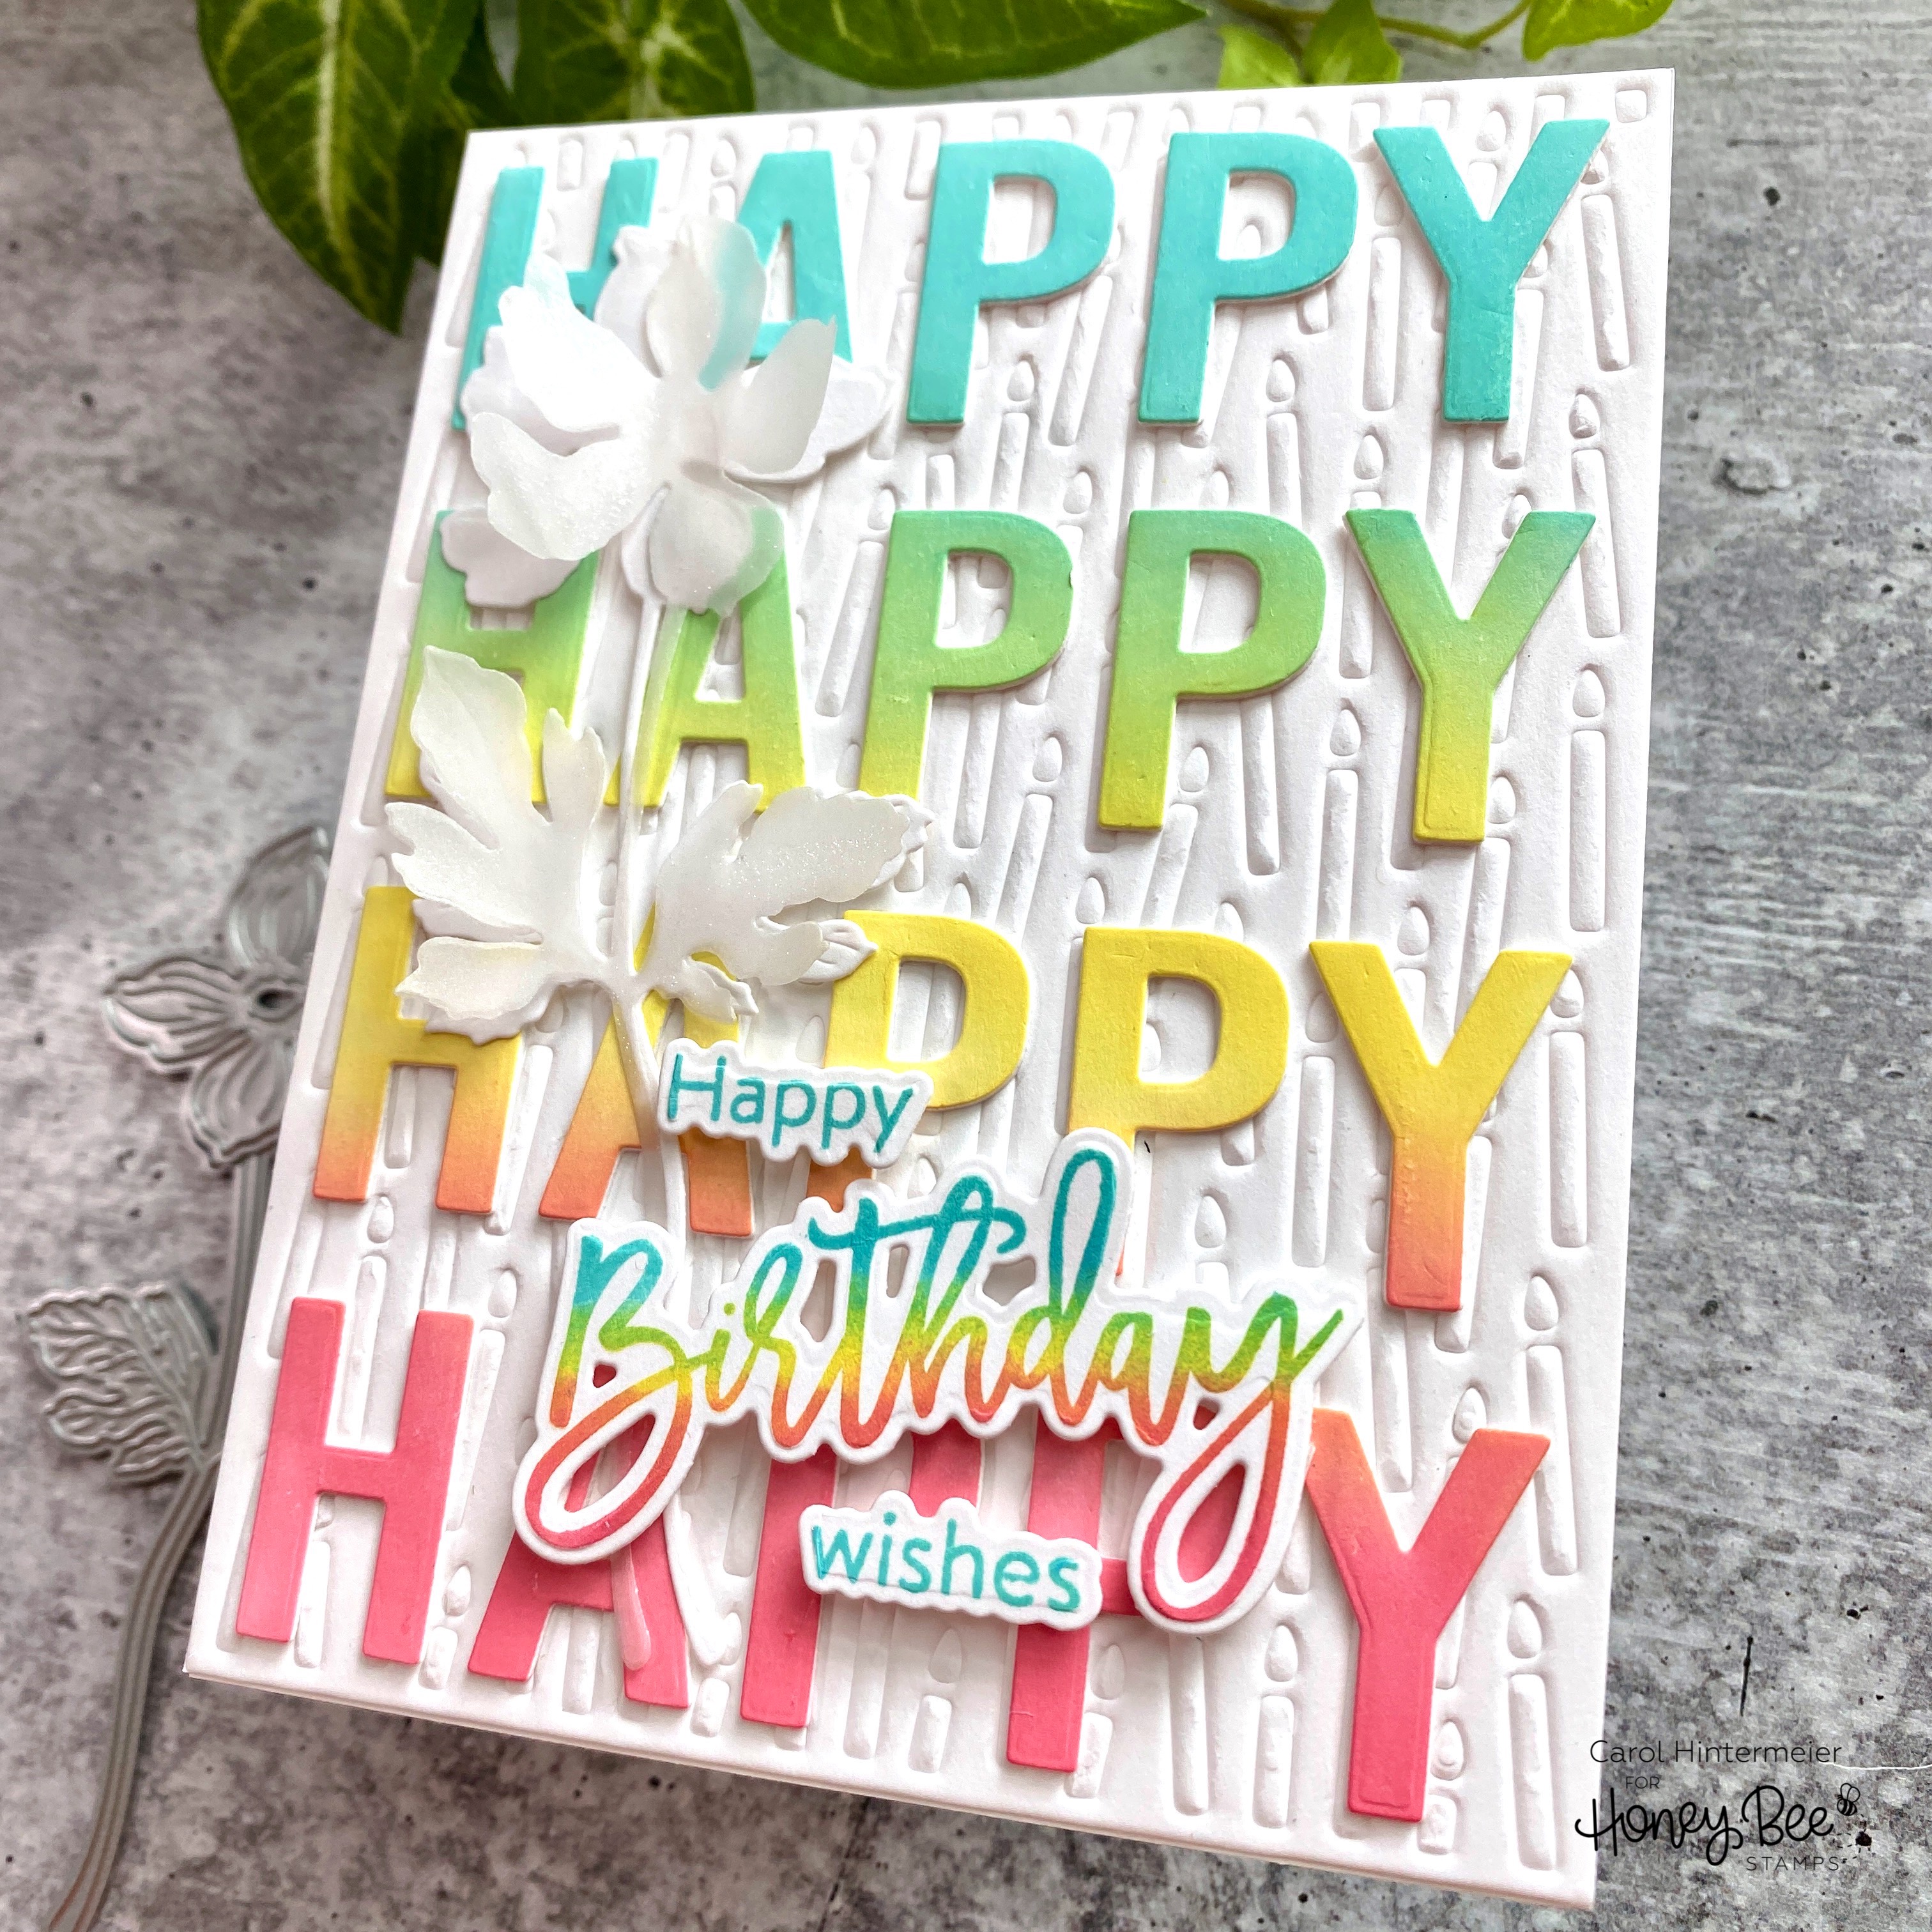
I die cut one of the flowers from the new Lovely Layers: Wildflowers once from white cardstock, and another time from vellum.  I adhered them to the card with dots of glue.

I stamped the sentiments from the also new Birthday Wishes set in the same Distress Oxides.  I stamped "birthday" using sponge daubers to achieve the ombré effect.  I used the coordinating dies to cut them out (I love having dies for the sentiments!!)  Then I popped them up with foam tape.  For a bit of sparkle, I added used a clear glitter pen on the vellum flower (which is why the petals are curled up!)

My second card uses the negative pieces from the Happy Happy Happy Cover Plate die cuts.  I glued the layers together, and then glued them to an A2 card base.

Next I glued the middle pieces into the letters A, and the P's.  Then I die cut another flower from the Lovely Layers: Wildflowers and inked on some Worn Lipstick Distress Oxide onto the top flower layer.  I used the other two Oxide colors for the other pieces of the flower.  Then I adhered it to the card.

I stamped the sentiment from the Happy Happy Happy stamp set in black ink and die cut it with the coordinating die.  I popped it up with foam tape.

These were so fun to make!  I love the "happy" colors too!  Do you have a favorite?  I hope you'll pop over to my Instagram and leave me a comment there.  Honey Bee will be choosing two lucky people to win a $25 gift card to their shop!  Happy 7th birthday Honey Bee!

Thank you so much for stopping by!  Have a fabulous Saturday!

Tuesday, April 26, 2022

Life Was Meant For Good Friends

Hello craft friends!  Today I'm sharing a card I made using Rubbernecker Stamps adorable new Group of Friends set!  This is such a great set and it has three other fabulous sentiments for all of your friendship cards!

First I stamped the Group of Friends image with Copic safe black ink.  I Copic colored the bear first and then added texture to his fur with a scrap piece of washcloth and Copic Colorless Blender.  Just add a few drops of the Blender to the rag and dab.  Check out the before and after!  


I proceeded to color the other friends with my Copic markers.  I colored the elephant next, then the pig.  And horrors, I just did NOT like the shade of pink the pig turned out to be!  (Think Pepto-Bismal pink!!)   I couldn't correct it with more markers, and not even colored pencils!

So, rather than start all over, I fussy cut the elephant and bear together.  I put it aside for later and I re-stamped the Group of Friends and colored all but the elephant and bear.  I just put a line of color along the outer edges so it wouldn't show when I popped the fussy cut one up.

Next I created the frame.  I wanted this to look like a Polaroid selfie so I positioned the largest Nested Rectangle Small Stitch die with the next to largest Nested Square Stitch die.  I taped them together, leaving enough room for the sentiment at the bottom.

After I die cut these, I did some partial die cutting by sliding the rectangle die down a bit to create a narrow strip along the top of the frame.

Next I stamped the sentiment with Versamark embossing ink, sprinkled on some black embossing powder and heat set it.

My next step was to trim the stamped and colored image down to fit the frame.  Then I used some green and brown Copics to freehand color a tree in the background.  I used a couple blue markers for the sky.

I added foam tape to the back of the frame and attached the colored image to the frame.  I used some patterned paper for the layer on my card base and adhered the image to the card.

My final step was to add foam tape to the back of the fussy cut bear and elephant and pop it up onto the card!  The dimension is fabulous, especially in real life!  Photos sometimes just don't capture the details!

This is such a sweet image and I hope you've enjoyed my card.  Thanks so much for stopping by!

Monday, April 25, 2022

Altenew April 2022 Spring Garden Collection Release Blog Hop + Giveaway ($300 in total prizes)

Hello, and welcome to Altenew's blog hop to celebrate the Spring Garden release!  You should have arrived from the awesome blog of Virginia Lu.  If you need to start at the beginning of the hop, head over to the Altenew Card Blog.

The entire Spring Garden collection is available now!  Be sure to check out all of the amazing new products in Altenew's shop.

***********************************************

I have three cards I created for this release and blog hop.  The first card features the amazing, and so beautiful, Bountiful Bouquet stamp set and coordinating die.

I stamped the outline of the florals with black ink.  Then I followed the included layering guide and stamped the other layers for the flowers and leaves.  I used the Crisp Dye Ink cubes from these sets:  Sweet Dreams, Green Meadows, and Summer Afternoon.  I die cut it with the Bountiful Bouquet die and added foam tape to the back.

I created my card base by adhering a strip of yellow gingham patterned paper along the right side.  Then I die cut the edge of a piece of A2 sized white cardstock with the Creative Edges: Scalloped Scallops Die set.  I added spatters of Warm Sunshine ink by smooshing it onto my glass craft mat and using a watercolor brush.

I stamped the sentiment, one of six, from the Bountiful Bouquet set in black ink and popped it up onto the card.


***********************************************

I just recently jumped into the fun of using hot foil plates and I have to say, I absolutely love these new ones from Altenew!

I started by foiling some 80# cardstock with rose gold foil and the Vibrant Florals Hot Foil Plate.  Then using the coordinating Vibrant Florals Simple Coloring Stencil set I added Crisp Dye inks with ink blenders.  For the flowers I used Pink Pearl, Coral Bliss and Snapdragon Crisp Dye inks and the leaves are colored with Forest Glades and Evergreen.

I added some spatters of Coral Bliss and some gold metallic paint with my paintbrush.  TIP:  Use the Vibrant Florals Hot Foil Plate as a mask while splattering, unless you want splatters on the flower, which would be very pretty too!

In the first photo you may have noticed the new Altenew Ultra Sticky Double-Sided tape.  Well, this is some good and sticky tape!  I used strips of the tape to foil the new Wonderfully Made sentiment.  I just added strips of the tape to some white cardstock, making sure each strip was next to the previous strip with no gaps.  Then I added a piece of rose gold foil to the cardstock with the tape strips (shiny side up).  (As I'm writing this, I realize that I could have then peeled off the clear film to leave only the foil behind.)  

So...evidently you can also just go ahead and die cut it without removing the foil.  I absolutely love this Wonderfully Made die and know I will use it often!  I die cut white cardstock with the die and adhered it to the back of the foiled sentiment for more stability.  Then I adhered it to a strip of vellum and wrapped and adhered the vellum on the back of the card.

***********************************************

My next card uses the beautiful Morning Blooms Hot Foil Plate.  I used gold foil this time on some 80# cardstock.  I absolutely love the effect, and ease, of the coloring with the Morning Blooms Simple Coloring Stencil set!  I used various inks from my stash to color the flowers and little hummingbird.

I added the foiled and colored piece to a gold layer before adhering it to my A2 card base.

I stamped the sentiment from the Versatile Vases set  in black ink.  After I trimmed it into a strip, I added foam tape to pop it up on the card.  I fussy cut the hummingbird and popped it up too.

Before you head to the next stop, be sure to leave a comment here, on my blog, for your chance to win one of the awesome prizes!  Thank you so much for hopping by!

Your next stop is the blog of the so talented Laurie Willison!


Giveaway Prizes:

$300 in total prizes! To celebrate this release, Altenew is giving away a $50 gift certificate to 2 lucky winners and a $25 gift certificate to 8 winners! Please leave a comment on the Altenew Card Blog and/or each designer’s blog post on the blog hop list below by 05/01/2022 for a chance to win. 

Altenew will draw 10 random winners from the comments left on each stop of this blog hop and announce the winners on the Altenew Winners Page on 05/03/2022.


Blog Hop Order:

Friday, April 22, 2022

Altenew Paint-A-Flower: Gerbera Revolution Outline Stamp Set Release Blog Hop + Giveaway ($200 in total prizes)

Hello, and welcome to the Altenew blog hop to celebrate the release of the beautiful Paint-A-Flower: Gerbera Revolution!  You should have arrived here from Natasha Davies' blog.  If you need to start at the beginning of the hop, head on over to the Altenew Card Blog.

This new Paint-A-Flower: Gerbera Revolution is available NOW in the the Altenew shop.  While you are at the shop, you can subscribe to the monthly subscription plan for each new Paint-A-Flower.  When signed up, you are guaranteed a spot in Altenew's monthly Paint-A-Flower releases and will receive a set each month at a specially discounted price! ($15.99--> $12.99).

Click the image for all of the details:


I haven't watercolored in quite a while, and when I saw  this beautiful set, I pulled out my Watercolor Brush markers and had lots of fun creating my card!

First I inked up the Paint-A-Flower: Gerbera Revolution with clear embossing ink and stamped it onto some watercolor paper.  Then I sprinkled on Rose Gold Crisp Embossing Powder and heat set it.

Next I used a few watercolor brush markers from the Tropical Fiesta Set and a watercolor brush to color the flowers and leaves.  I used Lemon, Turquoise, Desert Night, and Lime.  I also did a light wash of color around the flowers.  When the wash was dry, I added some spatters around the image using the same colors.  (Tip:  I didn't want spatters on the flowers so to mask it off, I just laid the stamp over the image!)

I adhered another piece of watercolor cardstock to my card base.  Then I added foam tape to the back of my colored panel to pop it up on the card.  I heat embossed the sentiment from the Paint-A-Flower: Gerbera Revolution with Rose Gold EP and added foam tape to the back.

Thank you so much for stopping by today.  Be sure to leave a comment here before hopping along to increase your chances to win one of the awesome prizes!

Your next stop on the hop is the blog of Katrina Howe!

Giveaway Prizes:

$200 in total prizes! To celebrate this release, Altenew is giving away a $50 gift certificate to 2 lucky winners and a $20 gift certificate to 5 winners! Please leave a comment on the Altenew Card Blog and/or each designer’s blog post on the blog hop list below by 04/28/2022 for a chance to win. 

Altenew will draw 7 random winners from the comments left on each stop of this blog hop and announce the winners on the Altenew Winners Page on 04/30/2022.

Blog Hop Order: 

Altenew Card Blog

Jenny Colacicco

LauraJane

Erum Tasneem

Colleen Balija

Jaycee Gaspar

Nenette S. Madero

Virginia Lu

Teresa Litchfield

Nathalie DeSousa

Terri Koszler

Preeti Chandran

Norine Borys

SathyaKala Sankaran

Nandini Karmarkar

Rosie Neustaedter

Natasha Davies

Carol Hintermeier >>> that's me!

Katrina Howe

Linda Westfall

Ann Taylor

Amy Hill

Sande Woodson

Daniel Diaz

Hussena Calcuttawala

Eva Bussom

Bridget Casey

Wednesday, April 20, 2022

Hope Your Day Blooms With Happiness!

Hello crafty friends! Today I'm sharing a card featuring some Honey Bee Stamps older, but favorite sets, the Branch and Leaves Honey Cuts and Itty Bitty Fall Flowers. I created a sweet card I can use for a birthday, anniversary, or even a wedding! I used newer products that were in the latest Modern Spring release too! I just love how Honey Bee's sets all work so well together--whether new or old! Read on for the easy card design details--with almost NO coloring! I haven't done that in a while. LOL!

First I created my A2 card base by layering pink cardstock with a piece I die cut with the Spring Leaves A2 Pierced cover plate die that was trimmed to 4" x 5-¼".

Next I die cut two shades of green cardstock with the leaves from the Branch & Leaves die set.  I cut the branch from Neenah Desert Storm cardstock and inked on Gathered Twigs and Ground Espresso Distress Oxide inks with a blending brush.  I adhered the leaf layers together with Bee Creative glue and then glued them to the branch.  I snipped off the end of the branch for it to fit my card.

I die cut two flowers from the Itty Bitty Fall Flowers die set from pink cardstock.  If you use spring colors, these sure don't look like Fall Flowers at all!  I used a stylus from the Flower Shaping Essentials Kit to shape the flowers and then glued them to the branch.  To finish the flowers, I added pink gems from the Hugs and Kisses Gem Stickers set to the flower centers.

The sentiments are from the Bitty Buzzwords: Bloom stamp set and coordinating dies.  I die cut the top layer of "bloom" three times and stacked them up for more dimension.  The other two sentiments are stamped with Intense Black ink and popped up with foam tape.

For a bit of sparkle (that doesn't show in the photos!) I used a clear glitter pen on the flowers and the "bloom" sentiment.  In real life, it adds a very pretty subtle sparkle!!

Thank you so much for stopping by today!  I hope your day will bloom with happiness!

Click the links for more details of the products I've used for this card:

Wednesday, April 13, 2022

Sending You Love & Hugs Card Featuring the Lovely Layers: Easter Lily

Hello crafty friends!  Today I'm sharing a sweet card featuring Honey Bee Stamps Lovely Layers: Easter Lily dies.  This is one of their early sets in the Lovely Layers line, and also one of my favorites!

The card base is a top-folding A2 size with edges I inked up by dragging the Saltwater Taffy Distress Oxide pad along the edges.  This is a quick and easy way to have a perfectly coordinating layer!  Next I die cut some 80# Neenah Solar White cardstock using the Quilted A2 Cover Plate die and trimmed it down to 4" x 5-¼".  Then I adhered it to the card base with Bee Creative glue.

Next I die cut the Lovely Layers: Easter Lily dies from white cardstock.  I used the smallest of the Detail Blender brushes to add Abandoned Coral and Saltwater Taffy Distress Oxide to the flowers' petals.  Then I added some dots to the petals with a R14 Copic marker.

I used Rustic Wilderness and Mowed Lawn to color the leaves and stamen stems.  Squeezed Lemonade is the color I used for the stamen tips.  I used some small foam dots to adhere with center flower layers and Bee Creative glue for the other pieces.

Then I stamped the sentiments from the Get Well Soon set with Intense Black ink.  I used the coordinating dies to cut them out and added foam tape to adhere them to the card.

After I adhered the flowers and leave to the card with glue, I added white pearls from the True Pearl pearl stickers set to the intersecting lines of the die cut card panel.  I love the shine and the detail that these pearls add!

Thank you so much for stopping by today!  If you are interested, check out my Instagram where I will have a short "reel" posted of my card making process.  I will post it most likely sometime this morning.  Have a wonderful day--stay crafty!!

Thank you for using my links to check out the products I used today!

Tuesday, April 12, 2022

Rainbow Card with New Yoga Cats Set

 Hello crafty friends!  Today I'm sharing a rainbow card I made with Rubbernecker Stamps' new Yoga Cats Set.  This set has five different cute cats in various yoga poses along with six different sentiments!  I created a fun rainbow background for these yoga cats--read on for the details!


 First I die cut the Slimline OPC Squares die three times.  Be sure to save one set of the squares that are cut.  Glue all three frames together and then onto a slimline card base.  Set aside to dry.

Next I stamped a cat on each of the three squares in Copic safe ink.  I also stamped the sentiment near the bottom of the middle square.  I placed a strip of masking paper over it. Then I stamped the cats again onto masking paper and fussy cut the masks.  Place the masks over the stamped images.  In the second photo below, you can see my test strip.  This helped me do two things: 1) make sure I liked the shades of ink I chose; and 2) helps me get the colors spaced out to cover all three squares.


To make it easy to ink the rainbow in a contiguous pattern, I adhered the squares in a line by placing some removable tape on the back of the squares.  I used ink blending brushes to blend on Posey, Lemon, Moss, Sonata, and Lavender inks.  The Color Fuse ink cube sets are linked in the supply list below.  Check out the reveal after removing the masks!

I kept my coloring simple in order for the cats to stand out from the background.  I used a few gray Copic markers to add shading on and under the cats.  When I finished coloring, I adhered each square into the frame on the card.

I decided to re-stamp the sentiment because my masking paper strip was a tiny bit crooked and I am somewhat OCD about things being straight and lined up!  LOL!  I added foam tape to the back of the sentiment to pop it up on the card.

Thanks so very much for stopping by today!  I hope you have relaxed after seeing these cute Yoga Cats! LOL!