Showing posts with label Glimmer Hot Foil Kit of the Month. Show all posts

Saturday, December 3, 2022

Spellbinders December 2022 Glimmer Hot Foil Kit

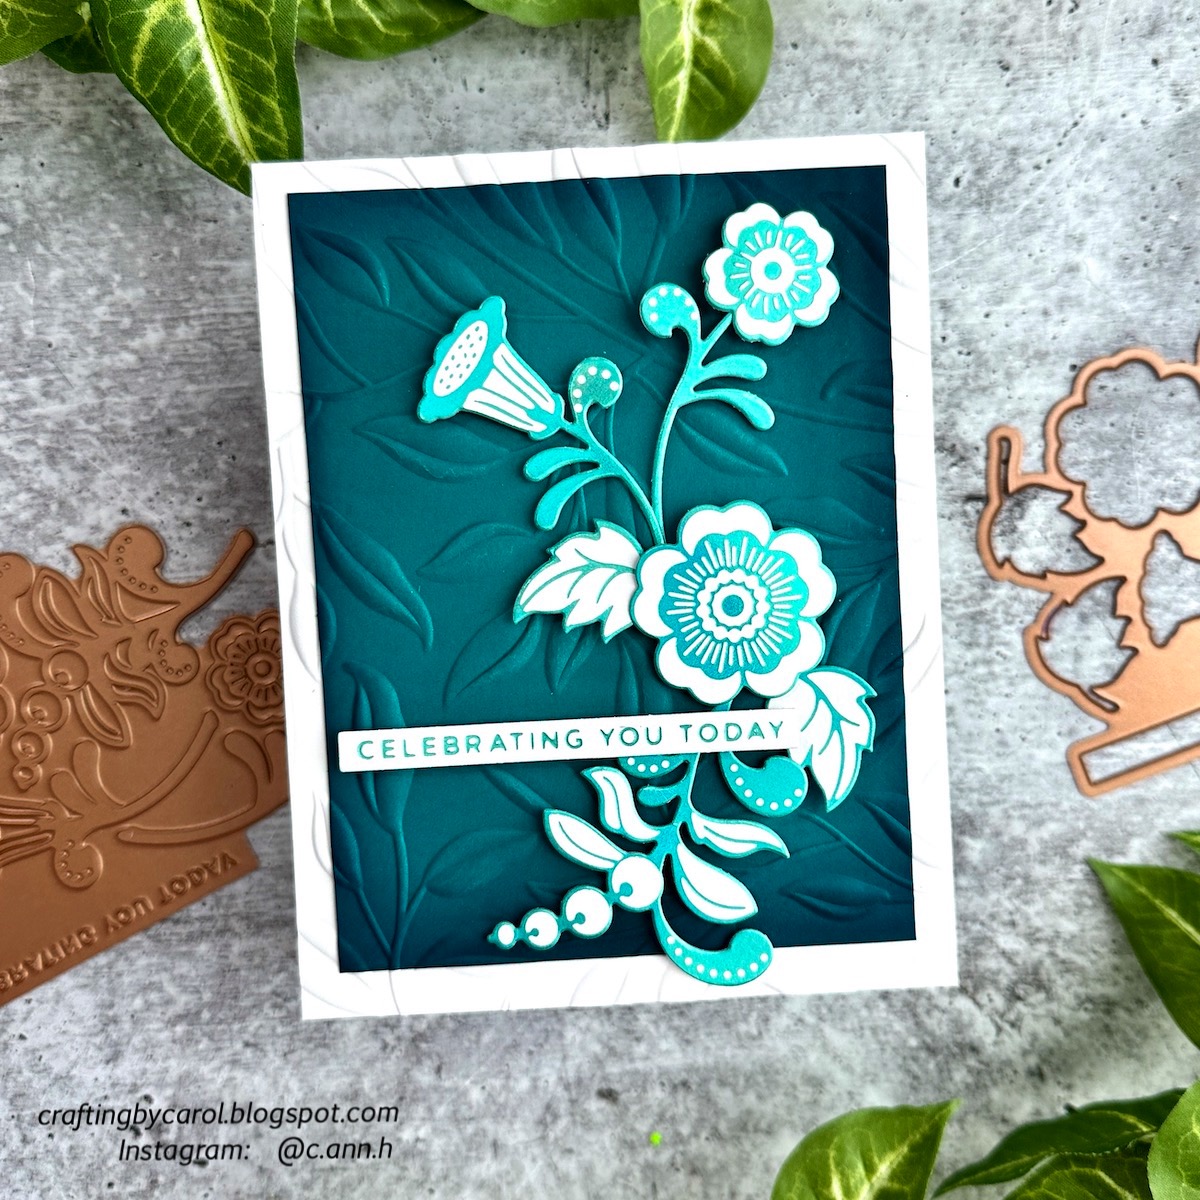
Hello friends!  Today my card features the December 2022 Glimmer Hot Foil Kit by Spellbinders!  I created a window card using the included dies and I love how it turned out!  Read on for the details.


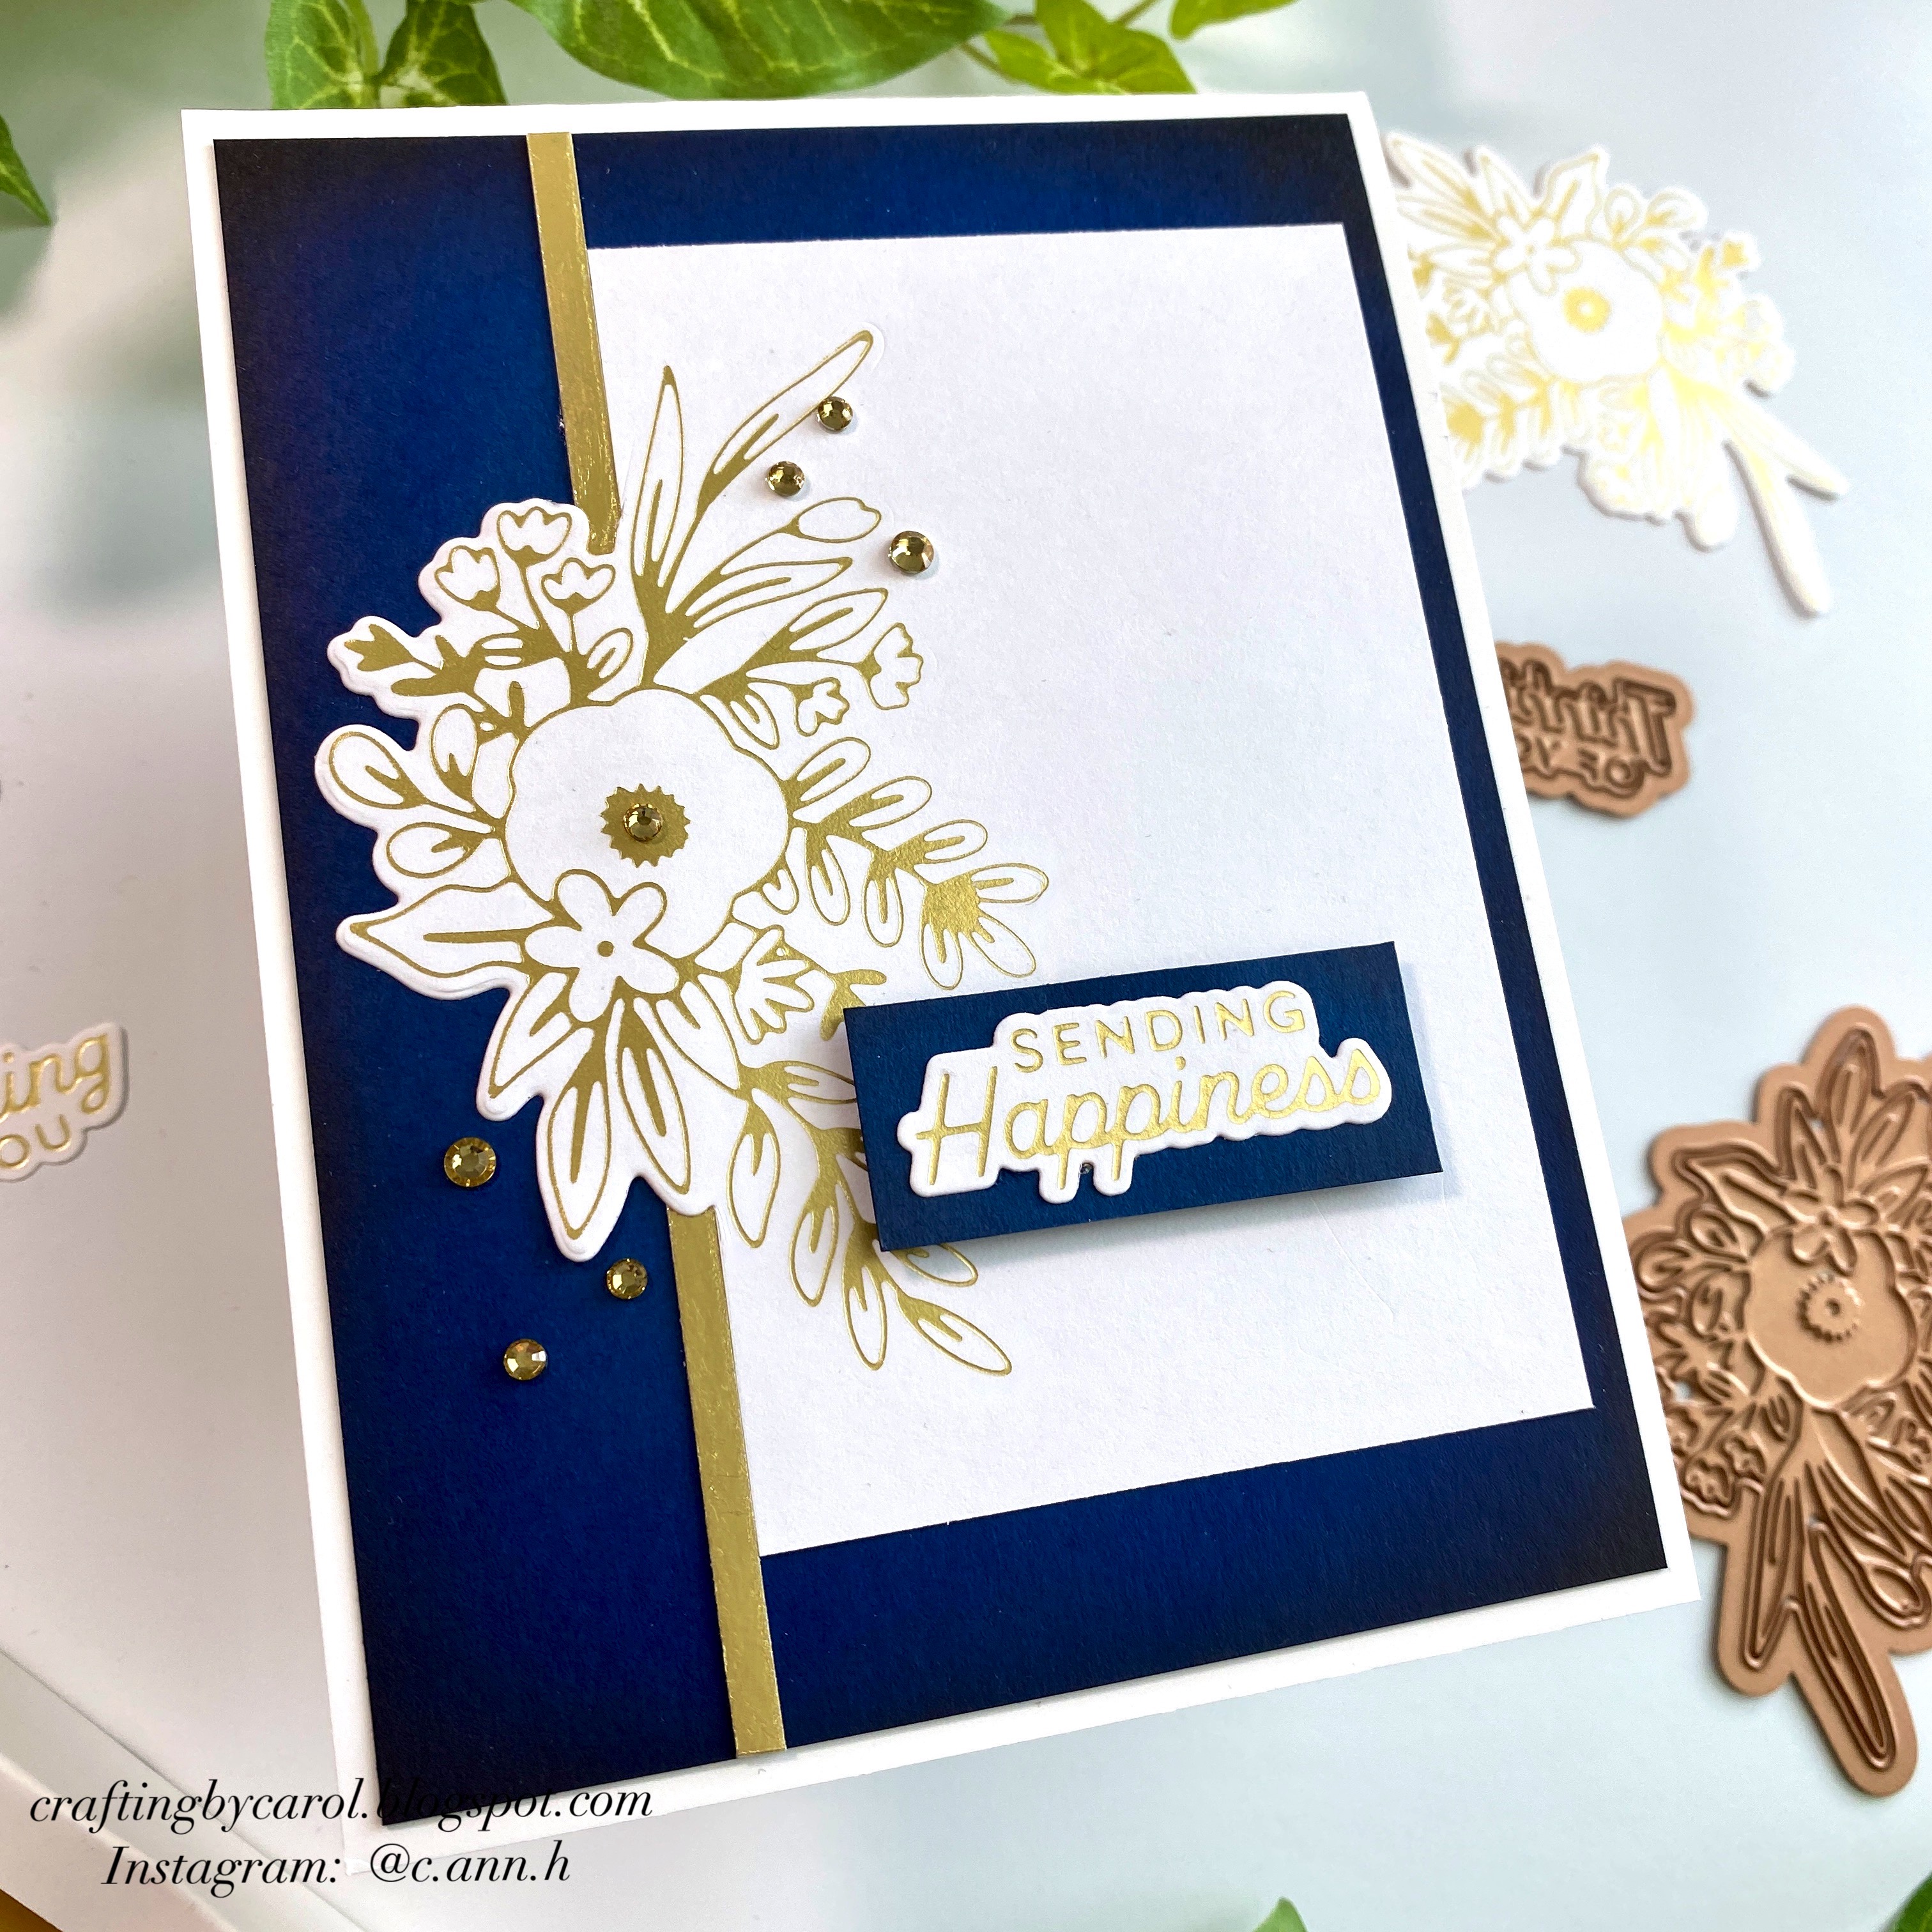
 First I trimmed some lavender cardstock (all supplies are listed below) to 4" x 5-¼".  I used some temporary tape to adhere it to an opened A2 card base.  Then I positioned the included scallop heart die over both pieces.  I ran this through my Platinum die cutting machine to create the window opening. 

Then I foiled the floral heart onto the lavender cardstock centering it around the die cut opening.  I used glue to adhere it to the card front taking care to center the die cut openings.

Next I foiled the scallop heart hot foil plate onto white cardstock and die cut it with the scallop heart.  (I used Matte Gold Glimmer foil on all of the foiled elements.)  I closed the card and adhered the foiled scallop heart with glue.


 Did you notice that the solid heart has a distressed foiled look?  Well, I haven't had time to verify, but I think it happened because I used some extra foil that had already been heated!  It was the center of the scallop foiled heart!  I popped that up with some thin foam tape.

The banner sentiment is die cut with the included die.  There's just enough overhang that I was able to add a few dots of glue to the ends to adhere it across the heart on the front of the card!

I used the dies from the kit to die cut the flowers and leaves from more lavender cardstock and some green cardstock.  I popped the flowers up with foam tape and glue the leaves.

To finished up I added some sparkly gem stickers to the flower centers!

This was such a fun card to make!  If you'd like to learn more about Spellbinders Club Kits, check it out HERE.  Thank you so much for stopping by.

Thank you for using my affiliate links for your shopping (never any additional cost to you).

Thursday, November 3, 2022

Spellbinders November 2022 Glimmer Hot Foil Kit of the Month

Hello friends!  Today I'm sharing two cards I made with Spellbinders' November Glimmer Hot Foil Kit.  This month's kit consists of one foiling plate for all of the images!!  I love this!  There is also one die to cut the images out along with a roll of hot foil.

My first card uses some teal cardstock and Moondust Glimmer Hot Foil.

First I embossed some white and teal cardstock with the Leafy 3D embossing folder.  I trimmed the teal piece down to 3-¾" x 5" and inked the edges with Peacock Feathers and Uncharted Mariner distress inks.

After I foiled the Glimmer Kit plate with Moondust foil, I used the die to cut them out.  I popped all the elements up with foam tape.  I love the look of two different cardstocks with the embossing folder!

My second card features the Glimmer Kit plate and rose gold Glimmer foil!

I used the same Leafy 3D embossing folder here.  First I added a sheet of double-sided adhesive to some white cardstock.  I carefully slowly pulled the backer away while adhering a piece of Rose Gold Glimmer foil.  I wanted a perfectly coordinating border for this card and I love the look.  I ran the panel, along with some white cardstock through my Platinum with the Leafy embossing folder.

Then I used an ink blending brush to add Peacock Feathers and Uncharted Mariner distress inks to the white panel.  I really like how the brush emphasizes the raised embossed leaves!  Again, I adhered the foiled images with foam tape and glue.

These were fun to make and I'm not sure which I like better!  Do you have a preference?  Let me know in the comments.  Thanks so much for stopping by today.  I hope you've enjoyed my versions of the Glimmer Foil Kit!

Thank you for using my affiliate links (never at any additional cost to you).

Sunday, October 2, 2022

Spellbinders October 2022 Glimmer Hot Foil Kit of the Month

 What a gorgeous Glimmer Hot Foil Kit by Spellbinders has this month!!  Spellbinders has created this lovely poinsettia spray hot foil plate for the kit and it includes three sentiments with the most beautiful font!

I used my Glimmer Hot Foil System and blush foil with the poinsettia hot foil plate to foil it onto 80# Neenah.  I also foiled all three sentiments with the blush foil.  I love how there are coordinating dies for all of the pieces!

Next I used the largest Essential Duo Lines Glimmer Rectangles to add blush foil to red cardstock.  I adhered this piece to an A2 card base.

Next I used some Copic markers to color in the poinsettias and other flowers and leaves.  TIP:  If you get a marker color onto the foil, use the very tip of your 0 Colorless Blender to remove it--frequently scribbling it onto white scrap paper to clean the tip.  It took the red marker right off of the foil!

I popped up the sentiment and image with foam tape.  For a bit more bling, I added some clear gem stickers around the image.

These hot foil plates in the Glimmer Kit of the Month make creating a beautiful card very quick and easy! Thanks so very much for stopping by!  I hope you have a fabulous, and crafty, week ahead!

Product links for more information (thank you for checking out my affiliate links--never any additional cost to you).

Saturday, September 3, 2022

Spellbinders September Glimmer Kit of the Month - Hot Foiled Autumn Card

 Happy weekend crafty friends!  Today I'm sharing my card that features Spellbinders' September Glimmer Kit of the Month.  I've used some beautiful copper hot foil and my Copic markers to make this gorgeous autumn card.  Read on for the details.

This month's Glimmer Kit includes a hot foil plate for the floral spray (I foiled it twice to complete the diamond shape) the little flowers and leaf and sprig, and the beautiful sentiment.  All of the floral elements also have coordinating dies to cut them out.

First I use two of the Essential Duo Lines Glimmer Rectangles and hot foiled them with copper foil onto an A2 sized piece of 80# Neenah.  I use the Glimmer Hot Foil System and love it!  Next I splattered dots of red gold metallic watercolor onto the panel.  Then I adhered this to an A2 card base.

Then I used the copper foil to foil the sentiment and floral hot foil plates onto 80# Neenah.  I repeated the foiling process once more for the large piece and twice more for the small floral pieces.

I die cut the sentiment out with an Essential Diamond die, added foam tape to the back and centered it on the card front.

Then I used my Copic markers to color the hot foiled elements.  Here is a list of the colors I used:

  • Red leaves and small flowers: E19, R39, R27, R17
  • Orange leaves: Y38, Y35, Y32, YR18, YR09
  • Green leaves: G99, G94, G43
Next I adhered the elements to the card with glue and a few bits of foam tape.

I added coordinating gem stickers to the flower centers to finish it up.  I just love the color of the copper foil!  I hope you've enjoyed my project and if you'd like more information about the Glimmer Kit, click here.  Thank you so much for stopping by!

Thank you very much if you choose to use my affiliates links (never any additional cost to you).

Sunday, August 7, 2022

Spellbinders August 2022 Glimmer Hot Foil Kit of the Month - Two Elegant, Foiled Cards!

Hello friends!  I'm thrilled to say that I'll be sharing projects each month using Spellbinders Glimmer Hot Foil Kits!  I'm really loving hot foil plates and discovering different ways to use them!

I created two cards to share with you today.  Both use the August Glimmer Hot Foil kit and Matte Gold hot foil.  You can receive this month's kit by signing up before August 28th.  I also use the Glimmer Hot Foil System and Spellbinders Platinum die cutting machine with the projects.  This month's kit includes the floral image, two sentiments, and coordinating dies along with an oval solid hot foil plate to do reverse foiling with.  A roll of Glimmer Foil is also included each month!

I went for an elegant look for both cards.  This first card was foiled with Matte Gold foil onto 80# Neenah Solar White cardstock.  I used the coordinating die to do partial die cutting on the floral.  (I love that there are coordinating dies for the sentiments too!)  Then I trimmed the floral piece to approximately 3-¾" x 4-¼".  I created a coordinating gold strip by applying double-sided adhesive to some cardstock.  Then I took a narrow strip of the matte gold foil and pressed it onto the adhesive.  Peel up the clear film and voila! 

 I adhered these to a navy blue mat layer that I inked up the edges of with Prize Ribbon and Black Soot Distress ink.  I added a few gold gem stickers for some pretty sparkle!

For my second card I used purple cardstock to foil the floral image onto.  Such a pretty and elegant look!

I used my Prismacolor Pencils to color the flowers.  I used the white pencil first to lay down a white base so that the other colors will show up.  I love this technique for coloring on colored cardstock!  I die cut the image and then foiled the solid plate onto Glimmer  Specialty Cardstock.  This is a synthetic cardstock with a super smooth surface that foils beautifully!  To die cut this out I used a die from the Essential Arches set.  I die cut one end, then rotated the die to cut the other.

Of course, this solid foiling plate is intended to be used to take the foil leftover from the first card I made and do a reverse type foiling with it.  I just chose to use it as a solid foiled oval to compliment the floral image.

I added foam tape to the back and adhered it to a purple cardstock panel that I embossed with the Tufted 3D Embossing Folder trimmed to 4" x 5-¼".  I adhered this to a gold trimmed layer (I used the same technique as above to create this perfectly coordinated layer).  I glued the floral image to the card and popped the sentiment up with foam tape.

I used a gold gel pen to add gold dots to the "buttons" of the Tufted embossing folder.

I hope you've enjoyed my cards today.  I look forward to sharing the new Glimmer Kits with you each month!  If you'd like to check out the subscription details, click here.  Thank you so much for stopping by today!