Showing posts with label My Favorite Flower stamps and dies. Show all posts

Wednesday, January 26, 2022

Antique Layering Roses Birthday Card | Honey Bee Stamps

Hello my crafty friends! Today I'm sharing a birthday card I made using the gorgeous Antique Layering Roses stamp set and coordinating Honey Cuts. The sentiment on the inside makes this into a perfect birthday card for your special friend!

I created my card base and layers by die cutting the Fluttering Hearts Cover Plate die three times from 80# Neenah. I adhered the layers together with Bee Creative glue and then adhered that to a piece I die cut with the Fluttering Hearts Pierced Cover Plate. I added this to my A2 card base with glue.

Next I stamped the images from the Antique Layering Roses stamp set with Intense Black ink. I highly recommend using a stamp positioning tool such as the MISTI with these layering stamps. Then I followed the included layering guide and stamped each layer with various inks in my stash. I experimented with my inks by stamping some layers multiple times. When I stamped the final layer, I discovered that I didn't have an ink that was card enough. So I stamped it a couple times with a cranberry red ink, and then stamped over it with a mahogany ink that helped to define that layer! Another tip is to do your experimenting on cheap paper, such as printer paper. It won't be exactly as stamping on Neenah, but you will be able to see if the colors work.

Before I added the images to the card front, I used the Inside: Birthday Sentiments stamps to add my greeting inside the card. I added also added one of the rose buds to make it pretty!

After I used the coordinating Honey Cuts to die cut the images, I arranged them on the card front. I used Bee Creative glue to adhere the center rose and leaves. I am loving the new Honey Bee foam dots to use for dimension like I did for the other two roses and the rose buds.
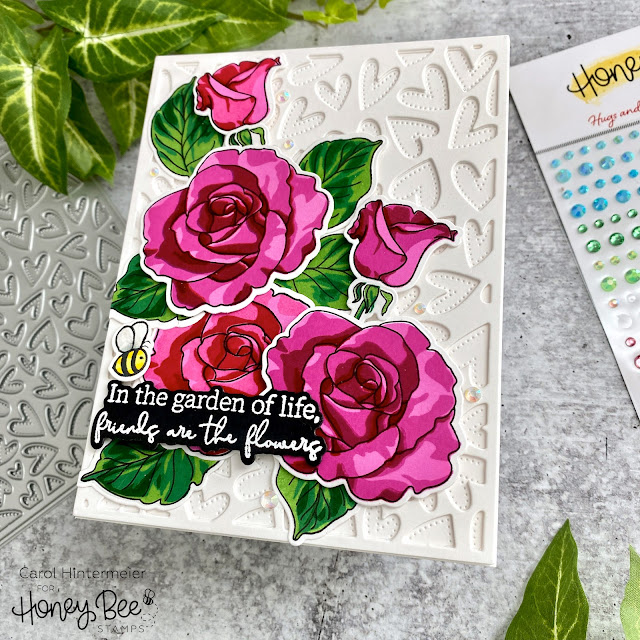
I stamped the sentiment from the My Favorite Flower set with Bee Creative Clear embossing ink onto black card stock. Then I heat set the white embossing powder, die cut it with the coordinating Honey Cut, added foam dots and adhered it to my card. I love adding sparkle to my cards and these gems from the Hugs and Kisses Gem Stickers were just right!

I couldn't resist adding the cute little bee from the Busy Bees stamp set.  I have several of these little guys saved from previous projects!

Layering stamps are lots of fun and I hope you've found some inspiration here today!  I always appreciate you stopping by!  Have a fabulous, crafty day!

Check out the products I've used here:
Wednesday, July 14, 2021

You're My Favorite Flower! | Honey Bee Stamps

 Happy Wednesday friends!  Today I'm sharing this A7 sized card that features Honey Bee Stamps adorable Sandie and Sis stamp set and the coordinating Honey Cuts.   I had lots of fun tucking little Sis into the wheelbarrow of flowers and dressing her and Sandie in some paper pieced hats and apron!  Read on for the details!

To begin, I die cut the largest A7 Doubled Stitched Frames Honey Cut from 110# Neenah Solar White card stock.  I added some purple tape to mask off the edges, then I used the Background Blender Brushes and Hexagon Palm Blender brush (which I love for its flat surface when blending larger areas) to blend on the sky and grassy background.  I used Salty Ocean, Mowed Lawn, and Rustic Wilderness Distress Oxide inks.

Next I die cut a fence with the fence die found in the Horizon Slimline Borders Honey Cuts.  This slimline die set is such a great one to have on hand since you can use the die cuts for any size card!  I adhered the fence to the background and added the penal to a top-folding a& card base with Bee Creative glue.  I set this aside to work on my card elements.

I stamped the images from the Sandie and Sis stamp set with Intense Black ink, which is alcohol marker friendly.  I truly love this ink!  I have tried several other black alcohol friendly inks and this one is definitely my favorite!  I colored all of the images with my Copic markers and then used the coordinating Honey Cuts to cut them out.

Next I stamped the little hats and apron with Bee Creative Intense Black ink onto some patterned paper from the Summer Stems 6x6 paper pad.  I die cut them with the coordinating Honey Cuts  but decided to fussy cut up to the black stamped line.  I used my Memento Tuxedo Black markers to go around the edges to hide the white core of the paper--it really gives them a more finished look.  Next I adhered the hats and apron to the bears with Bee Creative glue.  I adhered little Sis in the wheelbarrow after I trimmed off the bottom of the image so it wouldn't show.  I wend ahead and glued a few flowers in the wheelbarrow and one for each bear to hold.

I stamped the sentiment from the My Favorite Flower stamp set and die cut it with the coordinating Honey Cut.  Then I added foam tape to the bears, wheelbarrow, sentiment, bees butterfly, and a few of the flowers and added them to my card.  To finish it up, I used a white gel pen to add details to the hats, apron, and wheelbarrow just for fun!

I just adore this sweet set and can see using it many different ways!  Thank you so much for stopping by!

Links to products I used, if you'd like more information.

Wednesday, July 7, 2021

Bicycling Through The Wildflowers

Happy Wednesday crafty friends!  Today I have a card featuring Honey Bee Stamps Wildflowers stamps and dies with the Bicycle Builder die set!  I love the thought of biking through a field of wildflowers!  How about you?!  Read on for the details! 

My card is an A7 sized card.  I created the panel by die cutting the largest A7 Double Stitched Frames with white card stock.  (I have all supplies linked below--thank you if you use my links.)  I die cut the grass and hills from two shades of green card stock using the dies in the Horizon Slimline Borders die set.  (These are so versatile as you can cut them down from their 8-½" length to work with any sized card!  There's also a cloud and fence die in the set.)  I die cut the grass and hills by using the same A7 Double Stitched die.  I stenciled in some clouds using a stencil from the Outdoor Scene Builder set with a Background Blender brush and Tumbled Glass Distress Oxide.  I adhered the pieces to a side-folding A7 card base.

Next I stamped the flowers, butterfly and bees from the Wildflowers stamp set in Bee Creative Intense Black ink, which is Copic safe, and colored them with my Copic markers.  I used the coordinating dies to cut them out.

Next I used the Bicycle Builder die set to create the bicycle.  I die cut the pieces from teal, silver, and black card stock and adhered them all together with Bee Creative glue.  I adhered the bicycle to the card with some glue.  Then I popped up the green plant with foam squares and adhered it to the card.  I tucked in the flowers adding glue just to the bottom of the stems.  I also trimmed a few of the stems before adhering them.  I didn't add glue or foam to the back of the flowers so that they kind of float!  Gives the card just a touch of dimension!

The sentiment is from the My Favorite Flower stamp set and is stamped with Intense Black Ink.  I die cut it with the coordinating die and added some thin foam strips to pop it up.  I also popped up the butterfly and bees.  I absolutely love how Honey Bee has so many sentiments with coordinating dies!  Makes it so easy to play around with your placement!

Well, I hope you enjoyed our bide ride through the meadows!  LOL!  Thank you SO much for stopping by!

Thank you, should you use my links: