Wednesday, August 18, 2021

You Are Pawsome! | Honey Bee Stamps

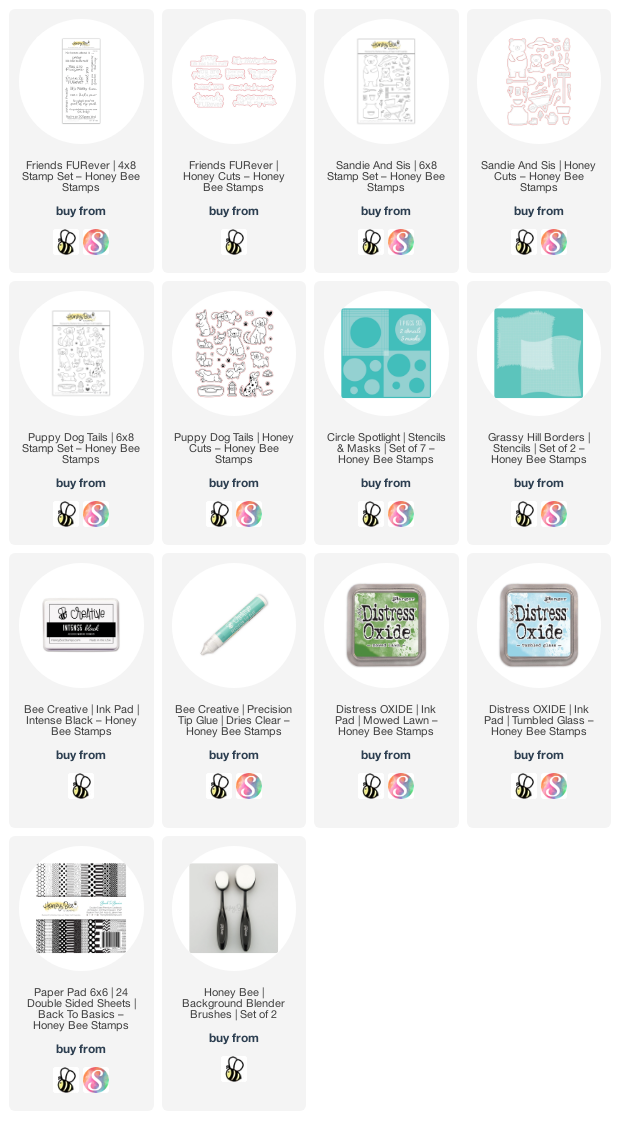
 Hello friends!  Today I'm sharing a cute puppy card using Honey Bee Stamps Puppy Dog Tails stamps and Honey Cuts!  I've loaded the adorable pups into a wheelbarrow that's in the Sandie and Sis set.

I began by stamping my images with Intense Black Ink (my favorite for Copic coloring!) and colored them all with my markers.  Here are the Copic colors I used for the main images:

  • Dog 1 (left to right): C7, C5, C3, C1, C0; for all dogs' ears/cheeks I used R20 and R30
  • Dog 2:  E55, E53, E51
  • Dog 3:  E59, E57, E55, E53, E51, E34
  • Dog 4:  C9, C7, C5, E18, E15, E13
  • Wheelbarrow:  B39, B37, B34, N9, N7, N5, N4, N2, N0

When I finished coloring everything, I die cut them using the coordinating Puppy Dog Tails and Sandie and Sis Honey Cuts.  Next I stamped the sentiments from Friends FURever stamp set in Intense Black ink and die cut them with the coordinating Honey Cuts.

Next I worked on my background for the images.  I placed the largest circle stencil from the Circle Spotlight Stencils & Masks set on an A2 white cardstock panel.  Then I positioned the hill stencil from the Grassy Hill Borders stencil set under the circle stencil.   (Check out the following photo to see the stencil positions.)  Then I used a couple Background Blender Brushes to ink on Tumbled Glass Distress Oxide for the sky and Mowed Lawn Distress Oxide for the hill.  I added some water spatters to the green hill, let it dry, and then removed the hill stencil.  I then added white spatters with some diluted white gauche.

I used a circle die from my stash that coordinates with the size of the stenciled background to cut it out.  I used one size smaller circle die to due cut a piece of a foam sheet that I added to the back of the circle.  I added it to a card base that I created with some black cardstock and a piece of patterned paper from the Back To Basics 6 x 6 paper pad.

Next I adhered my cute little images to the card front with Bee Creative glue.  I did need to trim off the bottom of the dog on the left for him to fit into the wheelbarrow.  I popped up the sentiments with some foam squares and added them to the card.

I used a black gel pen to trace over the dogs' eyes and noses to help them stand out a bit more.  A few touches here and there with a white gel pen finished up the card.

I had lots of fun creating my card with these adorable pups!  Now, if you are totally a cat person, check out the adorable Smitten Kittens set (link is below)!  A wheelbarrow full of kitties would be so cute too!  I hope you've enjoyed my card today.  Thank you so much for stopping by today!

Wednesday, August 11, 2021

Lovely Layers: Coneflower Birthday Card

 Hello friends!  Today my card features the oh, so popular Honey Bee Stamps Lovely Layers: Coneflower die set.  I decided to kind of transition the look of my card into autumn with some warm Distress Ink colors.

To begin, I had lots of inky fun with several of the yellow Distress Ink colors.  I smooshed the ink pads onto my craft mat, spritzed a bit of water onto the ink with my Distress Sprayer.  I like this sprayer because you can either mist the water or get larger drops, depending on how fast you squeeze the trigger.  Then I took watercolor paper and smooshed it into the ink.  The key to getting the layers is to be sure to use your heat tool and dry the layer before smooshing again.  I went for darker inks for the bottom layers of the flower.

Some of the Distress Ink colors I used are Mustard Seed, Rusty Hinge, Wild Honey, Crackling Campfire, and Squeezed Lemonade.  For the leaves I used Mowed Lawn, Peeled Paint Distress Ink and Twisted Citron Distress Spray.  After the panels were totally dry, I used the Lovely Layers: Coneflower dies to cut the parts of the flower and leaves.  (see photo above)  Next I used Bee Creative glue to adhere the flower layers together.  (Tip: For the petal layers, just add glue to the center so you can give the petals a little fluffing by using your fingers to curl the tips a bit.)

Then I used the Buffalo Plaid background stamp, inked it up with some beige ink and stamped it onto some Neenah Desert Storm card stock.  I added white spatters by diluting a dab of white gouache water using my paint brush.  When it was dry, I trimmed it to 4" x 5-1/4" and glued it to an A2 card base with Bee Creative glue.

For the sentiment I die cut the bottom layer of the Happy Honey Cuts from some of the lighter colored ink smooshed panel.  The middle layer is Neenah Desert Storm and the top layer is 80# Neenah Solar Crest card stock.  Then I used the "birthday" stamp I found in the Enjoy stamp set and stamped it onto Neenah Desert Storm with Bee Creative Intense Black ink.  I used my paper trimmer to cut it to a rectangle shape.

I used Bee Creative Glue to adhere the layered sentiment, leaves and flower.  I added a couple of small foam squares to the remaining sentiment strip and added it to my card.

I hope you enjoyed my version of this fabulous die set and have been inspired today!  Thank you so much for stopping by!

Tuesday, August 10, 2021

Best Wishes Card Featuring the New Fresh Breeze Stamp Set | Rubbernecker Stamps

 Hello friends!  Today my card is featuring one of the beautiful new Rubbernecker Stamps floral stamp sets!  This one is called Fresh Breeze, and it is a gorgeous set with solid stamp images and additional layering stamps that add so much dimension!

First created the background piece:

  • I "conditioned" the Fresh Breeze stamps by rubbing a white eraser over them until the shine was gone.  This really helps to minimize any beading up of the ink!
  • Stamp the base layer using two of the flower stamps from the Fresh Breeze set and the stems randomly over the A2 sized white card stock.  I used the lightest shade of ink from the Color Fuse ink Set #s 5, 6, and 9.  I stamped all of the stems with Clover ink from set #10.  I have these and all products linked at the end of my post.
  • Here's a peek at it all in progress:

  • I used an acrylic stamp block for this to make it quick and easy.  I was sure to let some of the flowers hang off of the card stock edge to create more of a natural background look.
  • I adhered the piece to a top-folding card base.

  • Next I stamped all of the layers for each of the two flowers creating three flowers and stems.  I switched to my MISTI for stamping the layers in case I decided to stamp the layer more than once.  I used the same Color Fuse sets as above, but for the three layers, I used shades 1, 2, and 4.  (Don't you love how the ink cubes are labeled 1 through 4?!!  I used Basil from ink set #10 for the stems.  Then I fussy cut them out.
  • I had a piece of sparkly vellum leftover from another project.  It was a piece that I had sprayed with Therm O Web Iridescent Glitter Dust.  It creates such a pretty, yet subtle sparkle!  I die cut the vellum with the next to largest Nested Oval Small Stitch die.
  • Next I adhered the flowers to the vellum oval with liquid glue.
  • Then I stamped the sentiment from the Fresh Breeze stamp set in black ink.  I trimmed it to a rectangle shape and adhered it to the oval.
  • I added foam tape to the back of the oval, but only behind the flowers and sentiment.  Don't want that to show through!  I adhered the piece to the card.

I love how this turned out!  It was really fun creating the background too!  Thank you so much for stopping by!  Have a wonderful, crafty week!


Saturday, August 7, 2021

Altenew Craft-A-Flower: California Giants Release Blog Hop + Giveaway

 Hello crafty friends!  I'm thrilled to be joining in the blog hop to celebrate the release of Altenew's gorgeous Craft-A-Flower: California Giants layering die set!

You should have arrived here from the blog of Nathalie DeSousa.  If you need to start over, head on over to the Altenew Card Blog.

This beautiful set is available for you in three different sets--click the links for more details.  Get it as a Layering Die Set; a Layering Die Set & Gradient Cardstock Bundle (5% off); or join the Monthly Subscription Plan for a specially discounted price!

It also comes with a layering guide to make it super easy to create this beautiful flower!


For my card today, I went with colors that I don't normally use.  It's good to step outside our comfort zones at times, right?!

For the card layers, I embossed white card stock with the gorgeous Spring Blossoms 3D embossing folder.  I love how this adds subtle interest to the background!  Then I trimmed the embossed panel to 4" x 5-¼".  I layered it on some coral card stock and adhered it to my card base.

Next I die cut all of the Craft-A-Flower: California Giant pieces from white card stock.  I looked at all of my various inks and chose a warm yellow, and a couple of coral shades for the flower and greens for the leaves.  I used some Ink Blending Tools to color the pieces.

I used the included layering guide to layer the pieces and glue them together.  I colored a scrap of white card stock with some of the same coral ink I used in the flower.  Then I die cut the sentiment shadow layer from it, and the sentiment top layer from white.  I popped the sentiment up with some foam tape.

Thank you so much for stopping by!!  Be sure to leave a comment for your chance to win before heading to the next stop, which is the blog of Reiko Tsuchida!

Giveaway Prizes
$200 in total prizes! To celebrate this release, Altenew is giving away a $50 gift certificate to 2 lucky winners and a $20 gift certificate to 5 winners! Please leave a comment on the Altenew Card Blog and/or each designer’s blog post on the blog hop list below by 8/13/2021 for a chance to win. Altenew will draw 7 random winners from the comments left on each stop of this blog hop and announce the winners on the Altenew Winners Page on 08/15/2021.


Blog Hop Order:

Altenew Card Blog

Erum Tasneem

Michelle Short

Virginia Lu

Natasha Davies

Emily Midgett

Dana Joy

Nathalie DeSousa

Carol Hintermeier <<< that's me!

Reiko Tsuchida

Amanda Baldwin

LauraJane

Terri Koszler

Tina Smith

Seeka

Keren Baker

Verity Biddlecombe

Sandhya Iyer

Linda Westfall

Joy Baldwin

Nenette S. Madero

Preeti Chandran

Daniel Diaz

Jenny Colacicco

Joylita Dsouza


Wednesday, August 4, 2021

Watercolor Framed Anemones | Honey Bee Stamps

 Hello my friends!  Today I have a card where I've watercolored the gorgeous Honey Bee Stamps' Framed Anemones stamp set.  I've used the newest Distress Ink color, Prize Ribbon, to do my coloring!  

This card was so easy to make!  It's been a while since I watercolored and I had not opened up my new Prize Ribbon inks at all!  First I stamped the gorgeous Framed Anemones stamp onto Bristol Smooth card stock with Versafine Onyx black ink.  I used this ink since it is waterproof.

I made sure the ink was dry before I started my watercoloring.  I put a few drops of Prize Ribbon Distress Ink refill onto my glass work surface.  I love using the refill ink for its highly concentrated properties.  I added the colors in layers on the petals, blending with a watercolor brush and water.  Make sure that you let one petal dry before coloring the one next to it or it will bleed across onto the finished one.  When I finished all of the petals, I went back to add more color in the areas where the shadows would be.

I used the same process for coloring the leaves.  I added one drop of Rustic Wilderness and Mowed Lawn refill inks to my work surface.  I added a layer of Rustic Wilderness to the leaves where the darkest areas would be, then blended in Mowed Lawn.  When the leaves were dry, I used a few Zig Real Brush markers to color the flower centers and to add the gray shadows under the florals and at the inside edge of the frame.

Then I got brave (haha!) and added spatters of Prize Ribbon ink that I diluted with water.  Next I stamped the sentiment from the Framed Anemones stamp set in Intense Black ink and die cut them with the coordinating dies.

I popped the sentiments up with foam tape.  Then I added some bling by adhering a few Reflections Dew Drops to the card.

I can't wait to mail this in the beautiful patterned paper envelope (peaking out behind the card) that's from the Summer Stems envelope pack.  Thank you so much for stopping by today!  Stay crafty!


Thank you for using my affiliate links.  (I may earn a small amount at no extra cost to you.)

Monday, August 2, 2021

Spellbinders - August 2021 Card Kit of the Month - Art School

Hello friends!  The latest Spellbinders' Card Kit of the Month is here!  This one is all about back to school, art, and creativity!

This kit has just about everything you need to create your cards!  I do like to make card samples that demonstrate that.  Honestly, the only items I used for all four cards is some liquid glue and foam tape strips (and a few Spellbinders die sets, but those would be totally optional if you don't have them.)  Be sure to check out the Art School kit details over at Spellbinders.  You will see photos of more samples, plus images showing the huge quantities you will get in each kit!  I have lots leftover for more cards, or to use in my scrapbooking!

Since there are a lot of photos in this blog post, I'll keep my descriptions limited to any additional information you may need for creating each card, along with any additional products I used.

For this card, I used some black and white twine from my stash and glued the little "create" banner to it.  From the kit, I used some patterned paper, die cuts, puffy stickers, and the card base.

This next card uses an additional die set for the background which is the beautiful Hemstitch Rectangles.  Check it out by clicking the link at the end of this post!

This time I used some of the dies that are included in the kit.  I die cut the paint palette and paintbrushes from white card stock and then colored them with my Copic markers.  I added Glossy Accents to the paints and the paintbrush handles for some fun shine.

This next card would be fantastic for a special school age child, especially fitting as school will begin in a few weeks!

I used the A-2 Matting Basics A & B die set for the card layers.  I used the largest die in each set to create those perfect layers!  I used a strip of the patterned paper on the card--I just love the shiny gold on the pencils!

My final card goes in a totally different direct with some beautiful florals! This sentiment would work for lots of different occasions too!

Again, I used the beautiful Hemstitch Rectangles die set.  I die cut the purple paper with the largest die and the flower paper with the next-to-smallest die.  A dark blue card stock layer really sets these pretty papers off!

I sure hope you enjoyed this and that you have found some inspiration for the August card kit of the month.  Thank you so much for stopping by!!


Check out the fabulous Spellbinders products by clicking the image:

Sunday, August 1, 2021

Altenew Build-A-Flower: Fashion Monger Dahlia Release Blog Hop + Giveaway

I'm thrilled to be part of the Altenew Build-A-Flower Fashion Monger blog hop!  This is an absolute gorgeous layering stamp set!


You should have arrived here from the blog of Verity Biddlecombe.  I you need to start over, head on over to the Altenew Card Blog.

This beautiful layering stamp set is available as a Layering Stamp & Die Set; a Layering Stamp & Die set + Ink Bundle (5% off); or join the Monthly Subscription Plan (14% off)!


I had so much fun watercoloring the gorgeous Fashion Monger Dahlia flowers!

I began by creating my card base.  I embossed some white card stock with the Buffalo Plaid 3D embossing folder and trimmed the piece to 3-¾" x 5".  Then I used the Altenew Ink Blending Tool to add some Baby Pink Crisp Dye ink to the embossed panel.  Next I squished the Magenta ink pad onto my craft mat and used a wet paint brush to add splatters.  When it was dry, I glued this to a pink card stock layer and added it to a top-folding A2 card base.

Next I used the handy, included layering guide to stamp my flowers and leaves.  I used various inks from these Crisp Dye ink sets:  Spring Bouquet (for the pink); Cool Summer Night;  Green Valley; and Shade of Purple.  Then I used the coordinating dies to cut them out.

I adhered the leaves and flowers using liquid glue and foam tape.  To finish up, I stamped the sentiment in Jet Black ink and fussy cut it out.  I popped it up with a bit of foam tape.

Thank you for stopping by!  Don't forget to leave a comment for your chance to win, and then head over to the next stop to the blog of awesome Sandhya Iyer!

Giveaway Prizes

$200 in total prizes! To celebrate this release, Altenew is giving away a $50 gift certificate to 2 lucky winners and a $20 gift certificate to 5 winners! Please leave a comment on the Altenew Card Blog and/or each designer’s blog post on the blog hop list below by 08/07/2021 for a chance to win. Altenew will draw 7 random winners from the comments left on each stop of this blog hop and announce the winners on the Altenew Winners Page on 08/09/2021.


Blog Hop Order:

Altenew Card Blog

Norine Borys

Jenny Colacicco

Virginia Lu 

LauraJane

Jaycee Gaspar

Mindy Eggen

Emily Midgett

Terri Koszler

Nathalie DeSousa

Seeka

Tenia Nelson

Dana Joy

Amanda Baldwin

Verity Biddlecombe

Carol Hintermeier <<< that's me!

Sandhya Iyer

Linda Westfall

Keren Baker

Daniel Diaz

Erin Thompson

Joylita Dsouza

Nenette S. Madero

Natasha Davies

Joy Baldwin

Linda Westfall