Sunday, December 27, 2020

Sending Warm Thoughts | Rubbernecker Stamps

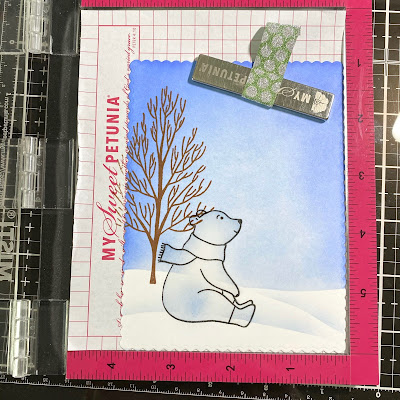
 Hello friends!  I hope your holidays have been fun so far!  Today I have a wintery card using Rubbernecker Stamps adorable Wintery Friends stamp set.  It's a one layer card and all you need is to do some masking and inking to get this dimensional look!  I love the sentiment I've used as it can serve for many types of cards!


Stamping, masking and inking:

  • Die cut white cardstock with the largest Nested Rectangle Scallop die.
  • Stamp the bear with Copic safe ink.  Also stamp the bear onto some masking paper.
  • Fussy cut the masking paper bear and place the mask over the stamped image.
  • I used a pencil to free-hand a hill onto masking paper.  Then divide that hill into three parts.  (see the photo below)  Cut the hills apart and place onto the card layer.
  • With an ink blending brush, ink on Sky ink (Color Fuse Set #7) getting lighter towards the middle of the card.
  • Ink on Odyssey ink around the edges.
  • Next remove the mask for the top portion of the hill and very lightly ink on Sky ink to create a shadow.  Repeat for the middle portion of the hill.  The photo below is a good visual of the process.  Leave the mask for the bear in place.  Click the photo to view it larger.


Next stamp the tree from the Wintery Friend set in Pecan ink.  This is from Color Fuse Set # 3.  It's best to use a MISTI, or other stamp positioning tool, for this as you will see from the next step.

For this step, use your anti-static powder over the tree to prevent embossing powder from sticking where you don't want it.  Leaving the tree stamp in place, ink it up with Versamark clear ink and stamp over the brown tree.  Sprinkle on clear embossing powder and heat set.  This gives just a bit of dimension and interest to a one layer card.


While my card was in the MISTI, I added some anti-static powder, then stamped the sentiment with Versamark, sprinkled on black embossing powder and heat set it.

Now is the magic time!  I love removing the final mask from the bear to begin my coloring!


To add shading to my white bear, I used a few grey Copic markers to color it.  Be sure to color in a shadow where the bear is sitting to "ground" it.


To finish up, I used a white gel pen to add white dots for some snow and.  I also added white dots to the bear's scarf.  I used two different sizes of Jelly Roll pens to get the different sized dots.  One was a 10 and another an 8.


Thank you so much for stopping by!  I'll see you back here in 2021!  Happy New Year!!

Thursday, December 24, 2020

Joy To The World | Honey Bee Stamps

 Merry Christmas Eve my friends!  For this special day I've made a card to celebrate the season using Honey Bee Stamps beautiful Northern Star Cover Plate Honey Cuts and the Joy stamps and Joy Honey Cuts.   I absolutely love the layering word dies that Honey Bee carries!  Keep reading to see how I finished the inside of the card!

This card was quick and easy to make!  To begin I die cut a piece of dark blue card with the Northern Star Cover Plate die.  I trimmed it to 4" x 5-¼".   Then I used a couple Background Blender brushes to ink some Blueprint Sketch and Black Soot Distress inks around the edges.  I adhered the blue panel to a piece of gold glitter card stock with some Bee Creative glue.  I love the gold sparkling stars!  I adhered this to a top folding white A2 card base.

I used the same card stocks to die cut my layers of the Joy Honey Cuts.  I die cut the white top layer three times for extra dimension and adhered all of the layers together.  While the layers were drying I stamped "To The World" from the Joy stamp set with Versamark, sprinkled on some gold embossing powder and heat set it.  I layered some blue card stock behind it and die cut it with a Sentiment Banners Honey Cuts.   I waited until I finished the inside of the card before adhering this to the card front.

I don't usually finish the inside of a card, but I thought that this beautiful image from the Christ Is Born set went perfectly with the front of the card.

I used a piece of scrap card stock for this and stamped the manger from the Christ Is Born set in Versamark, sprinkled on some gold sparkle embossing powder, and heat set it.  I used the coordinating Honey Cuts to die cut Mary and Joseph and the star.  I adhered the pieces above strips of blue and gold glitter card stock.

To finish off the inside, I used a sentiment that's in the Christ Is Born set and heat embossed it with gold embossing powder.

Thank you for stopping by today!  No matter how you celebrate this season, I am wishing all of the joy, peace, and happiness for you now and into 2021!

Friday, December 18, 2020

Divinity Designs December 2020 Release

Happy Friday my friends!  I've come to the end of my time as a guest designer for Divinity Designs.  I want say how very honored I am to have been asked by Kelley Holland to guest design! Thank you Kelley!  I've loved using her beautiful products and I hope you will be sure to check them out, if you haven't already!

Now onto my cards!  This first card uses the gorgeous Mandala Layering Combo die set.  I've used just the top layer of the die to create a shaker card.  I love the versatility of this set!


I used the pretty patterned paper from the Shine Bright paper pad and die cut it with the largest Pierced Rectangle die.  Then I die cut the base layer of the Mandala for my window opening in the center of the panel.  Then I die cut the Mandala top layer twice, once from gold card stock and a second time from white card stock.  I adhered the layers together for some dimension.  I created the shaker in the usual way and adhered the Mandala on top of the window.

The sentiment is from the Keep Christ in Christmas stamp set and I heat embossed it in gold.  I die cut it with a Pierced Rectangle die.  I added some gems to the mandala for more sparkle!


My second card was very easy and quick to make.  I only used one of the cute bear stamps from the Beary Christmas set this time.  After I stamped and Copic colored it, I used the included coordinating die to cut it out.  I die cut the Birch Background twice and adhered the layers together.  I added it to a piece of white glitter paper.  I hand cut the hill for the bears to slide down on from the same glitter paper.


I stamped the sentiment from the Beary Christmas set in coordinating ink.  I trimmed it into a banner shape and layered it on white glitter paper.


For my final card, I used the adorable Snowbirds stamp set and coordinating dies (that are included).

I used the A2 Portrait Card Base die to create my top folding card.  Then I die cut two Pierced Rectangles from white card stock.  On the smaller one I blended on Tumbled Glass and Faded Jeans Distress Oxide ink.  I splattered on Perfect Pearls, some white ink spray, and glitter spray!  I wish you could see the sparkle that shows in real life!

I Copic colored the birds, die cut them with their coordinating dies, and popped them up with foam squares onto a glittery hill.  The sentiment is stamped with Faded Jeans Oxide ink and die cut with a Pierced Rectangle.


I hope you've enjoyed my cards using Divinity Designs beautiful sets!  Be sure to check out all their other amazing products.  Thank you all for stopping by!

Wednesday, December 16, 2020

Little Red Pickup Christmas Gift Tag | Honey Bee Stamps

 Hello my friends!  Today I'm sharing an adorable gift tag that was inspired by the wooden signs you see so much of at this time of the year!  I've used Honey Bee Stamps adorable Little Pickup Paper Piecing Honey Cuts along with the Barn Wood Background stamp in this tag.  I've also used some previously released products that work so well with the newer ones!


I'm going to keep my details as brief as I can.   I've not wrapped a single present and still have shopping to do!  Anyone else with me?  LOL!

I stamped the Barn Wood Background stamp first with Pumice Stone Distress Oxide ink and then I tapped on some Hickory Smoke Distress Oxide here and there.  I repeated these colors until I was happy with the look.  Then I die cut it out with the largest Double Stitched Circles Honey Cuts.

I die cut all of the Little Pickup dies from white card stock.  I left them in the negative space to make coloring these with my Copics very easy!  I have most of the colors I used listed below.  I used Bee Creative glue to adhere the pieces and added foam squares to the back.

I die cut a hill with one of the Hill Border Honey Cuts and then cut it with the same Double Stitched Circle die so it would fit at the bottom.


I used R37 and colored some card stock so the sentiments would be color coordinated.  I die cut the sentiments with dies from the Tailgate Alphabet Honey Cuts and Let It Snow Honey Cuts sets.  I die cut two more layers for them and adhered them all together.

The greenery is from Lovely Layers: Pinecone and the brighter green pieces are from the Country Wreath Honey Cuts that I had left over from another project.  I added a few red gems from the Holiday Cheer Gem stickers to the bright green pieces.  To finish I tied some red and some gingham ribbon at the top.


I love how this turned out!  Thank you so much for stopping by.  I appreciate you so much for taking a minute to take a look!  Happy crafting!

Copic markers:
truck: R89, R59, R37, R35, R27, E29, E27, E25
tree:  G29, G07, G05

Supplies:
Distress Oxides: Pumice Stone and Hickory Smoke

Sunday, December 13, 2020

Big Bear Hugs and Frosty Kisses | Rubbernecker Stamps

 Hello friends!  I have a slimline Christmas or winter card using the oh SO adorable Rubbernecker Stamps Christmas Inchies stamp set.  I think these are so adorable!  They remind me of the cute little Weeble toys from long ago!  If you are still needing to make holiday cards, this one came together very fast!  Keep reading to see how I made it.

Creating the card base:

  • Die cut the Slimline OPC Wavy die three times from white card stock and once from red glitter card stock.
  • Adhere the layers together.
  • Create a 3-¼" x 8-¼" slimline card base.
  • Place the wavy frame (without adhering) onto the card base and use a pencil to lightly trace the wavy lines onto the card base.
  • Also trace the lines onto some Post-It tape and cut along the lines to create masks.
  • Place the masks onto the card base slightly below the pencil lines.
  • Ink some Artic ink (from Color Fuse set #7) onto the card base, above each mask, using a blender brush.  Begin inking at the top and remove each mask as you go.  This will create just a hint of a blue sky for the little scene.

Remove the masks, erase the pencil lines, and adhere the frame to the card base.

Card elements:

  • Stamp the images from the Christmas Inchies set with Copic safe ink and and color with Copic makers.
  • Die cut with the coordinating dies.  (Mine are fussy cut as I still need to order the dies.  It was easy!)
  • Use a white gel pen and a clear sparkle pen to add some fun details and sparkle to the images.
  • Stamp the sentiment with Versafine Onyx Black ink onto white card stock.  Trim into a rectangle.
  • Create a mat layer for the sentiment from red glitter card stock and adhere to the stamped sentiment.
  • Use liquid glue or foam squares to adhere the sentiment and the colored images to the card.

Thank you so much for stopping by today!  I hope you have a wonderful, and crafty, week!


Thursday, December 10, 2020

Pretty Poinsettias

Hello my friends!  It's been a hot minute and many more since I've done anything resembling watercoloring!  For my card today I've used Honey Bee Stamps beautiful Pretty Poinsettias stamp set and a variety of watercolors to color these beauties!  I also did some fun masking and ink blending too.


I have been wanting to open up the the Rustic Wilderness Distress inks since I received my order!  Before I inked up my background I stamped the poinsettias, leaves, and holly onto masking paper and fussy cut them out.  Then I trimmed a piece of Bristol Smooth card stock to 3-¾" x 8-¾".  I stamped the poinsettias first with Versamark and heat embossed with WOW! Metallic Rich Gold embossing powder.  I placed the masks on them and then proceeded to stamp and heat emboss the leaves and hollies.  I used the masks for them as needed.

I made sure the masks were in place and had fun inking up the background with Rustic Wilderness,  Bundled Sage, and Shabby Shutters Distress Oxides.  Using the Background Blender brushes and the Bristol card stock made the blending super easy!

Note:  If I do this again, I'll save the background to do last.  I had to be very careful not to get any water drips on the background as I watercolored!


When the background inks were dry, I began to watercolor the images.  I used several different mediums to do my coloring and I have them all listed below.


I used Honey Bee's Merry stamp set for the sentiment.  I heat embossed it onto vellum with the same gold embossing powder.  While I had the embossing supplies out, I embossed two thin strips of white card stock for the gold borders you see in the photo.  I wrapped and adhered the vellum on the back of the card panel.  I added foam tape to the back and popped it up onto a 4" x 9" card base.  Then I adhered the gold strips with Ranger Multi Medium Mat and set a stamp block on them while the glue dried.

I added a few gold gems from the Holiday Traditions Gem stickers set.  I added some Glossy Accents to the berries and flower center for a bit more shine!


I had so much fun making this card and it reminded me that I need to get my watercolors out much more often!  Thank you for stopping by and I hope you have a wonderful day!


Here are the colors I used on the florals and leaves: (I've provided links where I can)
background:  Distress Oxides--Rustic Wilderness, Bundled Sage, Shabby Shutters
poinsettias:  Zig Real Brush marker--Geranium
poinsettias centers:  Tombow Orange-933, Chrome Orange-993, Process Yellow-055
leaves:  Altenew Forest Glades from Watercolor Pan set, Tombow Dark Jade-177
holly leaves: Rustic Wilderness Distress Ink
holly berries:  Zig Deep Red, Carmine, blender brush

Wednesday, December 2, 2020

Big Pickup Merry Christmas Card | Honey Bee Stamps

Happy December my friends!  Today I'm sharing a card I made using Honey Bee Stamps SO adorable Big Pickup Cab stamp set and Honey Cuts.  I'm sure you've seen how some people add tinsel, wreaths, or reindeer accessories to their cars and trucks for the holidays, right?  I've never done that, but I love it when I see the decorated automobiles!  So now you know the inspiration for my card! :)


Here are my steps, in list form, for this card:

  • Die cut the largest Scallop A7 Card Frames Honey Cuts and adhere to a side-folding A7 card base.
  • Die cut the Birch A2 Cover Plates top and base, adhere together and adhere to a panel inked with blue ink. Trim the edges to fit the upper portion of the scallop layer.  I used the Bee Creative glue to adhere it to the panel.
  • Die cut the Hills Borders to fit within the stitched lines of the scallop layer.  Add thin foam tape to each layer.  Here's a photo to help you visualize the work in progress.  Adhere the layers to the card.

  • Next I stamped the Big Pickup Cab and die cut the Pickup Cab Honey Cuts and the wreath from the Threshold Card Builder with white cardstock.  I colored them with Copic markers.
  • After I built the wreath, I adhered it to the front of the pickup hood.  Then I added some red gem stickers from the Holiday Cheer gem stickers set.
  • I had a bow that I made and saved from a few weeks ago and added it to the wreath.  This bow is in the Lovely Layers: Pinecone Honey Cuts.  Of course, you can use ribbon or twine for a beautiful look too.
  • I added foam tape to the back of the cab and adhered it to the card.
  • Next I die cut cardstock that I colored to match with the top layer of the Merry Honey Cuts.  I die cut two of these from white cardstock and adhered them together.  I stamped and die cut the sentiments in the Merry stamp set with the Sentiment Banners.
  • I skipped the middle layer and die cut the base with some white sparkle cardstock.  Then I added the other layer with glue.


To finish it off with more sparkle, I used a clear glitter pen to sparkle up the hills the bow, and headlights on the truck.


Did you know there's a coordinating Big Pickup Tailgate to make a double-sided card with?  I can't wait to try that out!  Thank you so much for stopping by!  I sure hope I've inspired you to give this awesome set a try.  Have a wonderful, and crafty, day!

Tuesday, December 1, 2020

Divinity Designs December Release

 Happy December 1!!!!  It just doesn't seem like it should be December already!   Divinity Designs has an awesome new release for this month that includes some adorable birds and bears, and also a beautiful Mandala Layering Combo die set!   

My first card uses the SO cute Snowbirds stamps and coordinating dies.  I used the Birch Background die for the background.  After I die cut it from kraft cardstock and embossed it, I left it in the die and inked on some brown ink to enhance the embossing.  I stamped the greeting from the Snowbirds stamp set and popped it up with foam tape.


Next, take a look at these adorable Beary Christmas bears!  I kept this card quick and easy.  First I die cut a piece of Neenah cardstock with the largest Pierced Rectangle die, then embossed it.  I inked on some Tumbled Glass and Speckled Egg Distress Ink for the sky and the "pond".  Then I added some Nuvo Fresh Snowfall Glitter Accents to create snowy hills.  For some glittery accents on the pond, I used a Quick Glue Pen and drew some lines then sprinkled on some iridescent glitter.  When this was dry, I added foam tape to pop it up on the card base.


After I Copic colored the bears, I used the included coordinating dies to cut them out.  I stamped the sentiment and cut it out with the smallest Rectangle die.  I popped up the bears and sentiment with foam squares and added them to the card.  To finish, I added a few pink gems around the sentiment.  I sure wish the camera would capture the glitter and sparkles!

My final project is using the gorgeous Mandala Layering Combo die set to create some keepsake tags that can also be used as ornaments.


I used various gold and silver metallic and glitter cardstock for these tags.  There are three open layers to die cut and one solid layer for the backing.  I adhered the top three layers with glue.  Then I added thin foam strips to the back of the third layer and adhered it to the solid back layer. for some beautiful dimension!


To add even more bling I added gold and silver adhesive gems to each piece.  Is there ever too much bling?!  Not to me!  Haha!


Thank you so much for stopping by today.  Be sure to head over the the Divinity Designs' blog to see a lot more inspiration with these awesome new products!