
Hello friends! I hope your holidays have been fun so far! Today I have a wintery card using Rubbernecker Stamps adorable Wintery Friends stamp set. It's a one layer card and all you need is to do some masking and inking to get this dimensional look! I love the sentiment I've used as it can serve for many types of cards!

Stamping, masking and inking:
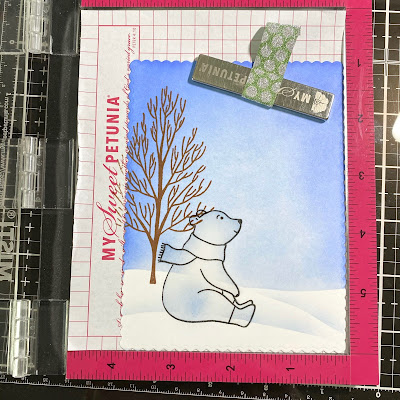
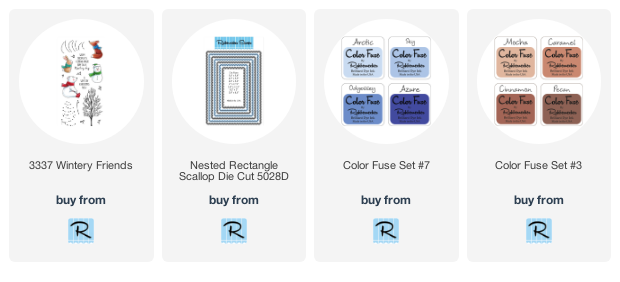
- Die cut white cardstock with the largest Nested Rectangle Scallop die.
- Stamp the bear with Copic safe ink. Also stamp the bear onto some masking paper.
- Fussy cut the masking paper bear and place the mask over the stamped image.
- I used a pencil to free-hand a hill onto masking paper. Then divide that hill into three parts. (see the photo below) Cut the hills apart and place onto the card layer.
- With an ink blending brush, ink on Sky ink (Color Fuse Set #7) getting lighter towards the middle of the card.
- Ink on Odyssey ink around the edges.
- Next remove the mask for the top portion of the hill and very lightly ink on Sky ink to create a shadow. Repeat for the middle portion of the hill. The photo below is a good visual of the process. Leave the mask for the bear in place. Click the photo to view it larger.

Next stamp the tree from the Wintery Friend set in Pecan ink. This is from Color Fuse Set # 3. It's best to use a MISTI, or other stamp positioning tool, for this as you will see from the next step.
For this step, use your anti-static powder over the tree to prevent embossing powder from sticking where you don't want it. Leaving the tree stamp in place, ink it up with Versamark clear ink and stamp over the brown tree. Sprinkle on clear embossing powder and heat set. This gives just a bit of dimension and interest to a one layer card.
While my card was in the MISTI, I added some anti-static powder, then stamped the sentiment with Versamark, sprinkled on black embossing powder and heat set it.
Now is the magic time! I love removing the final mask from the bear to begin my coloring!

To add shading to my white bear, I used a few grey Copic markers to color it. Be sure to color in a shadow where the bear is sitting to "ground" it.

To finish up, I used a white gel pen to add white dots for some snow and. I also added white dots to the bear's scarf. I used two different sizes of Jelly Roll pens to get the different sized dots. One was a 10 and another an 8.

Thank you so much for stopping by! I'll see you back here in 2021! Happy New Year!!
What a fun card! The bear is so cute, and such a great scene
ReplyDeleteCarol, you rock!! Thank you so much for taking the time to put together this picture tutorial of your process! I'm going to print this up. You're the best and your card is just adorable as well as being a sensational OLC!! Happy New Year Hugs, Darnell
ReplyDeleteGorgeous inky background! I LOVE the little bear!
ReplyDelete