Saturday, May 22, 2021

Altenew Paint-A-Flower: Lotus Outline Stamp Set Release + Giveaway ($200 in total prizes)

 Hello friends!  Welcome to the fun and inspirational blog hop to celebrate the release of Altenew's beautiful Paint-A-Flower: Lotus Outline Stamp!


You should have arrived here from the amazing Tenia Nelson's blog.  If you need to start at the beginning, head on over to the Altenew Card Blog.

The Paint-A-Flower: Lotus Outline Stamp is such a gorgeous stamp!  I love all of the sentiments in it too.  If you'd like to check it out, go to Altenew's shop for more details.

There are also two fabulous bundles for your to choose from: the Paint-A-Flower: Lotus Outline & Watercolor Essential 12 Pan Set Bundle, or the Paint-A-Flower: Lotus Outline & Watercolor Essential 24 Pan Set Bundle.  Click either photo to get to Altenew's shop for more details.

For my card with this beautiful set, I used my 36 Pan Watercolor set.  Read on for the details!

I began by stamping the beautiful Lotus image with black ink onto watercolor paper.  Then I used Pink Diamond, Puffy Heart, and Lagoon paints from the 36 Pan Watercolor set.  I used Mowed Lawn Distress re-inker to paint the leaves.  I added a very light layer of Lagoon to the leaves to give them more of an underwater look.

After the painting had dried, I stamped the included sentiment in clear embossing ink, sprinkled on some black embossing powder, and heat set it.  I really like this sentiment as it would work for several occasions!  I added a few clear droplets here and there in the water to mimic the bubbles for some fun dimension and shine!

I hope you've enjoyed my card and I've given you inspiration for the beautiful Paint-A-Flower: Lotus set.  Enjoy the rest of this amazing hop--lot's of inspiration is waiting for you!

Your next stop on the hop is sweet Ardyth Percy-Robb!

Giveaway Prizes:

$200 in total prizes! To celebrate this release, Altenew is giving away a $50 gift certificate to 2 lucky winners and a $20 gift certificate to 5 winners! Please leave a comment on the Altenew Card Blog and/or each designer’s blog post on the blog hop list below by 05/28/2021 for a chance to win. 

Altenew will draw 7 random winners from the comments left on each stop of this blog hop and announce the winners on the Altenew Winners Page on 05/30/2021.


Blog Hop Order:


Altenew Card Blog

Emily Midgett

Keren Baker

Joylita Dsouza

LauraJane

Norine Borys

Erin Thompson

Sandhya Iyer

Erum Tasneem

Nathalie DeSousa

Terri Koszler

Lilith Eeckels

Jenny Colacicco

Verity Biddlecombe

Virginia Lu

Nandini Karmarkar

Seeka

Tenia Nelson

Carol Hintermeier <<< that's me

Ardyth Percy-Robb

Linda Westfall

Teresa Litchfield

Helen Kalb

Amanda Baldwin 

Friday, May 21, 2021

Pawsome Stamps! An Awesome New Stamp Company!!

Hi crafty friends!!  I was absolutely thrilled to be invited to join in the launch of an awesome new stamp company called Pawsome Stamps!  There's a fun and inspirational Instagram hop happening today that will feature the other stamp sets being released today!  I had lots of fun playing with the new Cup of Tea stamp set and creating this cute scene with it!  Read on for details. 

I started by stamping the teacup image with Copic safe ink onto a white card stock panel that I die cut with a stitched rectangle die.  Next I stamped it onto masking paper and fussy cut it out.  Next I placed the mask onto the teacups and added a rectangle masking stencil over it.  Then I blended some Mowed Lawn and Tumbled Glass Distress Oxide inks onto the card.  I love how this spotlights the adorable teacups!

Next I stamped the butterfly, the rock path, and the snail.  Then I removed the masking paper and colored the images with my Copic markers.   Next I chose one of the four sentiments from the Cup of Tea set and stamped it in black ink.  I used a stitched banner die to cut it out and popped it up with foam tape on the card front.

Thank you so much for stopping by!  I hope you'll join us on the Instagram hop.  You can get over there by clicking the Instagram link in the left column of this blog! 

Wednesday, May 19, 2021

Garden Apron Birthday Card | Honey Bee Stamps

 Happy Wednesday friends!  When Honey Bee released the awesome Apron A2 Card and the Apron: Garden Tools Add-on Honey Cuts, I couldn't wait to create with these!

I love all of the little gardening tools and the scalloped apron pocket that comes with the Apron Garden Tools Add-on!

First I created a white apron card base with the dies from the Apron A2 Card die set.  Next I die cut the pocket and two apron ties from gingham paper in the Sweet On You 6x6 paper pad.  Then I added the tie to the top of the apron and adhered the floral apron die cut to the card front.  The floral paper is from the Spring Fling 6x6 paper pad.  I adhered the second tie to the back of the card, making sure it lined up with the one on the card front.

Then I used the largest Scallop A2 Card Frames Honey Cut and die cut a few strips of the scallop edges.  I adhered them to the apron top and bottom with liquid glue.  To hide all of the pieces that were showing on the back of the card, I adhered another white apron die cut to cover it and give a clean look.

Next I stamped the sentiments on the inside in black ink.  I love all of the various sentiments found in the Inside: Birthday sentiments set!

Now it's time to add the adorable elements to the card front!  I die cut the gardening tools from some mat silver card stock.  Then I die cut them once more with coral and green card stock from my stash.  I trimmed off the handles and adhered them to the silver tools.  Next I adhered the apron pocket pieces together and glued it to the card front.  I only added glue around the curved edge so I could tuck the tools into the pocket.

I even created little paper flower buttons for the apron!  I die cut three flowers for each button and adhered the layers together.  Then I pulled out a needle and embroidery thread and added a French knot to each button.  

Next I used the Bitty Buzzwords stamp set and coordinating Honey Cuts and die cut "enjoy" three times from white card stock.  I adhered the layers together with glue and added them to the shadow.  I stamped "your day" with Mowed Lawn Distress Oxide to coordinate with the rest of the card.

I had a few extra pieces and added those to the inside of the card for that special touch!

I think the handwritten plant tags add a personal touch!

I hope you've enjoyed my card and have found some inspiration today!  Thanks so very much for stopping by!

Tuesday, May 18, 2021

Altenew Classic Imagery Collection Release Blog Hop + Giveaway

Hello crafty friends!  Welcome to my stop of the blog hop celebrating Altenew's beautiful Classic Imagery Collection Release.

You should have arrived from the blog of the super talented Teresa Litchfield!  If you need to start at the beginning, you can hop back over to the Altenew Blog.

I've linked the full Classic Imagery Collection to this photo, but of course, all items are available individually and as a separate Embossing Folder Bundle or Stencil Bundle.  Click the photo to check it all out!


-----------------------------------------------------------------------

I had so much fun playing with the cool Illusion Twist Background Stencil for the first card I'm sharing!

First I placed the Illusion Twist Background Stencil over some 80# Neenah.  Then I inked through it using Mountain Mist, Volcano Lake and Lagoon Crisp Dye Inks (Sea Shore Mini Cube set).  Using a blending brush makes it really easy!  I trimmed it down to 4" x 5-¼" and added it to an A2 panel of Lagoon card stock.  Then I adhered the layers to a top-folding A2 card base.

For the sentiment I used the Simply Thank You die.  I die cut it five times.  On one of the die cuts I blended an ombré pattern of the same inks I used for the stencil.  I adhered all of the layers together with liquid glue.  Then I added some clear glitter pen and Glossy Accents over the top.  After it was dry, I adhered it to my card.  Such a fun, quick and easy card!

-----------------------------------------------------------------------

I am totally WOW'ed by the dimension of Altenew's 3D embossing folders!  When I saw the Daisy Bed 3D embossing folder, I just had to use it since daisies are some of my favorite flowers!

Before running the embossing folder through my die cutting machine with white card stock, I inked up one side of the embossing folder.  I smooshed Squeezed Lemonade Distress Oxide ink onto my silicone mat and used a brayer to apply the ink to the embossing folder.  Then I placed the card stock inside and used my machine to emboss it.  I repeated the steps once more to fill in a few places I missed.

I used a small blending brush to add a bit of Mowed Lawn Distress Oxide to the flower centers.  Next I added clear Wink of Stella to the flower's centers.  Then I used a green Copic marker to color in the few stems.  I trimmed the panel and matted it onto a black card panel and adhered it to my card base.

I love the font of the Handwritten Hello Die!  Also, how fabulous is it that there is a shadow die for it?!  I die cut the shadow three times from black card stock and adhered the layers together.  I topped it off with the white layer and added it to my card.

-----------------------------------------------------------------------

I LOVE Altenew's layering floral stencils and the Greenwood Flower Layering Stencil Set is another favorite!  For my next card I actually used two new stencils and one new 3D embossing folder and the top layer is actually all one layer.  Read on to see how I made this beauty!

First I used the Greenwood Flower Layering Stencil Set and created masks for the flowers and leaves.  This is easy to do.  I used a pencil to trace inside the first layer of the leaves and flowers stencil onto masking paper.  Then I fussy cut them out and will use them after the next step.

Next I inked up the gorgeous Greenwood Flowers Layering Stencil Set.  I used Shades of Purple inks, Chamomile, Sunray ink from the Golden Sunset set, and Forest Glades and Evergreen Crisp Dye inks from the Green Fields set.  The included layering guide makes inking up the layers so easy!  After I stenciled the yellow flower, I stuck the mask on top of it.  Then I inked up the purple flower, and then masked it.  The leaves got inked up next and also masked.

When all the elements had the masks on, I used the beautiful Fine Tulle Background Stencil and lightly inked some gray ink through it.  Then I added a shadow layer around the flowers and leaves with C3, C2, and C0 Copic markers.

I trimmed the panel down to 4" x 5-¼" and added it to a gray layer.  I popped this up onto a panel of white card stock that I embossed with the amazing Deck Planks 3D embossing folder!  I love the touch of texture peeking out!

Next I chose a sentiment from the Birthday Builder stamp set.  I heat embossed it onto a strip of gray card stock and popped it up onto the card front.

Now it time's to hop over to the awesome blog of Joylita Dsouza!

Giveaway Prizes

$300 in total prizes! To celebrate this release, Altenew is giving away a $50 gift certificate to 2 lucky winners and a $25 gift certificate to 8 winners! Please leave a comment on the Altenew Card Blog and/or each designer’s blog post on the blog hop list below by 05/24/2021 for a chance to win.  Altenew will draw 10 random winners from the comments left on each stop of this blog hop and announce the winners on the Altenew Winners Page on 05/26/2021.


Blog Hop Order

Altenew Blog

Nathalie DeSousa

Terri Koszler

Erum Tasneem

Jenny Colacicco

Emily Midgett

LauraJane

Norine Borys

Sandhya Iyer

Lilith Eeckels

Ardyth Percy-Robb

Michelle Short

Bridget Casey

Maryam Perez

Teresa Litchfield

Carol Hintermeier

Joylita Dsouza

Virginia Lu

Seeka

Nandini Karmarkar

Christine Pennington

Tricia Schaden

Helen Kalb

Wednesday, May 12, 2021

You Are Sweet As Honey | Honey Bee Stamps

 Hello my friends!  Today my card is featuring the new Honey Bee Stamps' Honey awesome Honey Jar Paper Piecing die set!  I also tried out Honey Bee's new No-line Coloring ink (and I love it) for my stamped images.  Read on for the details!

First I created my card base by die cutting three shades of teal card stock with the Hexagon Cover Plate dies.  (These are available as a set, or individually.)  I used Bee Creative glue to adhere them together and then I glued the stack to a light teal panel.  Next I glued this to a top-folding A2 card base.  I love how these dies easily create a stunning card base!

My next step was to die cut the Honey Jar Paper Piecing dies from 80# white Neenah Solar White card stock.  To make coloring them easier, I put the pieces back into the negative space and held them with some purple tape on the back.  For the jar and honey drips I used Copic markers in these colors:  Y19, Y18, Y15, and Y13.  I shaded the honey jar lid with C2, C0 and C00.

Next I stamped the flowers, leaves, and bees in the NEW Bee Creative No-Line Coloring ink by Honey Bee Stamps.  These are in the Chin Up Buttercup and the Busy Bees stamp sets.  I colored the leaves with YG67, YG17, and YG23.  I shaded the flowers with the "C" markers listed previously.  The bees are colored with the same yellows as the honey jar. Next I used a Micron .05 black pen to add the eyes and antenna to the bees.

When I finished my coloring I used the coordinating Busy Bees and Chin Up Buttercup dies to cut out the images.  I popped up the honey jar with foam tape and arranged the flowers around the jar.  I also popped up a couple of the bees.  To finish up I stamped the sentiment from the Just Bee-cause stamp set and die cut it with the coordinating die.

I really do like Honey Bee's no-line coloring ink!  What I really like is the particular shade of the ink and that I did not have to stamp it more than once in order to see it!  Definitely at the top of the list for me!

Thank you so much for stopping by!  I hope you are having a wonderful, and crafty, week!

Tuesday, May 11, 2021

Altenew 8"x11" Majestic Bouquet Stamp Set Release Blog Hop + Giveaway ($200 in Total Prizes)

 Welcome to the blog hop to celebrate Altenew's stunning Majestic Bouquet Stamp & Die Bundle!

You should have arrived here from the awesome blog of Verity Biddlecombe.  If you need to start over, you can hop over to the Altenew Card Blog!

My jaw literally dropped when I first saw this absolutely gorgeous stamp set!  You can purchase the Majestic Bouquet Stamp Set and Majestic Bouquet Die Set separately, however, I highly recommend the Majestic Bouquet Stamp & Die Bundle!

************************************************

I had lots of fun creating my card for today's hop!  Read on for the details.


First, I stamped the outline layer of one of the gorgeous Majestic Bouquet flowers with clear embossing ink onto 80# Neenah Solar White card stock.  Then I sprinkled on Altenew Rose Gold embossing powder and heat set it.  Then I followed the included layering guide to stamp the layering stamps with Mountain Mist, Lagoon, and Volcano Lake inks from the Sea Shore Crisp Dye ink cube set.  I repeated these steps for the two leaf clusters you see on the right.  I also stamped the solid layer of the little flowers with Mountain Mist ink.  I always use my MISTI for stamping--it was a game changer for me!


I had this idea to extend the stamping over onto strips of gradient cardstock.  I figured if it didn't work out, I could just use it as is with just the white card stock.  I used two colors from the Sea Shore Gradient Cardstock Set and cut the Volcano Lake paper into a ½" strip.  I cut the Mountain Mist paper into a ¾" strip.  Then I added ½" double-sided adhesive to the back to hold the two strips together.  (I left the adhesive's backer sheet on for now.)

Next I lined up the strip on the left of the panel that I had previously stamped and embossed.  I lined up the outline stamp over the first stamping and overlapping onto the colored card stock.  I picked the stamp up with the MISTI door, removed the white card panel, stamped and heat embossed the Rose Gold embossing powder.  I repeated the stamp layers and colors as I described above.  I did double stamp most of the colors to make them stand out more.  When I finished my stamping I adhered the strips to my card front.


To finish up, I selected a sentiment from the Majestic Bouquet stamp set, stamped it in clear ink, and heat embossed Rose Gold embossing powder.  I love how this turned out and hope I've given you some inspiration for your card making!  Thanks so much for hopping by!

Your next stop is the blog of Erin Thompson!

Here are the details for the Giveaway Prizes:

$200 in total prizes! To celebrate this release, Altenew is giving away a $50 gift certificate to 2 lucky winners and a $20 gift certificate to 5 winners! Please leave a comment on the Altenew Card Blog and/or each designer’s blog post on the blog hop list below by 5/16/2021 for a chance to win. Altenew will draw 7 random winners from the comments left on each stop of this blog hop and announce the winners on the Altenew Winners Page on 5/19/2021.

Blog Hop Order:

Altenew Card Blog

Jaycee Gaspar 

LauraJane

Erum Tasneem 

Michelle Short

Tenia Nelson

Jenny Colacicco

Norine Borys 

Anna Mahtani

Agnieszka Małyszek

Victoria Calvin

Linda Westfall

Emily Midgett 

Sandhya Iyer

Laurie Willison

Preeti Chandran

Seeka

Mindy Eggen

Verity Biddlecombe

Carol Hintermeier << that's me!

Erin Thompson

Helen Kalb

Joylita Dsouza

Keren Baker

Teresa Litchfield

Bridget Casey

Kelly Griglione

Nandini Karmarkar

Terri Koszler

Karen Brown

Daisy Birthday Card & Embossing on Acetate | Rubbernecker Stamps

Hello my friends!  This month we are featuring Rubbernecker Stamps amazing collection of background stamps!  I wanted to do something a bit different that I've never tried before!  Heat embossing the background onto acetate!

To begin, I created my card base.

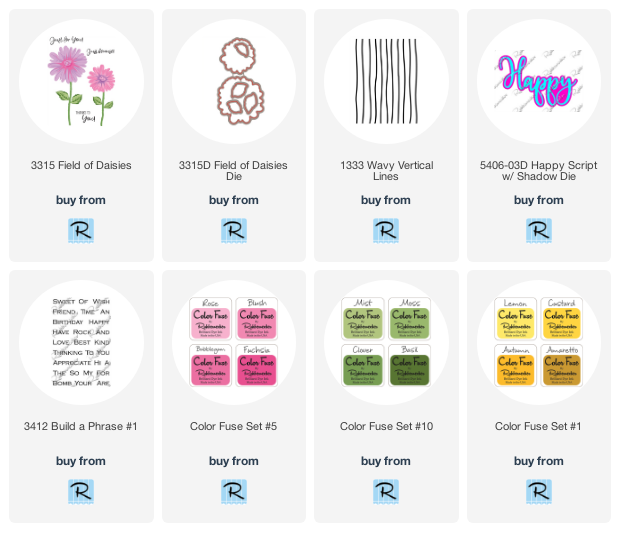
  • Use a foam blending tool to blend Rose, Bubblegum and Fuchsia inks (from Color Fuse set #5) in an ombré pattern on an A2 white card panel.
  • Important: you must use heat resistant acetate for this next step!  A web search will show you a few different brands to try.
  • Cut a piece of heat resistant acetate to 4-¼" x 6".  Also very important:  pat on an anti-static bag all over the acetate.
  • Then stamp the Wavy Vertical Lines background stamp onto the acetate with Versamark ink.
  • Turn on your heat tool now to allow it to thoroughly warm up.
  • Sprinkle on your embossing powder and then heat set.  Don't stay in any one area very long--keep the heat tool moving.  While the acetate is heat resistant, it is not heat proof, and can warp if you aren't careful.  I had just a few tiny ripples in the acetate when I was done, which don't distract from the card at all.
  • Next I used my score board to score a line in the acetate at ½".  See the photo below.  I used a ball stylus as the usual scoring tool didn't work as well.  Fold the acetate at the score line and press it down with a bone folder to sharpen the crease.
  • Then add some very strong double-sided adhesive, such as Scor-Tape, to the back top edge of the ombré inked panel.
  • Place the ombré inked panel onto the back of the acetate piece and fold the acetate flap to the back of it.  (see photo)  Now adhere this piece to a top-folding A2 card base.

The card front elements:

  • Stamp the first layer of the flowers from the Field of Daisies set with Rose ink.
  • Stamp the second and third layers of the flowers with Bubblegum and Fuchsia inks.
  • Stamp the flowers' centers with Lemon ink.
  • Die cut with the coordinating dies.
  • Stamp the leaves with Mist ink for the first layer, then with Clover for the second layer.  These are in Color Fuse Set #10.
  • Die cut the leaves with the coordinating dies.

  • Ink up a scrap of white card stock with Bubblegum ink.  Die cut the top layer of the Happy Script w/Shadow die from the pink card and three more times from white card stock.
  • Adhere all of the layers together with liquid glue.  This gives lots of dimension!
  • Die cut the Happy shadow from the Happy Script die set from white card stock.
  • Adhere the stacked layer to the Happy shadow and add foam tape pieces just under the "p" and "y".
  • Stamp "birthday" from the Build a Phrase #1 stamp set in black ink.  Trim it into a rectangle shape.
  • Adhere two flowers to the card front with foam tape.  Adhere the remaining flowers and the leaves with liquid glue.
  • Next add foam tape to the Happy sentiment.  I just added the tape to the right side of the sentiment and liquid glue to the back left end and adhered it to the card front.
  • Adhere the "birthday" sentiment with liquid glue and a small piece of foam tape.
  • As you can see from the next photo I added more double-sided adhesive to the back of the acetate, behind the flowers and sentiment.  This will hold the acetate in place and helps to minimize the tiny bit of warping from the heat.


After I had the card all assembled, I felt like the "happy" sentiment was getting lost with the other pink.  So I took a RV06 Copic marker and carefully colored over the Bubblegum ink.  Much better!


I absolutely love how this turned out and hope I've given you some inspiration today!  Thank you so much for stopping by!