Showing posts with label Nested Oval Small Stitch die. Show all posts

Tuesday, October 24, 2023

Leaf Trio Die Autumn Thank You Card

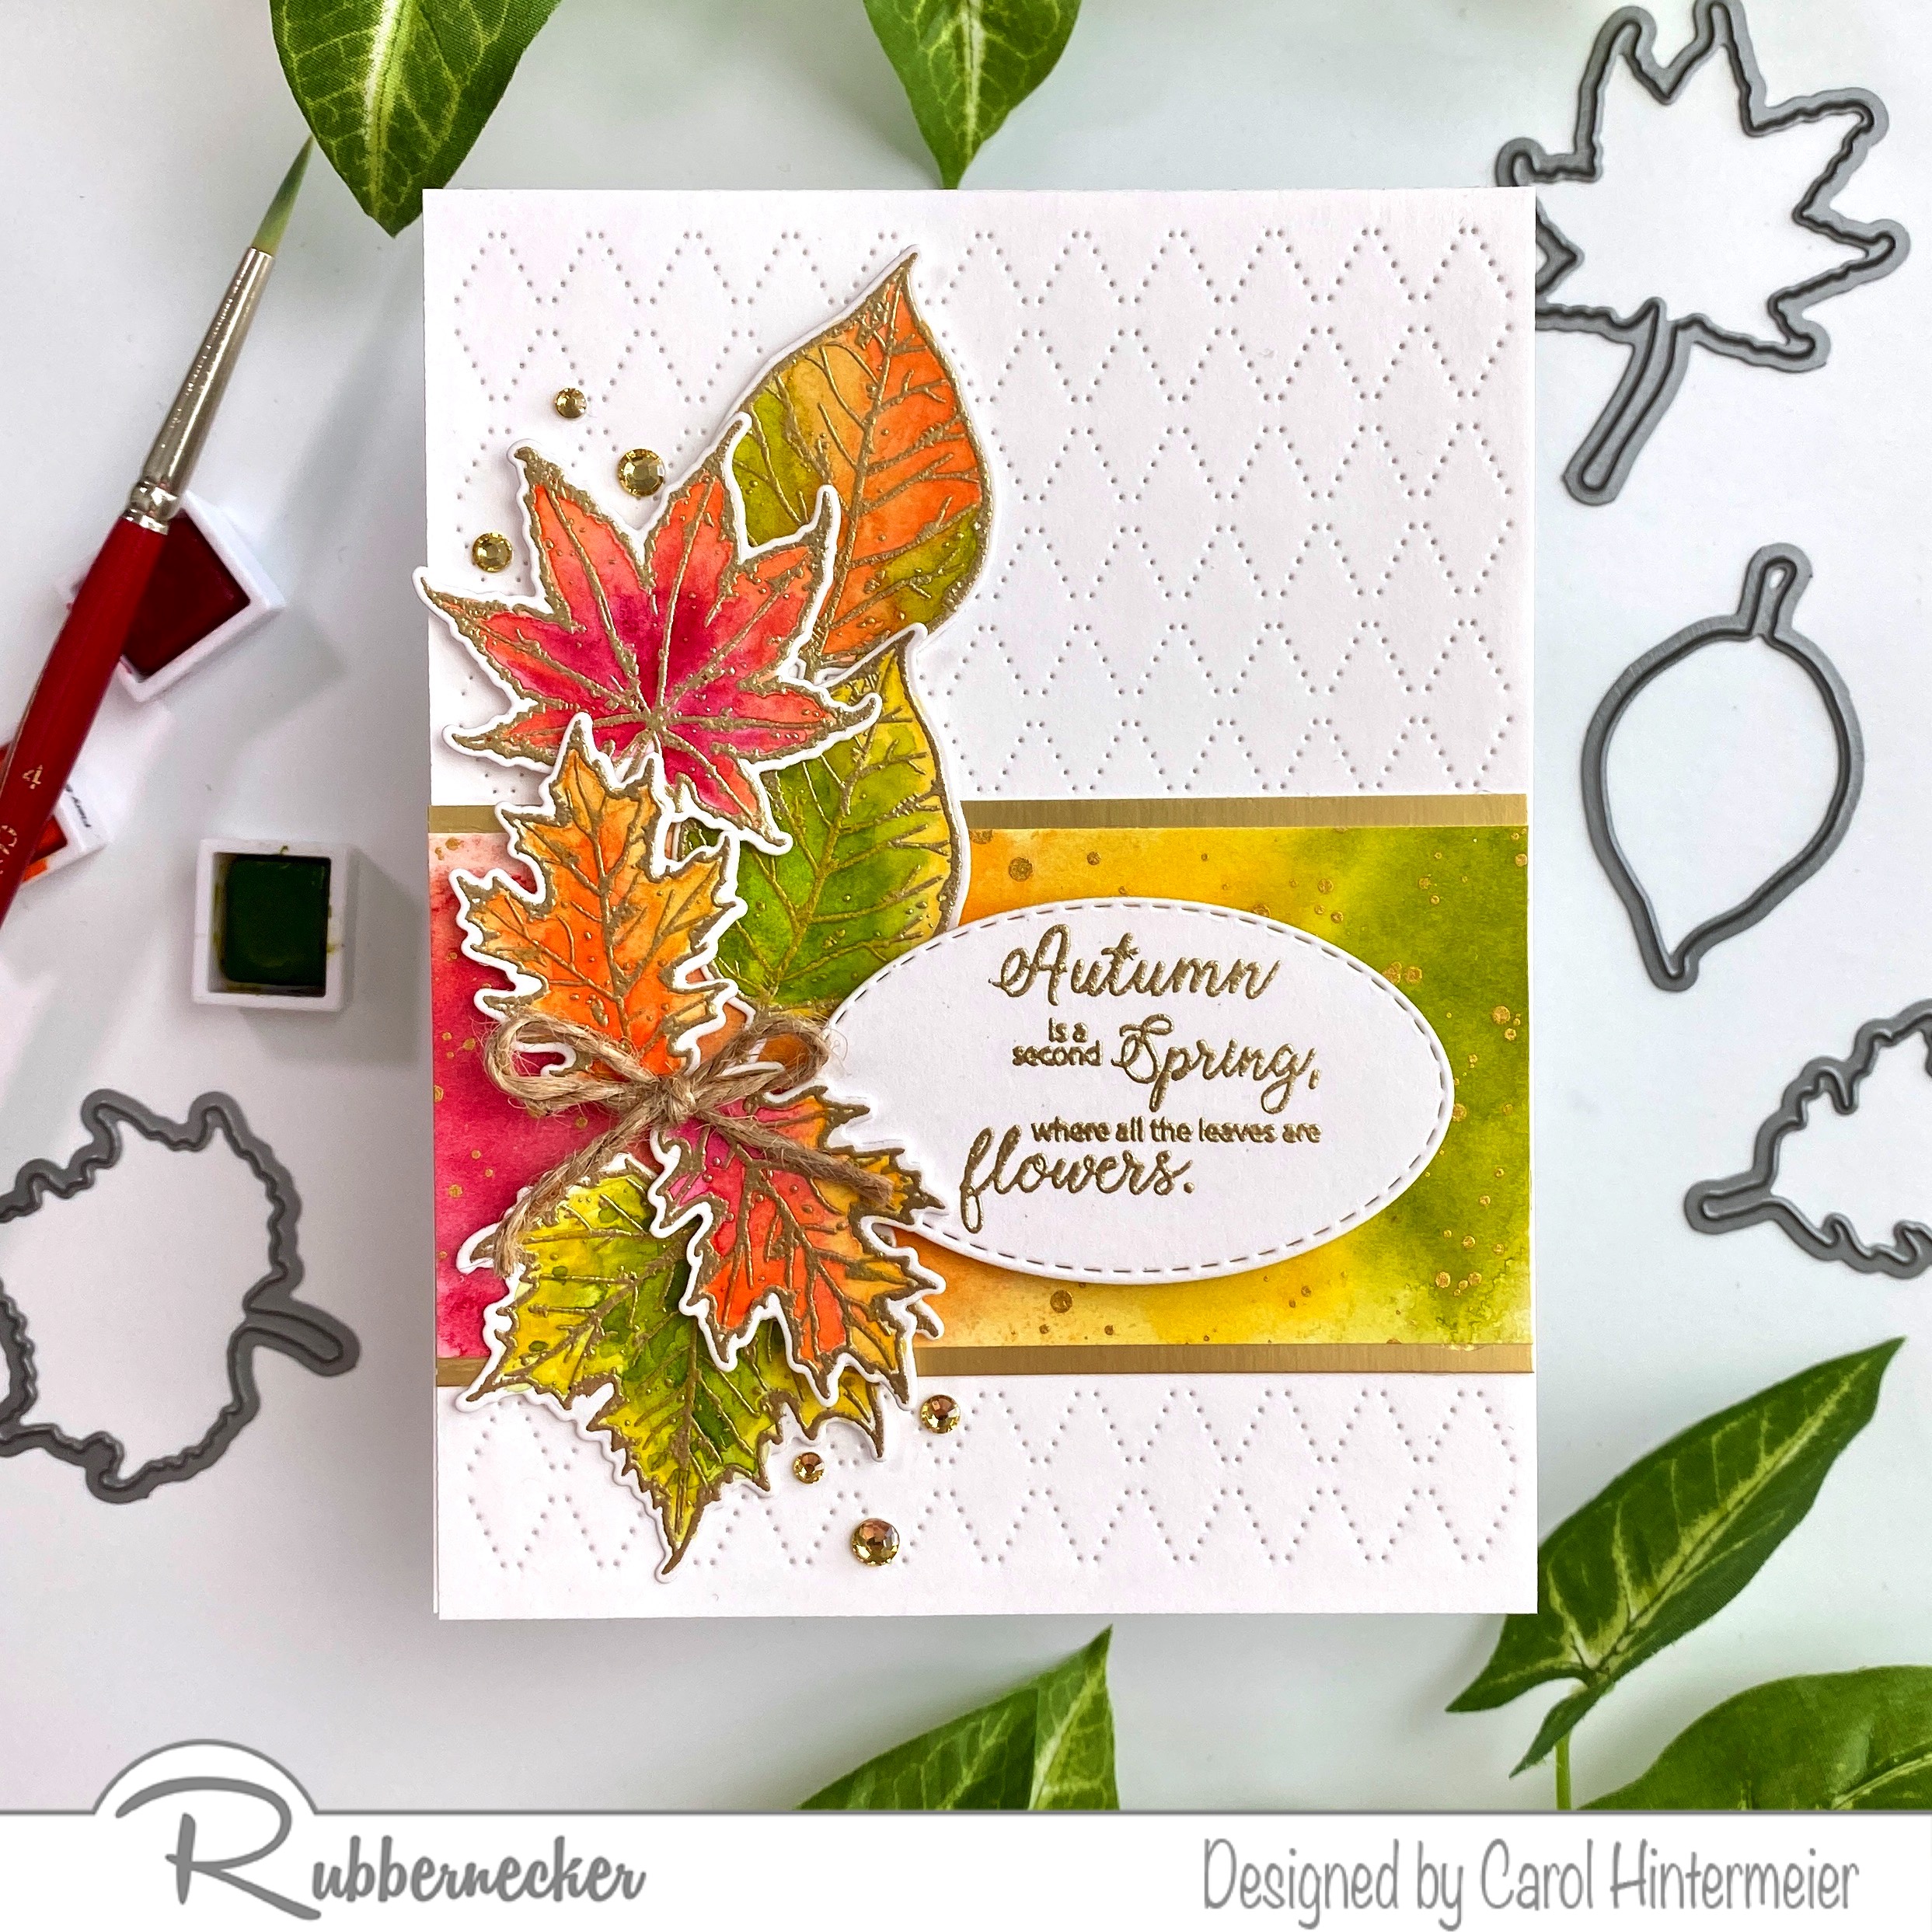
Hello crafty friends!  Today I'm sharing a gorgeous autumn Thank You card!  My collaged background features Rubbernecker Stamps beautiful Leaf Trio Die along with some other elements from their shop.

I used a large piece of Strathmore Bristol Smooth cardstock and ink blended several autumn colored dye inks in a random pattern until the piece was covered.  Then I die cut the Leaf Trio Dies from the inked cardstock several times until I had die cut the entire panel.

Then I die cut three pieces of white cardstock with the Window w/Reverse Scallop die.  I glued the layers together and set it aside to dry.

Next I trimmed a piece of striped cardstock from the Harvest Time paper pad to 3-¾" x 5".  I arranged all of the die cut leaves onto the paper and adhered them with glue.  I let some overhang the edge and trimmed off the excess to use to fill in empty spots along the edge.

I die cut and adhered three of the top layer of the Thanks Word w/Shadow die.  The shadow is orange cardstock from the Harvest Time paper pad.  I used the same orange cardstock as a base layer for the collage piece.

I arranged five of the remaining leaves around the sentiment adding a double bow made with twine.

I always like a bit of sparkle so I added some pretty coordinating gem stickers near the sentiment.

Thank you so much for stopping by!  I hope you have a wonderful day!


 Thank you so much for using my affiliate links to shop (never any additional cost to you)!

Tuesday, August 30, 2022

Autumn is a Second Spring - Loose Watercoloring and Gold Heat Embossing

 Hello crafty friends!  I don't know how we are already at the end of August, but I'm happy it is because I'm so over these hot temperatures!  LOL!  Today I'm sharing a card I made, while thinking of cooler weather to come, with Rubbernecker Stamps beautiful Splatter Leaves set.   I did some loose watercolors for this card and have the details below!

First I stamped my leaves from the Splatter Leaves set onto Strathmore Bristol Smooth cardstock with Versamark, added gold embossing powder, and then heat set them.  While I had the supplies out, I went ahead and stamped the sentiment from the set and heat embossed it too.

Then I used some Artist Watercolors in some warm colors to color the leaves.  (The set I used is linked below. I used Red Cosmos, Fiery Sunset, Fall Harvest and Tropical Green watercolors.)  First I used a brush and water to dampen the paper and then dropped in my colors and let them alone to blend.  I let them dry and then added another layer of color.  While that was drying I took another piece of Bristol and added random water puddles and dropped in the same colors.


When the strip of color was dry, I trimmed it to 2" x 4-¼" and adhered it to a gold card stock layer measuring 2-¼" x 4-¼".  I glued this to white cardstock that I die cut with the Diamond Pierced Cover die.  I added this to an A2 card base.

Then I used the coordinating Splatter Leaves dies to cut out the leaves.  I arranged them and then adhered a few with foam tape and the others with glue.

Next I die cut the sentiment with the third smallest Nested Oval Small Stitch die.  I popped it up onto the card with foam tape.  I embellished the card with a twine bow (attached with a small Glue Dot) and a few gem stickers.

I love the gold embossing with the Autumn colors!  This was really fun to make and I hope you've enjoyed it.  Thank you so much for stopping by!


Tuesday, December 14, 2021

Christmas Gnomes | Rubbernecker Stamps

 Hello crafty friends!  Today I'm sharing an adorable Christmas card featuring Rubbernecker Stamps Christmas Gnomes set.  I've also stenciled the plaid background panel with one of their new two-part stencil sets!  Read on for the details.

Here are the steps for my card base and panel:

  • First I die cut 80# Neenah card stock with the largest Nested Rectangle Small Stitch die.
  • Next I sprayed the back of the Plaid Texture Stencils with Pixie Spray.
  • Using an ink blender brush and the base layer Plaid stencil, add Crimson Color Fuse ink through the stencil.  Remove the stencil.
  • Position the second layer of the Plaid stencil over the card and add more Crimson ink through the stencil.
  • Next, die cut an oval in the plaid panel with the fourth largest Nested Oval Small Stitch die.
  • To create the frame for the oval, center the fifth largest Nested Oval Small Stitch die in the the nest largest size oval die and tape the two dies together with some temporary tape.  Die cut some white glitter card stock with the ovals.
  • Adhere the plaid panel onto a top-folding A2 card base with liquid glue.
  • Adhere the frame around the opening with glue.

Creating the image and scene:

  • Stamp the gnome from the Christmas Gnomes set onto 80# Neenah card stock.  Die cut the Neenah card stock with the fourth largest Nested Oval Small Stitch die.
  • Also, stamp the image onto some masking paper and then fussy cut it out.
  • Stamp the sign for the gnome onto 80# Neenah and fussy cut it out.
  • Next color the images with Copic markers.  (My marker colors are listed below.)
  • Stamp "Merry Christmas" from the Christmas Gnomes set onto the sign with Versafine Onyx black ink.  Add clear embossing powder and heat set it.
  • Now apply the mask to the gnome and and use an ink blending brush to lightly add some Arctic Color Fuse ink to the top 2/3rds of the image for the sky.
  • Place the stamped oval in your MISTI (or other stamp positioning tool).
  • Stamp a few trees from the Pine Tree Set with Shadow Creek and Mountain Pine Color Fuse inks.
  • Use Copic markers to draw in a few shadow and hills for the snow.  (I used BV0000, BV000, C2, C0, and C00.)
  • Remove the mask for the fun reveal!

Finish the card by adhering the gnome image into the die cut opening on the card front with glue.  Then add a few small foam squares to the back of the sign to pop it up on the gnome.

It was really fun using the stencils and creating my little scene for the adorable gnome!  Thank you so much for stopping by!

Copic colors:

R89, R39, R37, R35; E59, E57, E23, E34; G28, YG17, YG25; E11, E21, E51, E50; BV0000, BV000, C2, C0, C00; W5, W3, W1

Products I've used to create my card:

Tuesday, January 26, 2021

A Hug In a Mug! | Rubbernecker Stamps

 Hello my friends!  Today I have a cozy coffee card using Rubbernecker Stamps' beautiful Coffee Set!  I created my own background using the smaller images in this set.  Keep reading for all the fun details!


I stamped the coffee cups and coffee pot in black ink randomly over a piece of 80# Neenah card stock.  I used the "coffee" sentiment to fill in a few empty spots.  I also made sure to let the images fall off the edge for more interest.

To make the background images really pop off the page, I used some gray Copic markers to add shadows around them.  I used C5, C3, C1, C00.  I used C0 to blend out the edge of C00.  You can really see the difference in these next two photos!  (Click the photos to see up close.)

Next I die cut the panel with the largest Nested Rectangle die and adhered it to a layer of blue card stock.  Then I adhered the layers to a top-folding A2 card base.


I stamped the gal in Copic safe ink and colored her with my markers.  I die cut her out with the coordinating die and adhere her to a vellum oval that was die cut using a Nested Oval Small Stitch die.
Next I added foam square to the back, keeping the behind the gal so they won't show, and adhered it to the card front.

I stamped the sentiment and die cut it with the smallest Nested Oval Small Stitch die.  This is adhered to a blue card stock layer that I cut with a Nested Oval Scallop die.  I popped it up with foam squares.  For just a touch of bling, I added a few blue crystal gem stickers.


I had so much fun making this card, especially the background!  I hope I've given you some inspiration for your next card.  Thanks so much for stopping by!