Thursday, August 22, 2019

Hey Pumpkin! | New Flip Card by Art Impressions

Hello friends!  Today kicks off Week 2 of Art Impressions Gotta Gingham! challenge.  My card today features the newly released Pumpkin Mice Flip Card set.


These cards are fun and easy to make.  The measurements and directions are on the back of the Flip Card Die packaging.  I decided to create a fun nighttime, glowing-pumpkin scene.  Since this is the first time I've done a scene like this, I worked on the background first.  I used my Copics to color it as well as the other images.  I've listed the markers I used below.


When you flip the card open, you see the back of the mice in the pumpkins!  So cute!  Both sentiments are included in the set.


I trimmed some deep blue paper (it's not as dark as it looks in the photos) to fit on the card card front and layered gingham paper on top.  In order to help the image on the front stand out better, I used a frame die to cut three frames.  I glued them together for some dimension and adhered it to my colored panel.  I used a  white gel pen and a clear sparkle pen to add stars to the night sky.  I also added sparkle to the pumpkins and the mice's hats.


We hope you will enter the Gotta Gingham! Challenge at Art Impressions.  Find all the details HERE.  Thank you so much for stopping by!


Copic markers:
B97, B99, E19, E44, E47, E70, E71, E74, E77,
N0, N2, N4, N5, N6, R20, V12, V15, V17,
YG01, YG05, YG09, YG17, YG67, YG99, G99,
711, Y13, Y15, YR12, YR14, YR18

Supplies:
Neenah Solar White 80# cardstock

Monday, August 19, 2019

Hello Sunshine!, Art Impressions

Happy Monday friends!  I'm on the Art Impressions blog today with a card using the fun Produce Stand MTF (mini TryFold) set.  It is definitely summer here in Texas with the temperatures over 100ยบ!!  Who is ready for fall?!!  I've only used these stamps once before--it was last summer!--so I thought I'd pull it out and make this cute notecard to send to a friend.


As with all of Art Impressions' TryFold cards, the instructions for the card size, scoring, and where to place the stamps are on the back of the packaging.  Makes it so easy!  I stamped everything using my new favorite Copic-safe ink: Ink on 3 Blackout Detail ink.  This ink stamps the lines a nice and crisp black and is quick to dry.  I haven't had any smudging at all with my markers!  

I colored the images with my Copic markers (listed below--I was shocked at how many I used! LOL!).  I used a black Micron 005 pen to draw some lines on the front of the produce stand.  And also, to create a frame on the final image, in the photo below.  


If you use alcohol markers, you know that they will bleed through to the back of your cardstock.  To hide that, I used some gingham paper on the two inside panels.


To finish up, I stamped the greeting included with the stamp set on the inside panel using Versafine Onyx black ink.  (I need to do a comparison of that and the Ink on 3!)  I used a sentiment from the Art Impressions Sentiment Set 2 and stamped it on the card front.  I thought it fit perfectly with the one on the inside.  


Thank you, as always, for stopping by and taking a look.  Have a wonderful, and crafty, week!


Copic markers:
B21, B23, BG0000, BG000, C0, C1, C3, C5, 
E31, E33, E37, E53, E55, E57, E70, E71, E74, E77,
N0, N2, N4, N6, N8, 
R14, R17, R21, R22, R24, R27, R35, R37, R39, 
Y02, Y13, Y15, Y17, Y19, YG0000, YGG01, YG11, YG13,
YG17, YG21, YG23, YG25, YG61,
YG61, YG53, YG67, YR01, YR02, YR07, YR65, YR27

Supplies:
Micron 005 black pen

Monday, August 12, 2019

Never Too Old!, Art Impressions

Happy Monday friends!  For my post on the Art Impressions blog today I've used the so fun Never Too Old Laugh Lines set.


I stamped this gal in Copic safe ink onto a piece of 3-¾" x 5" white cardstock and then colored her with the Copic markers listed below.  I also stamped her onto some masking paper and fussy cut it out.  I used a brick stencil and a mask for the grass to create the background.  I have more details with photos on the Art Impressions blog, if you'd like to check it out.

I stamped the sentiment in Versafine Onyx Black ink and used a die from the Tag Stitched Die set to cut it out.  To get the rectangle shape instead of a tag shape, after I cut it the first time, I flipped the paper around so the triangle shape was below the bottom of the tag cut line.   I used a few foam squares to pop it up.


I decided that she needed flowers and presents for her birthday, so I used two of the Holiday Mansion accessory sets along with the included dies to add these.  The presents are from the HM Birthday Set and the flowers from the HM Garden Set.  These are also popped up with foam squares.  I used a clear sparkle pen on these and the balloon which also has some Diamond Glaze added to it.  Her earring and hat pompom has some Nuvo Glitter Drops on them.


I know I say this every time, but it's so true that I appreciate you for stopping by my blog to take a look at my cards!  Have a wonderful week!


Copic markers:
BG13, BG15, BG32, BV20, C00, C1,  E23, E50, E51, R53, E93,
N0, N2, N4, RV14, Y11, Y13, Y15, Y19, YG23, YG25 

Supplies:

Thursday, August 8, 2019

Coffee With You, Art Impressions

Hello friends!  It's week two of the Coffee Card Challenge over at Art Impressions.  My card today uses the Coffee BFFs set, and I made a scene!!!  


I stamped the girls in Copic safe ink and colored them with the markers listed below.  I also stamped the bottom portion of the image onto some masking paper and fussy cut just the leg portion of the chairs out.  I added it to the stamped image and then stamped the floor (all products listed below) in the same ink.  I extended the lines of the floor with a Memento marker.  


Here are a couple photos of the bead board wall I drew in with a pencil and ruler.  (You can also spy the mysterious smudge in the upper left!  Have NO idea how that happened!)  After I drew the pencil lines, I used a couple gray markers to add some shading.  I did this before I drew in the permanent lines because I wanted to use the finer tip of a Micron 005 pen and didn't know if it's Copic safe or not.  Then I used two blue markers to color in the rest of the wall.


To cover the smudge, I stamped the sentiment on some scrap paper and used a ruler and pencil to draw a frame around it.  Once I was satisfied, I went over the pencil lines with the Micron pen, fussy cut it out, and adhered it with glue.  I added the finished panel (cut to 3-¾" x 5") onto a gray layer, and then added that to a top-fold A2 card base.


We hope you will join in the Coffee Card challenge over on the Art Impressions blog.  Thank you so much for stopping by!


Copic markers:
Hair: E25, E29, E35, E51 AND E31, E33, E37
Skin: BV20, E0000, E50, E51, E53, E93
T-shirts: W00, W1, W3
Chairs: E23, E57, E59
Pants: B93, B95, B97 AND YG61, YG63, G94
Jackets: R14, R22, R32 AND E42, E43, E84
Coffee cups: C1, C00
Floor:  C5, C3, C1, C00
Wall: B000, B0000
Frame: E23, E25, E29

Supplies:
Memento Dual Marker
Micron 005 black

Cottage Window Scene, Honey Bee Stamps

Hello!  It's my turn over on the Honey Bee Stamps blog today.I had so much fun last week with Honey Bee's 6x6 paper pads that I made another card that uses at least one sheet from each of the four pads!

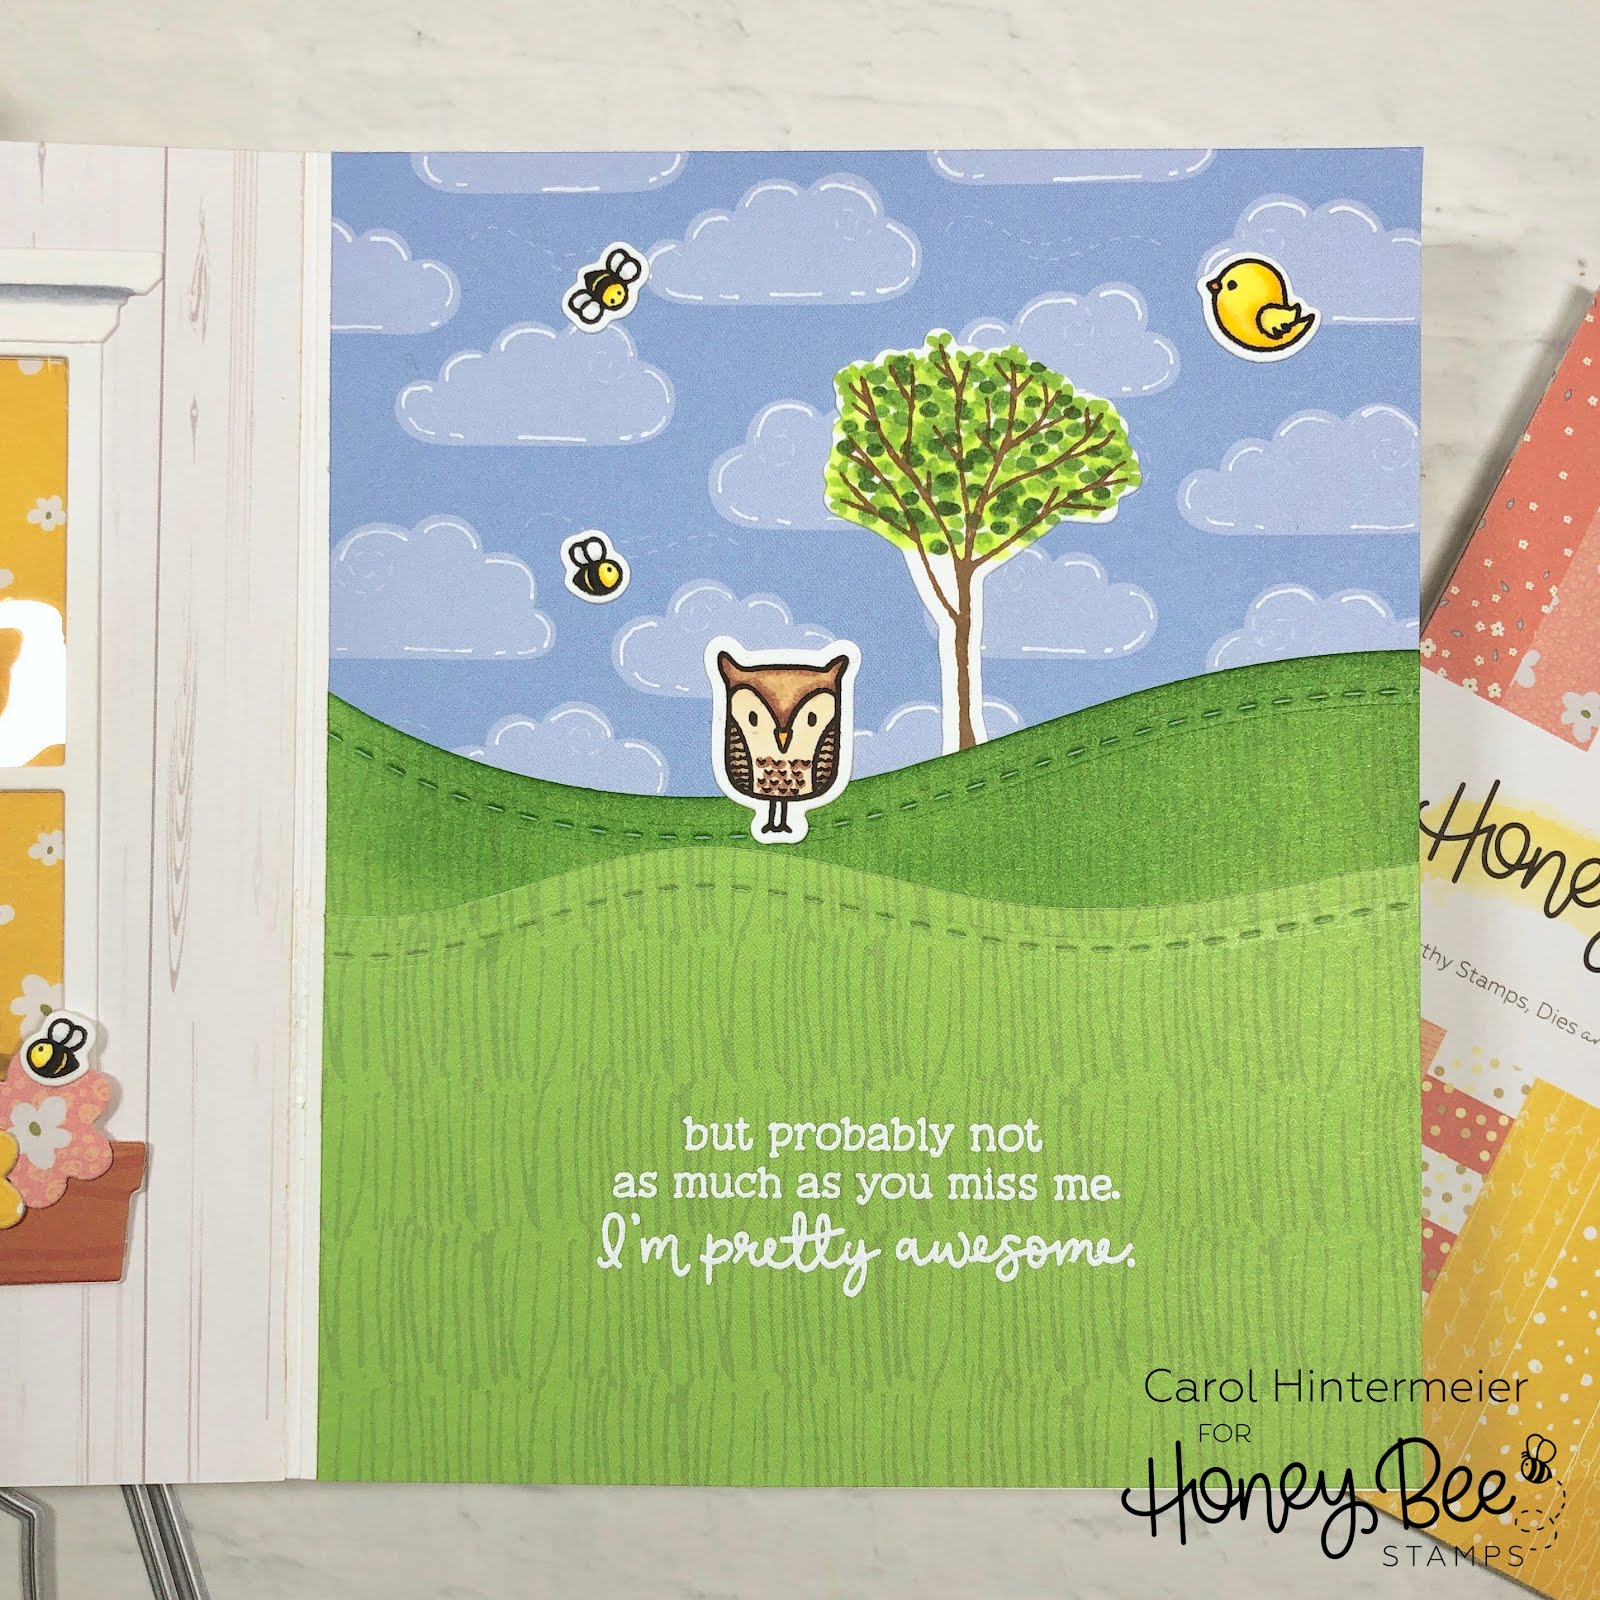
For this card, I used the Cottage Window Honey Cuts and left off the shutters and created a "looking from the inside out" window.  This cute little bunny is looking out the window at his owl friend leaving and missing him already!  That's my story!  Haha!


The patterned papers on the card front are from the Spring Fling pad.   I liked these two florals for the "wallpaper" and the curtains.   To have the curtains double sided, I die cut four of each; and since they are symmetrical, I could adhere them back to back. I stamped and Copic colored the bunny, owl, and tree that are from the Silent Night stamp set (yes, a Christmas set can also work anytime!)  The sentiment is from the Missing You stamp set, and I layered the sentiment onto a leftover strip of yellow paper.


Here is a look at the scene inside.  I layered a piece of acetate between the two window pieces and used a wood-look patterned paper from The Bee's Knees pad for the outside around the window.  I die cut the hills with the Hill Borders Honey Cuts from paper in the Over The Rainbow pad.  I lightly inked the hill in the back for some dimension.  The cloud paper is from Over The Rainbow.  I used a white gel pen to add some accent lines on the clouds.


Here you can see the cute little bunny's nose peeking through the window.  I mirror stamped him and just colored that tip that was showing.  For the flower box I used the Bunch of Bouquets Honey Cuts. I used three of the flower dies a die cut some of the flowers on a piece of paper from the Spring Fling pad.  The window box paper is from the Great Outdoors pad.


I just love this sentiment that's also from the Missing You set.  That surely would make anyone smile!  I stamped it in Versamark and heat embossed it with white embossing powder.  I didn't really plan on what size to make this card--somehow it turned out to be 6" x 5"!


Here are a couple different views of my card.


The two bees and the bird are from the Birds and The Bees stamps and Honey Cuts.


I totally love how this card turned out!  I hope you do too!  Thank you so very much for stopping by! Have a wonderful, crafty rest of your week!  Carol :)

Supplies:
Honey Bee Stamps products:
Other supplies:

Monday, August 5, 2019

Gazebo TryFold, Art Impressions

Happy Monday friends!  Guess what?  There is the 2019 Mega Sponsor Fall Blog Hop beginning today on the Art Impressions blog and my usual Monday blog post there is the featured project!  AND, there will be prizes, so be sure to go HERE for all the details and to begin the hop and leave comments THERE for your chance!

My card today uses the beautiful Gazebo TryFold set.  The images in this set are so pretty and just as timeless as when the set was first released!


This is so easy to create!  All the directions you need are on the back of the packaging.  The images were stamped onto Bristol Smooth cardstock with Versafine Onyx Black ink since I was planning on using my Zig watercolor markers. (If you aren't watercoloring, the pre-folded cards from the TryFold Cardstock & Envelope pack make this even easier!)  I've listed all my Zig colorns below.  Since there aren't a lot of instructions for me to give you, I have LOTS of photos!! 

I decided to use the beautiful Butterfly Clasp die on this to hold it closed for mailing. 


This is the view when the left panel is opened.


The right side is open, revealing the final image and sweet sentiment.


Here's a final look at the card after removing it from the envelope.


Don't forget to get on over to the Art Impressions blog to join in the hop!  As always, I do appreciate you stopping by for a look!  Have a great week!


Watercolor markers:
Zigs: Pale Green, Light Green, May Green, Pink, Scarlet, Yellow,
Bright Yellow, Shadow Mauve, Violet, Pale Violet, Lilac, Fog Gray,
Gray, Light Gray, Mid Brown, Blender
 Tombow #565 & #977; Marvy Olive Green

Supplies:
Strathmore Bristol Smooth cardstock
Memento Tuxedo Black ink
Connoisseur #4 round brush
Grumbacher #2 round brush
Spectrum Noir Clear Sparkle Pen

Saturday, August 3, 2019

AECP, Polychromatic Class

Hi!  I've finished another Altenew Academy class for my AECP (Altenew Educator Certification Program) Level 2 requirements.  Well, I have had this absolutely beautiful Build-A-Flower: Hibiscus set since April 2018 and have never used it!!!!  Shame on me!  LOL!


The Altenew Academy Polychromatic class is about different ways to use color.  There are six lessons full of great ideas.  My card today uses the idea of having your colored images really pop by having a bright white background.  I feel confident I've achieved that!!  Another lesson is about using colors within, or close to, the same family and my hues of orange do that.

I used my MISTI to stamp all the images.  For the flower I stamped the solid base layer first in Altenew's Sunday ink.  I continued with the subsequent layers in Chamomile, Snapdragon, Marigold, Vineyard Berry, and Heartbeat for the last small layer.  Even though the Vineyard Berry and Heartbeat inks are in a different ink cube set, I was happy to find that they were fabulous with the yellow colors!  I always stamp extra, mainly because I'm bound to mess up one, and then I just call that one my "practice" flower to test layering and colors on.  The leaf has four layers and the green inks I wanted to use just have the three cubes: Limeade, Lime and Fresh Leaf.  So I just used the Fresh Leaf for the final dark layer and stamped it about four times.  You can see from the photo below that it really stands out right after I stamped, but once they are dry, it blends very well.


Once everything was stamped and die cut, I arranged them on the front of an A2 top-folding card base.  I wanted to plan out where to place the sentiment from the Birthday Builder set.


Once I had everything in place I used some Press-N-Seal to pick up my arrangement.  Then I stamped the sentiment with some Versafine Onyx Black ink.  I flipped the Press-N-Seal with the images over so I could put glue on all the leaves.  Then, flip it back over and press it in place.  I wait a minute before removed the Press-N-Seal with the flowers so the glue on the leaves will be dry.  I popped up the two large flowers with foam squares.  The buds have a couple thin foam squares at the top are glued down at the stem end.  


I added just a few clear droplets in order to add a bit of shine while keeping the white background.


I haven't used layering stamps in quite a while it seems, and I totally LOVE this Hibiscus! I sure won't wait as long to use this one again!   This class is full of inspiration for your stamps and I highly recommend it!  Thank you for stopping by!  Carol :)

(P.S.: I saw Cindy's  beautiful butterfly card over on a Flickr challenge and found out about a challenge called a2z Scrapbooking with the prompt of "birthday".  So I'm entering this card.)

Supplies:
Altenew Inks: