Showing posts with label beach scene. Show all posts

Wednesday, August 14, 2024

Sending Warmest Wishes (And Dreaming of the Beach)

Hello crafty friends! With schools beginning and summer vacations taken, I thought how nice it would be to have one last trip to the beach! I'm dreaming of going to the beach with this Honey Bee Stamps Lovely Layers: At The Beach dies as the star of this card. Check out these details!
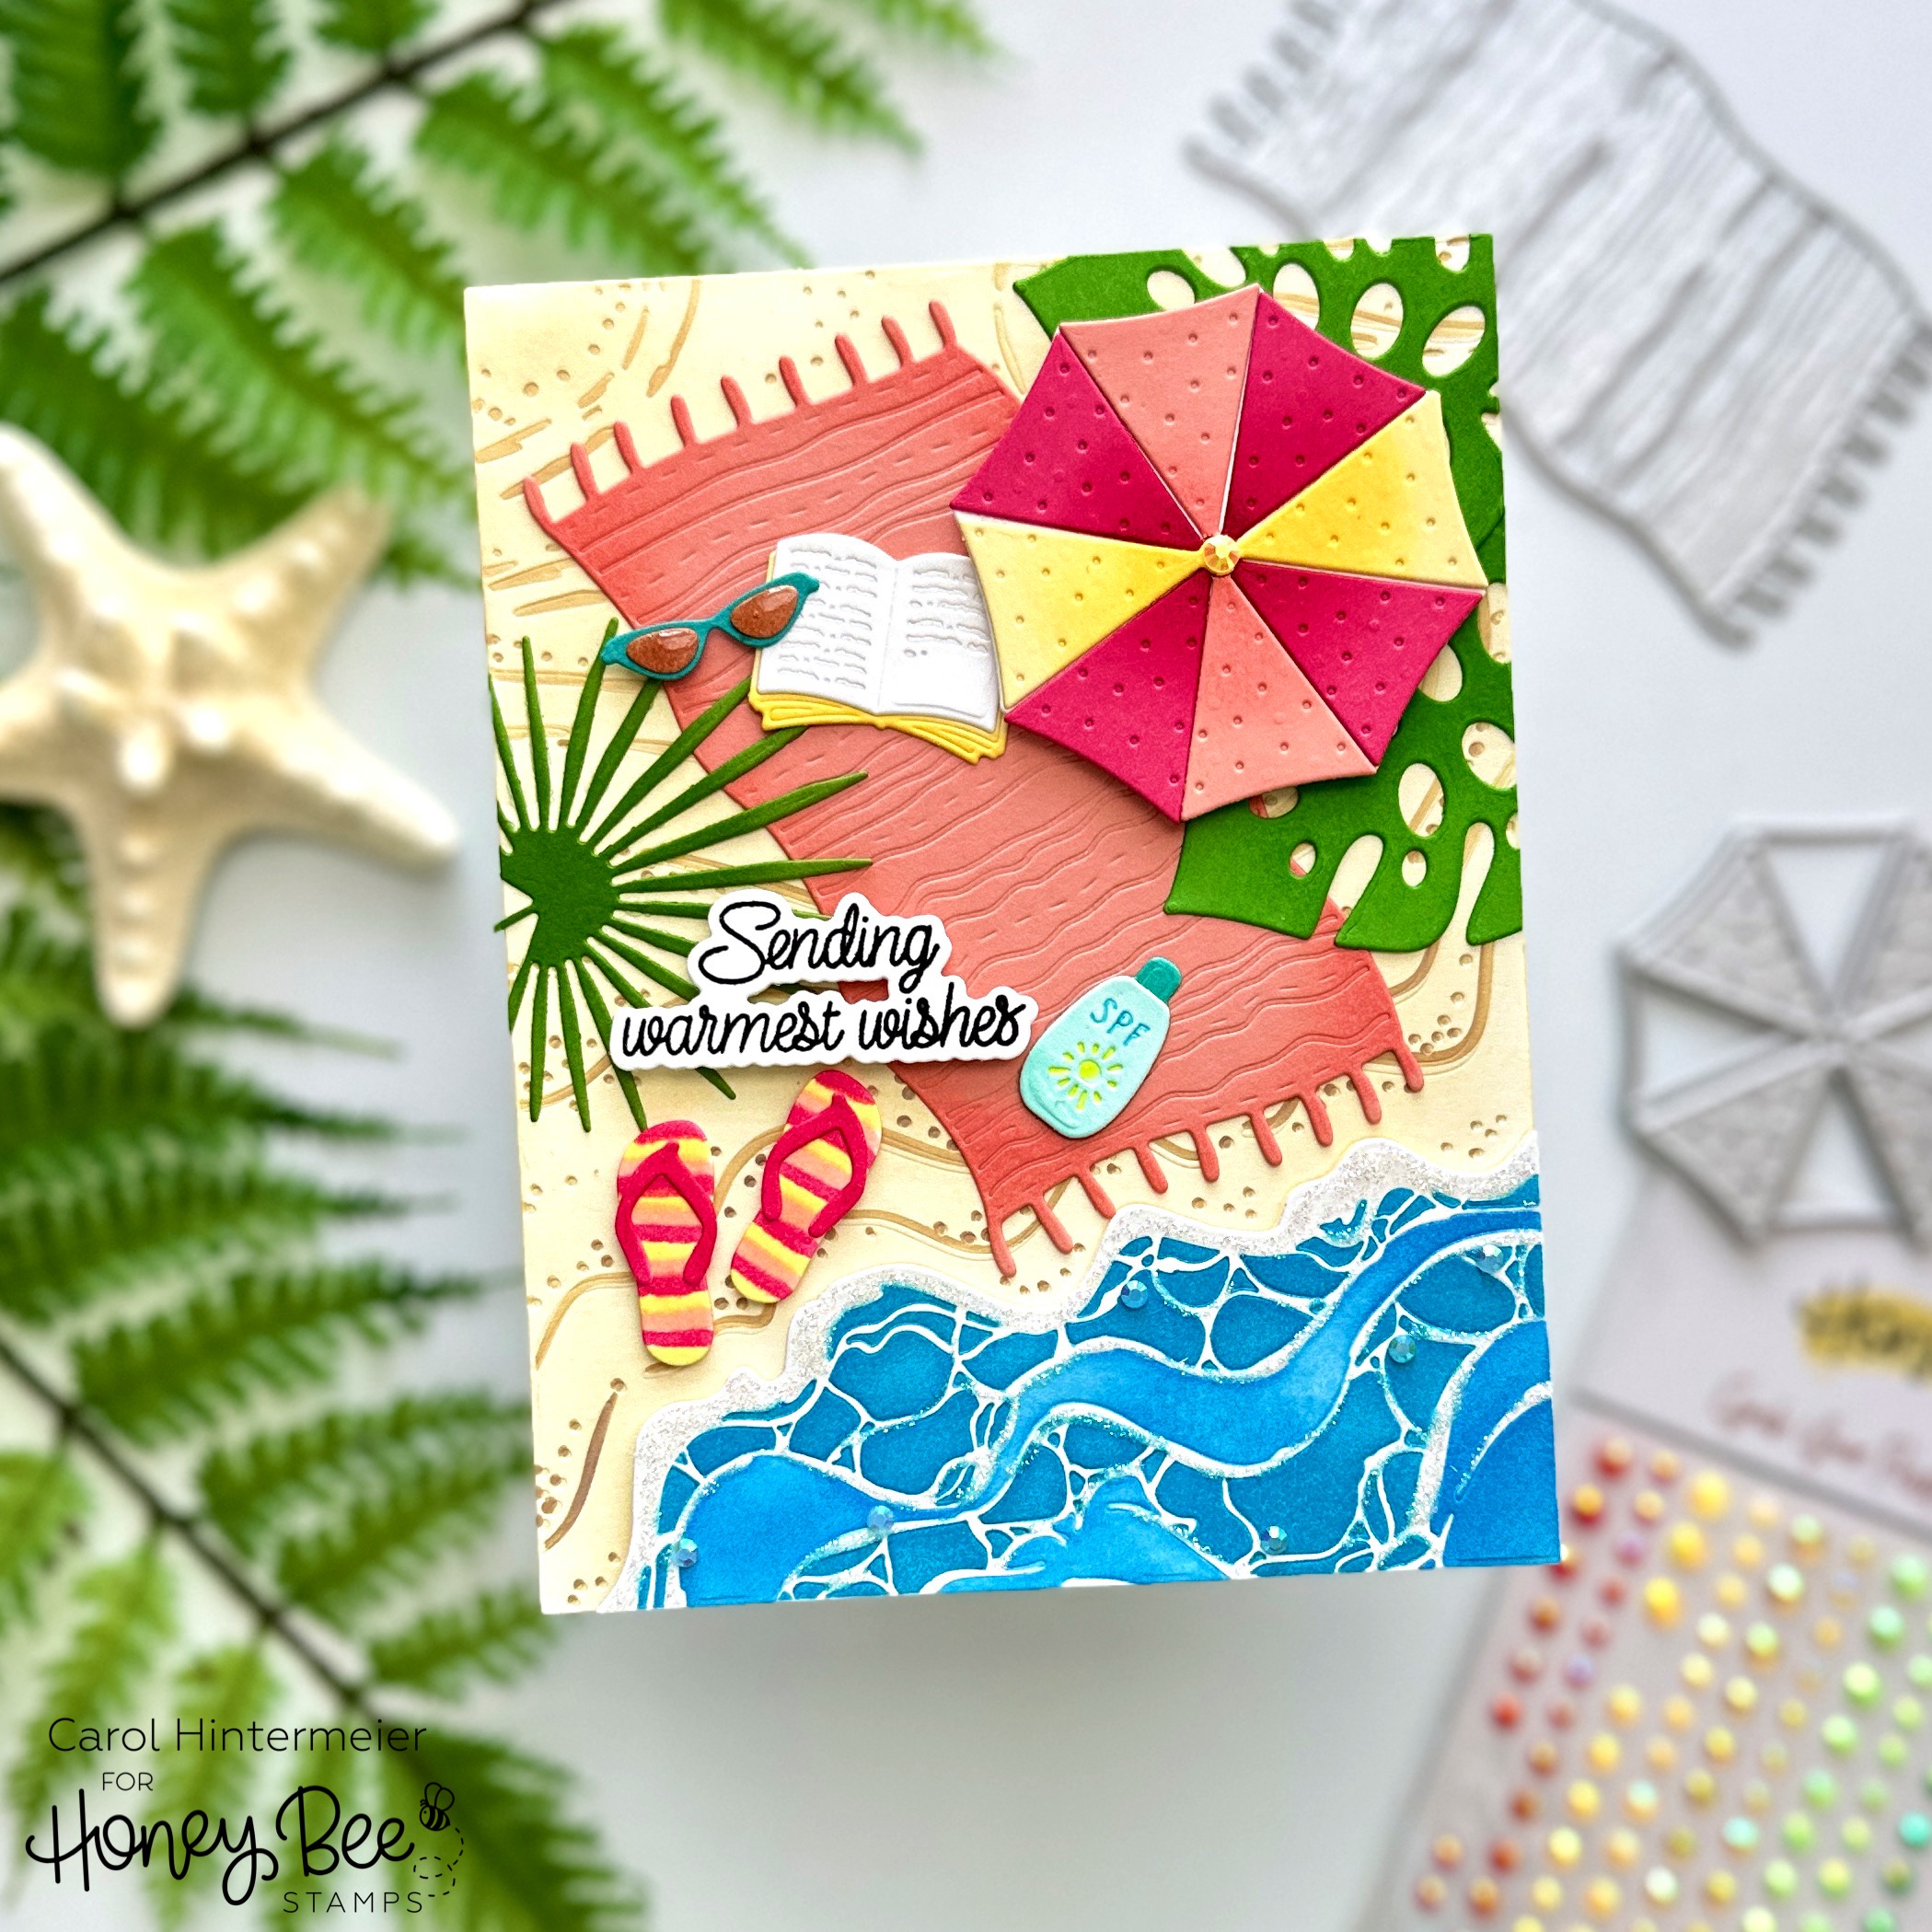
First I made the background layer for the card. I die cut the pieces of the Beach Break A2 Cover Plate dies. Then I used Distress Oxide inks and blender brushes to add the color through the Beach Break stencils. I used Mermaid Lagoon, Salty Ocean, Brushed Corduroy, and Antique Linen. I added Star Dust Stickles to the white portions of the waves and set it aside to dry.

Next I die cut various colors of cardstock (in list below) with the dies in the Lovely Layers: At The Beach Honey Cuts. I used three Copic markers (RV14, Y13, E02) to color the stripes on the flip-flops. I die cut the top layer of the umbrella three times from three different colors of cardstock. I added a bit of shading with blender brushes and coordinating inks. Then I used my scissors to trim the yellow and coral layers and adhered them to the base with glue.

This is a very easy Lovely Layers set to assemble. However, if you'd like you can download and print the helpful Layering Guide found just after the product description.

With all of the card elements complete, I used glue and foam dots to adhere them to the background layer.

I chose one of the awesome sentiments from the Sunkissed Summer stamp set. After I stamped it in black ink, I cut it out with the coordinating Sunkissed Summer die.

For a bit more sparkle and shine, I added gems from the Grab Your Passport Gem Stickers to the water and the umbrella. For the shine, I put Crystal Glaze on the sunglasses.

I hope you've enjoyed our last trip to the beach, because next week we dive into all things fall with the sneak peaks of the next fabulous Honey Bee release! Thank you so much for stopping by and be sure to subscribe to the blog for updates on the new release!

I so appreciate you using my affiliate links to shop (never any additional cost to you)!
Wednesday, July 31, 2024

Framed Beach Scene Retirement Card

Hello crafty friends! What would be better than a long trip to the beach to celebrate a retirement? I sure don't know! That thought was my inspiration for this framed beach scene card that features one of my favorites from the latest Honey Bee Stamps release, the Palm Beach Cover Plate and the coordinating Palm Beach stencils.

I began by running the Palm Beach Cover Plate die through my die cutting machine with 80# white cardstock. Then I used each of the coordinating stencils to color this beautiful scene with Blender Brushes and various inks. I used a few inks in my stash (linked below) and some Distress Inks. The Distress Inks I used are Peacock Feathers, Mowed Lawn, Rustic Wilderness, Black Soot, and Gathered Twigs.

Next I die cut 110# white card stock with the Wood Frame Builder dies. After I glued the stenciled scene to my A2 card base, I used glue to adhere the frame pieces to the card.

To add a few embellishments to my framed beach scene, I die cut 110# cardstock with the Lovely Layers: Small Seashells dies. I also colored these with Blender brushes and a few inks in my stash. Then I used glue to adhere three of the seashells at the corner of the frame and a foam dot to adhere the sand dollar.

I stamped the sentiment from the Rest & Relaxation stamp set with black ink and cut it out with the coordinating die. To accommodate the extra height added by the seashells, I added a double layer of foam strips to the right side of the sentiment. I added a bit of glue to the back left of the sentiment to adhere it.

I love how quick and easy it was to make this card! I hope you've found some inspiration here too. I appreciate you stopping by and hope you have a wonderful day!

Thank you for using my affiliate links to shop (never any additional cost to you)!

Wednesday, July 24, 2024

VW Van Beach Scene Light-up Card

Hello friends! Today my card features the SO fun Lovely Layers: Beach Bound Honey Cuts by Honey Bee Stamps.  But check this out! I made the van light up to go with my evening sunset beach scene! These are not as hard to make as you may think. Check out the details below!

First I created the background. I used two strips of removable tape to mask off the area for the ocean. Then I used blender brushes to add Mermaid Lagoon Distress Ink through the two Layered Waves stencils.

I moved the pieces of tape to protect the inked ocean and then blended on several Distress Inks to create the sunset and evening sky. The inks I used are Carved Pumpkin, Squeezed Lemonade, Tumbled Glass, Stormy Sky, and Chipped Sapphire. The sand is inked with a light tan ink and then stamped with the Sandy Shores background stamp in Gathered Twigs. I stamped it a few times without re-inking the stamp the second and third times.

I used a white gel pen to add dots to the evening sky for the stars.

I created the cute van by die cutting teal, white, and gray cardstock with the dies in the Lovely Layers: Beach Bound set. I also die cut a piece of vellum with the die that has the headlights on it because we need to have the lights transparent. Then I followed the Layering Guide to assemble the pieces with glue. NOTE: I did not adhere the headlights to the van.

I used a few Copic markers to color the surfboard and a fine tip black pen for the details.

Next I die cut the two palm tree layers that are in the Lovely Layers: Hammock set from white cardstock. I blended on green and brown inks to color the layers. I adhered the layers with glue while following the Layering Guide. I glued them to the background layer and trimmed off the excess.

For the lights, I used my die pick tool to poke holes in the center of the spot where the headlights are. Then I used a pencil to make a mark through the holes onto the background scene layer and poked a hole there too. Now I can use those holes to make pencil marks on the card base for the light placement.

Now I can adhere the die cut vellum "headlight covers" onto the van.

One more planning element is to decide where the battery pack for the lights will be placed. You can use a stamp that says "push", or just hand write it onto the front of the scene layer. Just be sure to place the "push" so the lights come on when it's pushed in that spot.

In the photo above, the card base is on the left and the back of the background scene is on the right. I only had a set of Pear Blossom Press's EZ-Light with three lights. That round foam dot you see is what I covered the third one up with. All of the foam tape is Pear Blossom's extra thick tape (World's Best Foam Tape). If you don't have that, just make a double layer of the foam tape you have.

As you adhere the beach scene layer onto the card front, press the lights to be able to see that those holes are directly over the lights.

Press the lights again as you adhere the van on the card to make sure the holes in the headlights are directly over the lights. Look how cute it is with the lights on!

It looks very subtle in the photo, but in real life it is noticeably brighter! You can also check out my post on my Instagramwhere I have a short video clip and the lights show much better in that!

I stamped a sentiment in black ink from the Rest & Relaxation stamp set and cut it out with the coordinating Honey Cut. It is adhered to the card with foam strips.

I hope you've enjoyed my light-up beach scene card today! Thank you so much for stopping by--you are appreciated!

Thank you for choosing to use my affiliate links to shop (never any additional cost to you)!

Thursday, November 14, 2019

Home is Where You Park It! | Art Impressions

Hello friends!  It's already week two of Art Impressions' Couple Cards challenge, which means you can create a card with any "pair" theme.  I had so much fun masking, stamping and coloring this scene for the couple from the Happy Trails Set!  This set also has a camper stamp and sentiments to use on a birthday card, a retirement card, and a few other general ones.


To begin, I actually planned my scene (gasp! Me, planning? LOL!)  by stamping onto some printer paper to get an idea of where I wanted everything to be.  Then I stamped the images onto masking paper and fussy cut out the tree and just the portions of the people that needed to be masked.  I stamped the people first, applied their masks, then using my sheet I planned on, I positioned the lights.  I just fussy cut the ends of the lights mask and applied it.  Then I stamped both trees.  

Because I'm not really experienced at coloring/free-handing a background, I colored it first.   The Copic colors are listed below.  Once I knew I'd be happy with the background, I finished coloring the rest.  Did you notice how I snuck in red and green?  I was kind of thinking "Christmas on the beach!" Sounds good to me!


I die cut the colored panel and the green card stock layer with the Rectangle Double Stitched dies.  Then I stamped the sentiment with Versafine Onyx Black ink using my MISTI.


I hope you've enjoyed my card today and that you'll be entering your project into the Couple Cards Challenge!  


Copic markers:
sand:  E55, E53, E51
sky:  B0000, Y11, Y13
trees:  E59, E57, YG17, YG25, YG03
skin:  E04, E11, E21, E00, E000, R20
clothes:  R29, R27, R24, G07, YG17, YG25, B97, B95, B93
hair:  YR24, Y19, Y21, N5, N2
chairs:  C3, C1, C00

Supplies: