Showing posts with label Tropical Bouquets. Show all posts

Wednesday, August 14, 2024

Sending Warmest Wishes (And Dreaming of the Beach)

Hello crafty friends! With schools beginning and summer vacations taken, I thought how nice it would be to have one last trip to the beach! I'm dreaming of going to the beach with this Honey Bee Stamps Lovely Layers: At The Beach dies as the star of this card. Check out these details!

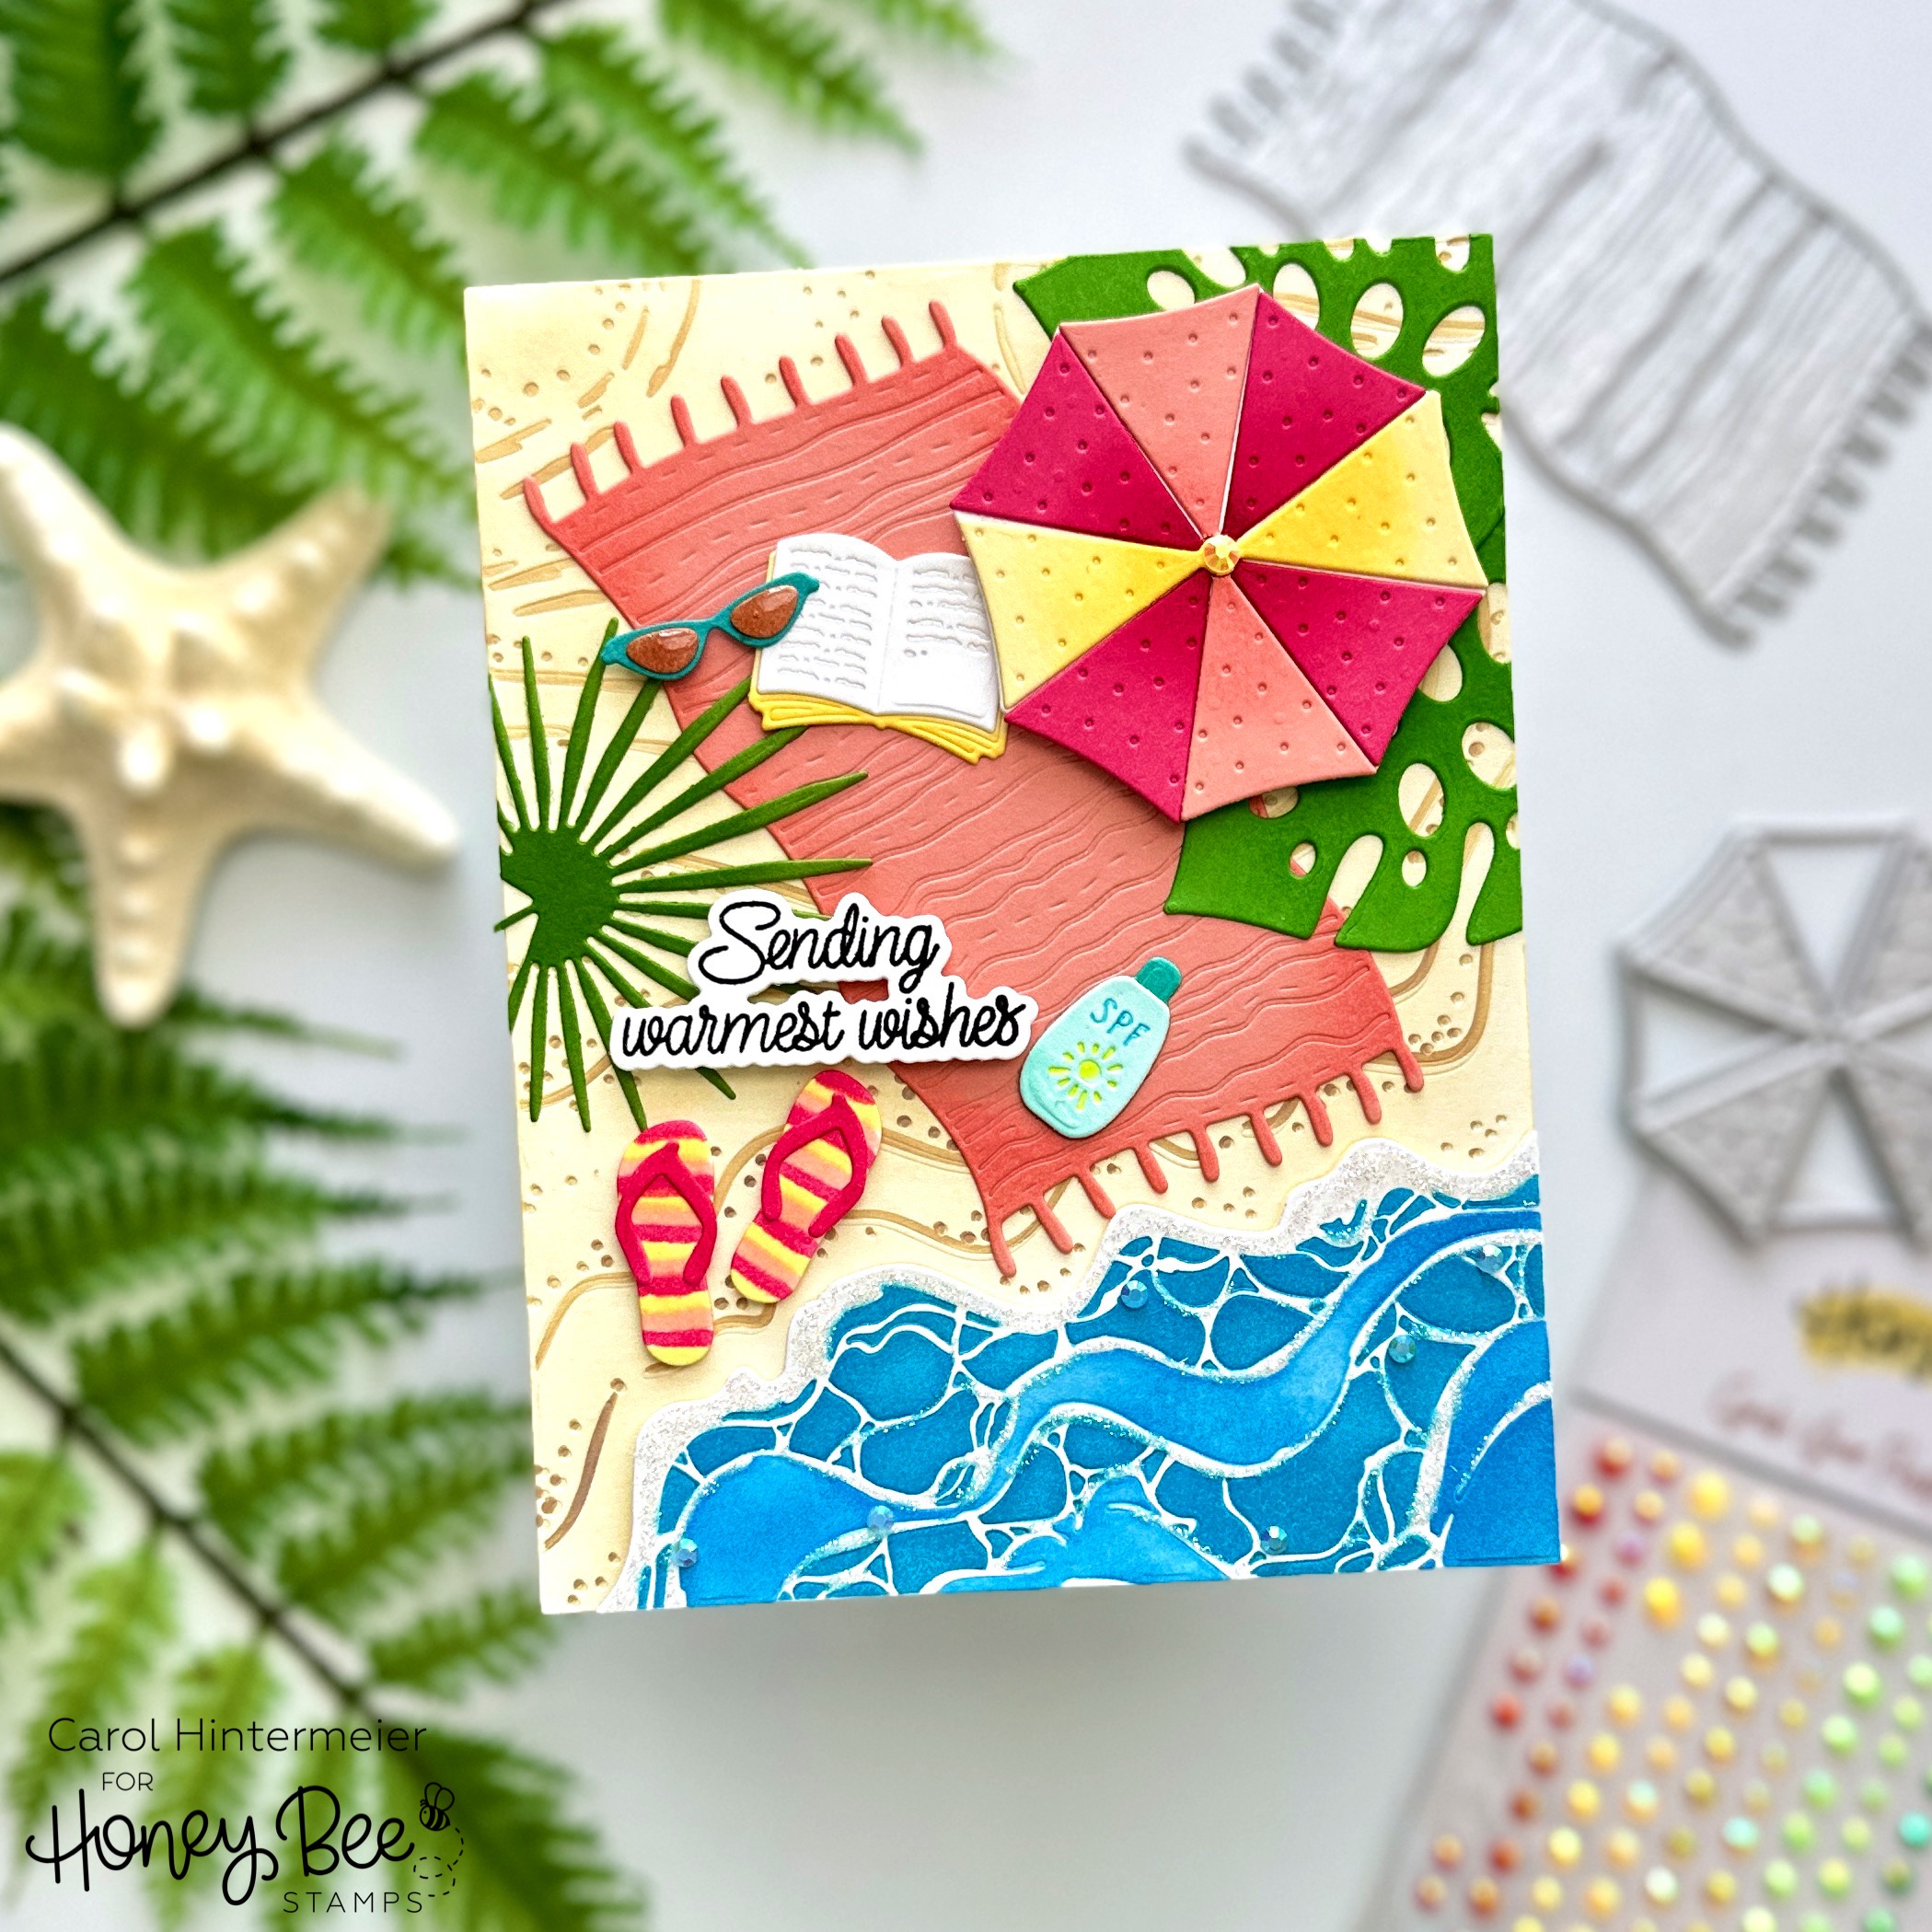
First I made the background layer for the card. I die cut the pieces of the Beach Break A2 Cover Plate dies. Then I used Distress Oxide inks and blender brushes to add the color through the Beach Break stencils. I used Mermaid Lagoon, Salty Ocean, Brushed Corduroy, and Antique Linen. I added Star Dust Stickles to the white portions of the waves and set it aside to dry.

Next I die cut various colors of cardstock (in list below) with the dies in the Lovely Layers: At The Beach Honey Cuts. I used three Copic markers (RV14, Y13, E02) to color the stripes on the flip-flops. I die cut the top layer of the umbrella three times from three different colors of cardstock. I added a bit of shading with blender brushes and coordinating inks. Then I used my scissors to trim the yellow and coral layers and adhered them to the base with glue.

This is a very easy Lovely Layers set to assemble. However, if you'd like you can download and print the helpful Layering Guide found just after the product description.

With all of the card elements complete, I used glue and foam dots to adhere them to the background layer.

I chose one of the awesome sentiments from the Sunkissed Summer stamp set. After I stamped it in black ink, I cut it out with the coordinating Sunkissed Summer die.

For a bit more sparkle and shine, I added gems from the Grab Your Passport Gem Stickers to the water and the umbrella. For the shine, I put Crystal Glaze on the sunglasses.

I hope you've enjoyed our last trip to the beach, because next week we dive into all things fall with the sneak peaks of the next fabulous Honey Bee release! Thank you so much for stopping by and be sure to subscribe to the blog for updates on the new release!

I so appreciate you using my affiliate links to shop (never any additional cost to you)!

Wednesday, August 16, 2023

Sending You Sunshine

Hello crafty friends! Today I'm back to the beach with my card featuring Honey Bee Stamps' fun Beach Scene A7 Cover Plate die, but not an A7 card! Keep reading for how I made this into an A2 card!

First I die cut the Beach Scene A7 Cover Plate die from 80# Neenah. Then I used some inks from my stash and a few Distress Inks to color the layers with ink blending brushes. The sand layers are Antique Linen and Gathered Twigs Distress ink. The water layers are three shades of teal inks (linked below). Then the sky is more Distress Inks in the color of Squeezed Lemonade, Scattered Straw, Tumbled Glass and Prize Ribbon.

Next I die cut more 80# Neenah with the fourth largest Sweet Stacks: Rectangles die. Then I used glue to adhere the Beach Scene layers to the rectangle. I slightly offset the center of the scene so that the sunrise would appear more on the right side. After all of the layers were glued on, I used my scissors to trim off all of the excess on each side.

I adhered the Beach scene to an A2 card base. Next I die cut colored cardstock with the hibiscus and plumeria blossoms and leaves dies from the Tropical Bouquet Honey Cuts. I adhered the pieces to the card with glue, except for the hibiscus, which is popped up with a foam dot.

I can't believe I didn't even add any shading to the flowers! LOL! But I just thought that they were very pretty as they are! I treated a piece of white cardstock with my antistatic tool. Then I stamped the sentiment from the Wish You Were Herestamp set in black pigment ink. I sprinkled on black embossing powder and used my heat tool to set it. I cut it out with the coordinating die.

I added foam tape to the back of the sentiment for dimension to match the flowers. I really wanted to add a bit of bling, but decided that this card didn't need it at all! What do you think?

As much as I loved making my autumn wreath card (last week's blog post) it's really hard to get into the autumn feel with it still so hot where I am! This beach scene was just what I needed, and I hope you've enjoyed the process. Thanks so very much for stopping by today!

Thank you for shopping with my affiliate links (never any additional cost to you)!

Wednesday, July 29, 2020

Just A Tini Note Birthday Card with A Window | Honey Bee Stamps

Hi my friends!  Today I have a birthday card using several of Honey Bee Stamps' new stamps and dies.  I love Honey Bee's cover plate dies and the Garden Lattice Cover Plates are so beautiful!!  This sentiment from Sip Sip Hooray is so funny!  Keep reading to see the inside of card to see what I mean!


The most complicated part of this card is creating the card base, so I have the steps and a couple of photos to explain how to make this.  (All supply links are below.)
  • Die cut some 80# Neenah Solar White card stock with the Garden Lattice Base and Top cover plates.
  • Next I used a nesting circle die from my stash to die cut the circles in the Garden Lattice cover plate pieces.
  • I die cut the top layer first, then positioned this over the base layer and drew a pencil line on the base layer.  Die cut the circle from the base and repeat for your A2 top-folding card base.
  • Adhere the Garden Lattices to the card base, lining up the circle openings.
  • Next I die cut white card stock with the Circle Thin Frames die.  I picked two circles to fit over the openings of the card front and adhered them together with 1/8" Scor-Tape and attach to the card front.
  • I used a scrap piece of card stock that just fit the circles of the Circle Thin Frames that I chose and die cut those again.  Adhere together in the same way and use on the inside of the card front for a finished look.

Next I worked on the layer inside the card.
  • I didn't, but you could go ahead and die cut some card stock with the largest A2 Double Stitched Frames die.  (I just didn't think about it at the time. Haha!)
  • Now for the stenciling.  I used the Circle Spotlight stencils and positioned one with the card stock in my MISTI.
  • Next I created some masks with some full stick Post-It Notes so I could add the sand layer.
  • First I used a Blending Brush to add some Antique Linen Distress Oxide.
  • Now position the Sandy Shores background stamp and stamp it onto the sandy layer with Brushed Courduroy Distress Oxide.
  • Now I repositioned the mask from the sand to cover it.  I used Mermaid Lagoon and the Ocean Waves stencil to add the waves.  (Tip:  When you get this stencil, use your scissors to snip the various waves apart.)
  • Next I covered the waves with a mask and added the sun and sky.  I used Squeezed Lemonade, Mustard Seed, and Tumbled Glass Distress Oxides.

Now for the other fun elements!
  • I die cut the florals and greenery with the Topical Bouquets dies from colored card stock.  I added shading to some pieces with Distress Oxide ink and a couple of Copic markers.
  • Stamp and die cut the martini glass in the Raise A Glass stamp set and coordinating dies twice.  I used the solid stamp to color in the glasses.  I added some clear sparkle pen to add a bit of bling.
  • Once I had these finished I adhered them to the card front and inside.
  • I stamped the sentiments from the Sip Sip Hooray stamp set and die cut them with the coordinating dies.  I popped up the one on the card front with foam and adhered the inside sentiment with glue.
  • I LOVE these little lemons from the Lemon Drop sequin mix and just had to add them to my martinis!

Now I want to buy the ingredients for some Lemon Drop martinis!  Haha!  I sure hope that my instructions help explain how to make a card like this!  If you have any questions, you can always use the "contact me" form in the left column.  Thank you so much for stopping by!!


Supplies:
Garden Lattice cover plate: Top & Base
Distress Oxides:  Antique Linen, Brushed Corduroy, Squeezed Lemonade, Mustard Seed, Mermaid Lagoon, Tumbled Glass