
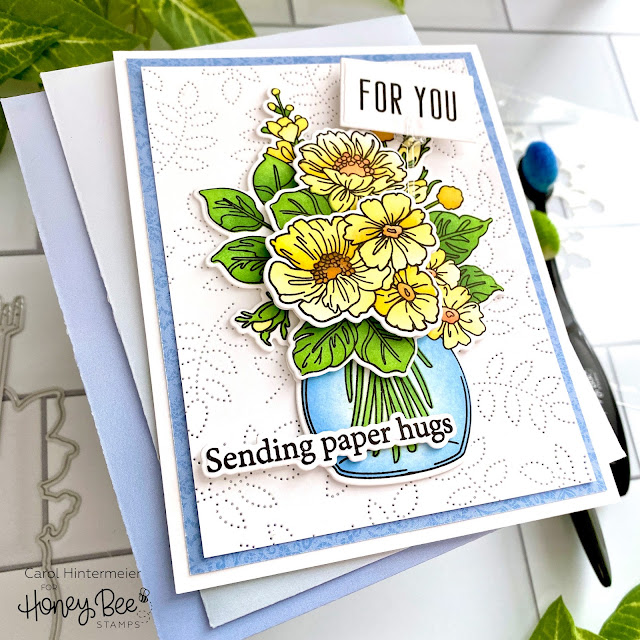
Hello crafty friends! Today I'm sharing a sweet card featuring Honey Bee Stamps new Floral Vase stamp set, coordinating Honey Cuts, and the Floral Vase stencils! I colored the entire image using just the Floral Vase stencils, and it was really lots of fun! The way these stencils have etched lines on them to help in lining it up makes these super easy to use! I also have a few tips for these coloring stencils, so read on for the details.

First I worked on the Floral Vase with the stencils. Now, my first tip is to stamp your images using the Bee Creative No Line Coloring ink. Why? When you leave your stamps in your MISTI, you can come back after the stenciling and re-stamp the images with Intense Black ink. (And that's my second tip: leave your stamps in place in your MISTI!) You will get a beautiful, crisp and clear stamped image over your stenciling! (This totally eliminates the worry of smearing the black ink, if you are impatient like me and don't let it dry enough--LOL!) My third tip is to let you know that these stencils will line up perfectly with the other two flower clusters in the set. I did use a few pieces of masking tape to cover up some openings before I stenciled. My fourth, and final, tip is that these Detail Blender Brushes are the perfect size for the details of these stencils! Check out this next photo for an example of my process:

The above photo shows one of the two additional floral clusters in this set in addition to the main floral vase stamp. You can use these as separate elements on a card, or you can pop them up on the main image for extra dimension as I did for this card.
I used various inks from my stash that I've been neglecting a lot! My go to are usually the Distress inks and Distress Oxide inks. You could use Mowed Lawn, Squeezed Lemonade, Mustard Seed, and Carved Pumpkin for a similar look. After I finished stenciling and re-stamping the images with Intense Black ink, I used the coordinating Honey Cuts to cut them out. I added foam dots to adhere the layers together.

I adhered a piece of patterned paper from the Modern Spring paper pad that I trimmed to 4" x 5-¼" to an A2 card base. Then I ran the Spring Leaves A2 Pierced Cover Plate die and some white cardstock through my die cutting machine. I trimmed it to 3-¾" x 5" and used Bee Creative glue to adhere it to my card. I added some white foam strips to the back of the floral vase to pop it up a bit on the card. I tried to capture the beautiful dimension in this photo:

I die cut the floral pick from the Floral Vases Honey Cuts from some leftover clear plastic packaging and adhered the sentiment to it. I added some foam dots to the back to pop it up. Next I stamped the sentiments from the Inside: Kindnessset with Intense Black ink and used the coordinating dies to cut them out. I added foam strips to the sentiment on the front, and adhered the inside one with Bee Creative glue.

To add some decoration to the card inside, I stenciled a portion of the flowers in the bottom left corner. I think this adds a fun and pretty surprise when the card is opened!
I really enjoyed coloring the Floral Vase images with these stencils, and I hope you've been inspired to give these a try. Thank you so much for stopping by! Stay crafty!
Thank you should you choose to use my links to shop (some may be affiliate links--always no additional cost to you)
Really stunning, Carol!
ReplyDelete