Wednesday, March 18, 2020

Pear Blossom Press EZ-Light Blog Hop | Lighting Up the Treat Shop!


Hello friends!  I'm so happy to be joining so many awesome crafters for the Pear Blossom Press Light-Up Card Hop with EZ-Lights.  Trust me when I say, "You will be using these all the time once you see how EZ they are to assemble!"  There are prizes for commenters too!  You will need to visit each stop and comment for your chance.  Please see the complete list of hoppers and prize information at the end of this post.


I have lots of photos for you, so on to the fun part!  I have always been impressed by the light up cards I've seen; however, I've been totally intimidated by trying to make one.  The EZ-Lights really are SO easy to use.


Check out these COOL lights!!!


I used the Honey Bee Stamps Treat Shop Add-On set that coordinates with their House Builder dies for my card.  (Links to all products are below.)  I created my card base from the House Builder dies.  I die cut one more house to use all of my elements on and to add the EZ-Lights to.

Next I have some photos of my assembly.   The top left is a photo of the back of the top layer showing how I laid out the unit and situated the wires, taping them down as I went along.  The next photo show how I used a small hole punch to make a hole for the umbrella light to stick through before adhering the roof .  The bottom right photo shows the foam tape (doubled up) and the Scar-Tape I used on the battery pack.   Finally, CHECK the lights before adhering it to your card base!!


After I had the top layer adhered to my card base, I could finish up with the cute little details to complete my treat shop!  So the recipient knows this is an interactive card, I stamped "press" onto the shrub on the left.


I don't really do videos, but I here's a short one that I hope works!  Haha!


I'm so glad you stopped by for a look, and I hope I've given you some inspiration to give these AWESOME EZ-Lights a try!  Be sure to go to  each stop and comment along the way for your chance to win!  See the prize information below this list.

Carol<<that's me!
Tanna<<your next stop

Now, who wants to win an awesome prize from Pear Blossom Press?  Two prizes will be awarded to two separate winners, chosen at random, from comments left on participating blogs and videos.  No purchase is necessary to win.  Comments must the posted by 11:59 p.m. PST on March 25, 2020.  Only one comment per blog or video will be counted, but you can comment on multiple blogs and videos in the hop for additional entries. (This is to prevent spam.)  Contest is open internationally to participants over 18 years of age.  Void where prohibited by law.  Any personal information collected will only be used for the purposes of contacting winners, your information will never be shared or sold.  Comments left on YouTube videos must not violate community guidelines.  This contest is not sponsored by YouTube.  Winners will be announced on April 1, 2020 at pearblossompress.com and prizes must be claimed within 30 days of announcement, or new winners will be drawn.

Supplies:
Distress Oxide inks:  Cracked Pistachio, Evergreen Bough

Honey Bee Stamps products:

Monday, March 16, 2020

Watercolor Daisy Wreath Thank You Card | Art Impressions

Happy Monday my friends!  I'm back with the promised card using another image from the beautiful Art Impressions Exclusive Daisies set  available only at Scrapbook.com.  This time I used the daisy wreath image from the set.


I stamped the wreath in Versa Fine Onyx Black ink onto watercolor paper.  I used my long neglected Zig Clean Color Real Brush Markers to watercolor it.  The colors are listed below.  I stamped the sentiment from the set in the same black ink.  Then I die cut it with a Circle Double Stitched die.


For the card layers, I began with a top-folding A2 card base.  I trimmed some blue gingham paper to 5-½" x 3-7/8" and adhered it to the card base.  Then I cut a strip of white card stock to 5-½" x 2" and used a stitched edger die (sorry, I didn't know until checking after I made the card, it is sadly retired) to add the stitching to the edges.  I think you could easily use a black pen and add stitching to the white strip for a very pretty effect.  I added foam tape to the back of the circle and added it to the card front.


I hope you've enjoyed seeing another idea using this awesome set!  You will probably see another card sometime in the future as there are many more sentiments and images I've yet to use!  Thanks for stopping by!  Have a fabulous, crafty week!


Zig Clean Color markers:
Light Green, Dull Blue, Bright Yellow,

Monday, March 9, 2020

Oopsie Daisy! | Art Impressions

Happy Monday friends!  I'm on the blog over at Art Impressions today and have this card featuring the new, and so beautiful, Scrapbook.com exclusive for Art Impressions Exclusive Daisies set.  This set is only available at Scrapbook.com and you can find the link at the end in the supply list.

I love daisies and couldn't wait to play with this set!  I've used one of the several images in the set to make a sweet birthday card that I've Copic colored.  I've listed the markers I used below.


After I finished coloring the daisies, I used a few BG markers to add a shadow effect around the bouquet.  This helps to make the white flowers pop more!  I die cut the panel with a Rectangle Double Stitched die.  This is adhered to a black layer and then onto a card base with a polka dot layer added to it.


I stamped the cute sentiment from the set in black ink.  I die cut it with a die from the Flag Double Stitched die set.  I die cut some black card stock with the same die and offset it.  I also popped it up with some 3D foam squares.  For the heart embellishments, I took a few clear acrylic hearts and colored them with my Y19 marker.  Once they were dry I adhered them with some Distress Collage Medium Matte.


Thanks so much for stopping by today!  Check back next week as I'll have one more card using another image from this set.  Until next week, stay crafty!!

Copic markers:
BG000, BG0000, C3, C1, C00,
Y19, Y13, YG67, YG17, YG15,
Colorless blender

Supplies:

Sunday, March 8, 2020

NEW Rubbernecker Color Fuse Inks and Layering Stamps

Hello friends!  Today I have a card using the beautiful NEW Color Fuse Inks by Rubbernecker Stamps!   There are four sets out with more coming soon.  These inks are perfect for inking up the fabulous new layering stamp sets!

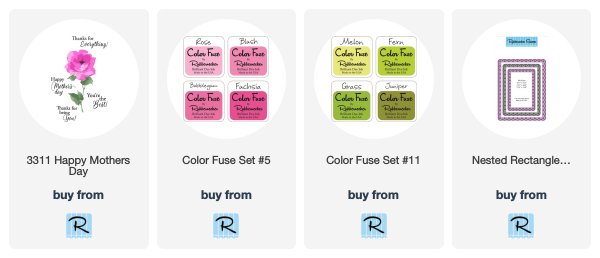
For my card today I've used the gorgeous new Happy Mother's Day set.  I love that there are other sentiments included to use any other time of the year!  Also, if you are new to using solid layering stamps, keep reading as I've included a list of tips that I find helpful.


Steps to make the card:
  1. Following the included layering guide, stamp the bottom layer in the lightest ink color.  I used the pink set and began with Rose.  I did stamp each layer twice as I love a vibrant color!
  2. Stamp the second layer with Bubblegum and the third with Fuchsia.
  3. Stamp the flower center with Melon from the green set.
  4. Stamp the stem with leaves in Melon, then Fern, and the last layer with Grass.
  5. Die cut the panel with the largest die in the Nested Rectangle Scallop w/Holes die set.
  6. Stamp the sentiment in black ink.
My tips for using solid layering stamps:
  1. "Season" the stamp. (Not with salt and pepper--LOL!)  I have tried several ways, but what seems to work the best for me is to use an eraser all over the stamp.  Use a dry microfiber cloth to wipe off the eraser debris.
  2. Next stamp Versamark Clear ink onto the stamp.  Use your dry microfiber cloth to very lightly wipe some of it off.  See the photos below for a before and after "seasoning".
  3. I use a MISTI to do my stamping, especially layering stamps.  It's handy to use a stamp positioner so you can do a second stamping if needed.
  4. Ink up the stamp.  Tap the ink pad lightly to the stamp.  If you mash the ink pad down too hard, it will leave lines in the ink from the edges of the ink pad.
  5. I always do a trial run of my stamping on scratch paper.
  6. Stamp the layer a second time, if needed.
  7. LET EACH LAYER DRY (or use your heat tool) before stamping the next layer!  If you stamp the second layer before the first is dry, the edges of the second layer will kind of feather out.  
   

Did you notice the perfectly matched pink layer?  Well, these inks blend LIKE BUTTER!!  I used an ink blending brush with the Bubblegum ink and inked up the edges of an A2 sized white card stock piece.  Adhere the card panel to the pink card and add to a top-folding A2 card base.


I added a few clear pink acrylic hearts for a bit of embellishment.


I absolutely LOVE the watercolored look of this floral stamp!  It's so easy to line up and create a beautiful image!  I hope my tips help you when you give these beautiful new stamps and inks a try!  Thanks so much for stopping by today!  Have a wonderful, crafty week!


Thursday, March 5, 2020

Hug in A Mug Floral Coffee Mug | Honey Bee Stamps

Happy Thursday friends!  Those that know me know I love a pretty decorative coffee cup to have my morning coffee in.  That's what inspired me to make a pretty coffee mug with flowers on it for my card today!  I used the beautiful Mother's Day stamp set and the Coffee Cup Card Honey Cuts.


Here are the steps for my coffee cup card:
  1. Die cut one Coffee Cup Card base, three of the lids and the two pieces for the sleeve from Neenah Solar White 80# card stock.
  2. Adhere the three lids together and also the two pieces for the sleeve.  Set aside to dry.
  3. Stamp the flowers from the Mother's Day set onto the front of the coffee cup with a Copic safe ink.  I used my MISTI, to help in getting it lined up just right and to stamp it twice for a good impression.  Be sure to leave the stamp in your MISTI for the next step.
  4. Slide the sleeve onto the coffee cup and place into the MISTI.  Use some scrap paper to cover the coffee cup, leaving the sleeve exposed.  Ink up the stamp and stamp the sleeve.
  5. Next I colored the florals on the coffee cup and the sleeve with my Copic markers.  I used a pencil and ruler to draw a very light line on the lid and at the bottom of the cup to help me get some shading in those areas with my gray Copics.


When my coloring was finished, I adhered the lid to the coffee cup.  The sentiments are from the Perfect Blend set and are stamped in Versafine Onyx Black ink.  For the inside sentiment, I did a bit of stamp surgery and masking.  I cut apart the sentiment "and friends".  I positioned them all and before inking them up, I masked off the "s" from friends.  No stamps were harmed in this process!  Haha!!


I had so much fun coloring this and love how you kind of get a bonus when the sleeve is removed by the full image on the card front!


Thank you so much for stopping by today!  Have a wonderful day and lots of crafty time!


Supplies:

Happy Camper card & Week 2 of Home Sweet Home Challenge | Art Impressions

Hello my friends!  Today begins week two of Art Impressions Home Sweet Home challenge!  For my inspiration card, I've used the so fun Happy Trails set.


Here are the steps for my card:
  1. Stamp the camper onto some masking paper and on the front of a top-folding 5-½" x 4-¼" card base.
  2. Fussy cut the camper on the masking paper and apply the mask to the other stamped image.
  3. I used THIS masking stencil to create the framed, inked background.  These are so helpful in centering and inking a background!  I used Tumbled Glass, Salty Ocean and Mowed Lawn Distress Inks and blender brushes.
  4. Remove all of the masks and Copic color the image.  My Copic colors are listed below.
  5. I used my green Copic to add in some grass sprigs here and there.
  6. Add a die cut sun to the top left corner.


I stamped the sentiment in Versafine Onyx Black ink and die cut it with a Flag Double Stitched die.  I die cut a second one and colored the edges with a yellow Copic to layer behind the sentiment.  I used my Tiny Attacher stapler to connect them and popped it up with some thin foam squares.  I used a white gel pen to add some highlights here and there on the camper and the chair.  I also used a red pen to add the dots to the curtains.


Will you be entering this challenge?  I hope I've given you some inspiration for this challenge.  Check out the details here and I hope to see your project entered!  Thanks so much for stopping by!

Copic markers:
B52, B93, BG01, BG02, BV13,
C7, C5, C3, C1, C0, E25, E31, E34,
RV29, R35, R59, RV63, V04, Y06, Y18
YG03, YG25, YR04, YR15,
N8, N6, N4

Supplies:

Monday, March 2, 2020

Happy Mail Gift Card Holder | Art Impressions

Hello Ai friends!

I have a fun card today using the adorable Mailbox Gift Card Holder set.  This is another versatile set that will be great to use for so many different occasions!


I stamped the images with Copic safe ink and used some Copic markers to color them.   I've listed the markers I used below.  Next I used the included dies to cut them out (except the latch, which I fussy cut).  I also stamped the mailbox onto some patterned paper from my stash and fussy cut it out.  I used the alphabet set (5284) to stamp out the words.


I followed the directions on the back of the package for the easy assembly.  I added foam tape to the back (be sure to leave the gift card area open) and popped it up onto my layered card base.  This card turned out to be 5" x 4-3/4".  I adhered the flowers with liquid glue and popped a few up with thin foam squares.  I also added a flower to cover the hole that is die cut for the flag since I didn't use that.  I added the latch with a silver brad.


Thanks so much for stopping by today!  I hope you have a wonderful, crafty week!


Copic markers:
C5, C3, C1, C0, C00, E27, E57, E23,
G43, R24, R22, R21, R20,
Y17, Y08, Y04, Y00, YG67, YG17, YG61

Supplies:
Art Impressions Mailbox Gift Card Holder set
Art Impressions silver brads
Art Impressions Small Alphabet set