
I'm very happy to be sharing my project for my Level 1 final assignment for the Altenew Educator Certification Program.
My challenge was to create a gift set of at least six coordinated cards with a matching package to gift them in. I also was to focus on three of the techniques from the ten classes in Level 1. As you will see in my process, I'm focusing on techniques from Altenew Academy classes Let It Shine, Irresistible Inking Techniques and Easy Ink Blending Techniques. The focus of my cards in this set is my most favorite thing of Altenew's, and that is their florals.

The techniques from the classes are as follows:
Easy Ink Blending Techniques - using emboss resist
Let It Shine - I used Rose Gold embossing powder for the shine
Clean & Simple Boutique Cards - dry embossing and creating gifts
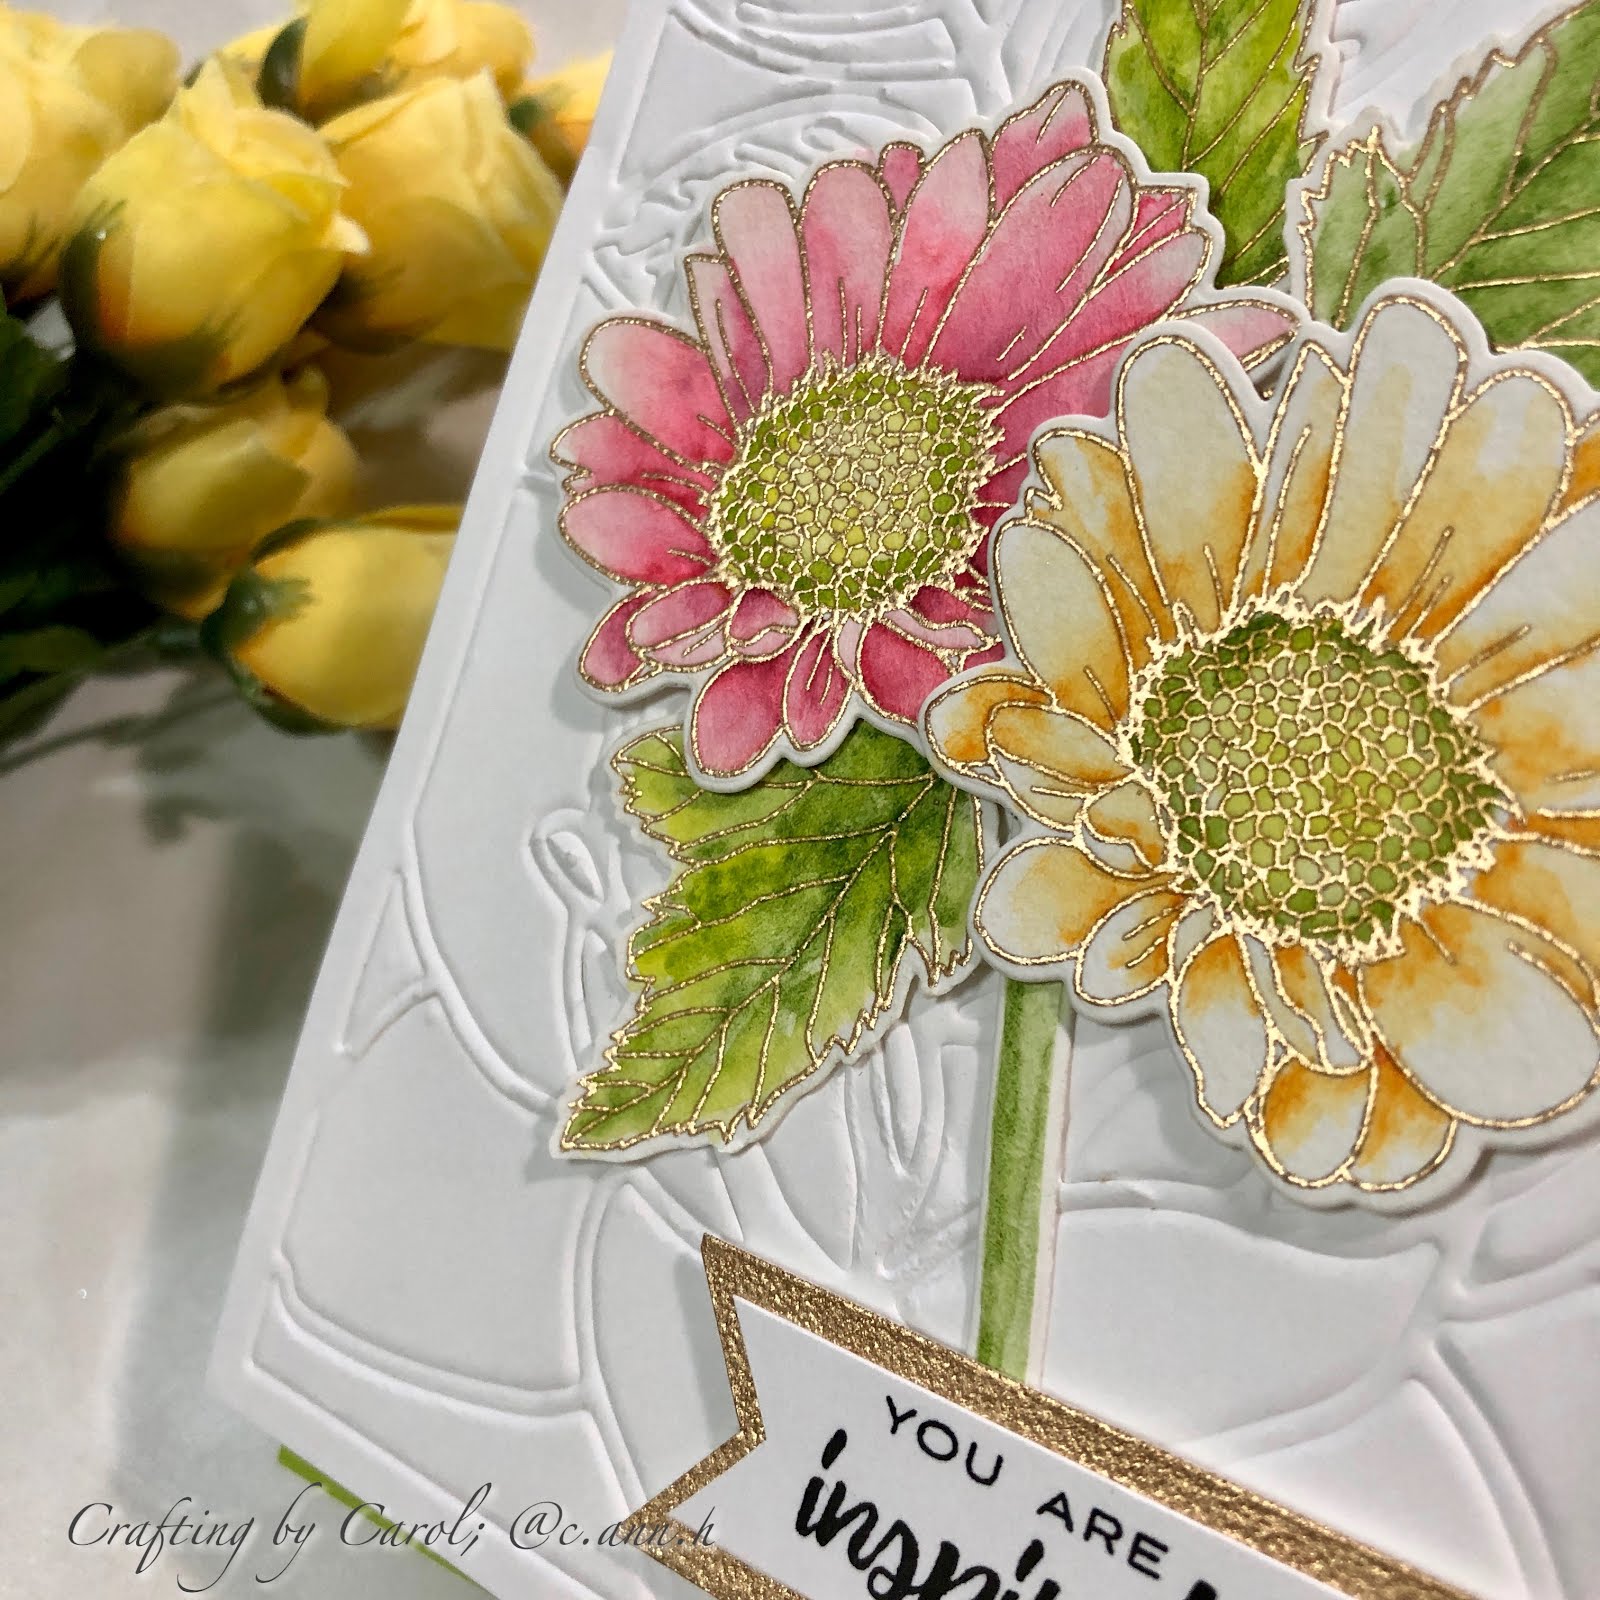
To begin, I prepped several pieces of watercolor paper with an anti-static bag. (All supplies, with links, are listed below.) I used my MISTI to stamp the flowers using Versamark clear ink. I sprinkled on Altenew's Rose Gold embossing powder and melted it with my heat gun to set. I like to use a coffee filter to catch the excess embossing powder as it makes it easy to pour it back into the bottle. The embossed images will now resist any paint or ink that is applied to them. The Easy Ink Blending class talks about using ink pads to color with. Since my Altenew ink stash is very small, I used Altenew's beautiful Watercolor 36 Pan Set. The colors in this set are just so vibrant and perfect for these flowers!


I began by taping my paper to my glass mat to help reduce warping. I used some low-tack removable tape. I didn't do that for the remain pieces as I didn't have too much warping. As you can see from the photos (click to enlarge) I sometimes put some of the paint onto my mat with some water to reduce the intensity of the color. It really is amazing how I just used a handful of paint colors to achieve the varying shades on each flower. I used these colors for the flowers: Coral Berry, Grapevine, Fresh Lemon, and Warm Sunshine. By combining these colors in differing levels, you can get different looks. The leaves were painted with various combinations of: Forest Glades, Evergreen, and Bamboo. Once all of the flowers and leaves were colored and thoroughly dry, I used the coordinating dies to cut them out.


Before assembling my cards, I needed to get the sentiments ready. I wanted each sentiment strip to have a gold layer behind it so I smooshed my Versamark pad onto a piece of scrap 80# card stock and dumped the Rose Gold embossing powder all over it and heat set it--twice--gives it a more solid embossing! Then I used my MISTI and arranged the sentiments so I could stamp them all at once. I used my paper trimmer to cut them into strips and hand cut a few into banner shapes. I cut the gold embossed paper to layer behind each one as you can see on the finished cards.


Next I decided to use the beautiful Layered Blossom Cover Die A to dry emboss a base layer for each card. I used 80# Neenah Solar White paper. You will need a rubber embossing mat to do this and follow your machines layering directions. If you find that your paper cracks after embossing it, try spritzing both sides of the paper, VERY lightly, with a mist of water. Then run it through your machine to dry emboss. This helps to minimize any cracking that may happen. To arrange the flowers and leaves for each card, a tip is to use Press N Seal after you have arranged your pieces the way you want. Put the Press N Seal on top of your arrangement, flip it over, apply your adhesive to desired pieces, flip it back over and place it where you want to glue it.


Each card was assembled using a standard A2 top-fold card base with the dry embossed panel adhered onto it. Most of the flowers are popped up with foam squares over the glued leaf clusters. The sentiments are also popped up. So here are all the photos of my cards. I love how they turned out!!


This card is my bonus card that I made for our sweet and beautiful daughter. Her birthday is today and we celebrated this past weekend, which is why it's not in the photo with the other cards. She loved it!

And, finally, the gift box I made to present the set in.

The box was easy for me to make. I did some searching in Pinterest and didn't find the size I wanted. However, seeing how these were made I was able to create my own measurements for this box. Before I glued the flaps of the yellow top, I centered a rectangle die (the die was slightly smaller than the Layered Blossom Cover Die A) on the top and cut it out. Then I adhered the Cover Die A on the inside of the yellow top. Because this post is already VERY long, and I wanted to easily find this myself, I created a page for my blog titled How To with the photos showing everything you need to make one of these yourself. You can find that page by clicking "How To" at the top of my blog page or click HERE to go there now.

I stamped a sentiment from the Extra Special stamp set with Versamark and heat embossed it with Rose Gold embossing powder. I then cut it out with a tag die, tied some ribbon on it, and adhered it with a glue dot.

And that all! If you are reading this, I just have to say thank you so much! I am very pleased with how this card set and box turned out. If you have any questions, please leave a comment. If you are a "no-reply" commenter, I won't be able to reply directly. Otherwise, I'd love to hear what you think about my project! I so appreciate all kind comments.
Carol :)
Supplies:
OH MY GOD! What a brilliant set of cards and THAT box is totally amazeballs!! LOVE the details Carol, you did such a terrific job!!
ReplyDeleteCongratulations on reaching this milestone! WOOT WOOT!
Thanks so much for entering your beautiful work in the AECP assignment Gallery. I love your write-up and descriptions! Please keep up with your excellent work!
THUD!!
ReplyDeleteI am totally IN LOVE with what you did, Carol! What a phenomenal box set! I could not love love this more....You did a SUPERB job! I am so looking forward to your next phase! Congratulations on passing Level 1!
ReplyDeleteOkay, I'm back. Luckily the chair isn't that high off the ground. But honestly, Carol, I'm speechless! If Altenew doesn't hire you - like I'm talking paid position - after this post, they're nuts!! And I'm so appreciative of the time you took to teach us. This post is being bookmarked and will remain at the top!! Hugs, Darnell
ReplyDeleteI'm blown away! What stunning, amazing, BEAUTIFUL cards and box. I'm sorry for gushing but WOW you're talented!
ReplyDeleteSo amazingly GORGEOUS!!!! Thank you for sharing
ReplyDelete