Showing posts with label Slimline Nested Stitch dies. Show all posts

Tuesday, July 26, 2022

Christmas In July - A Slimline Card with Gold Embossed Dimensional Tree

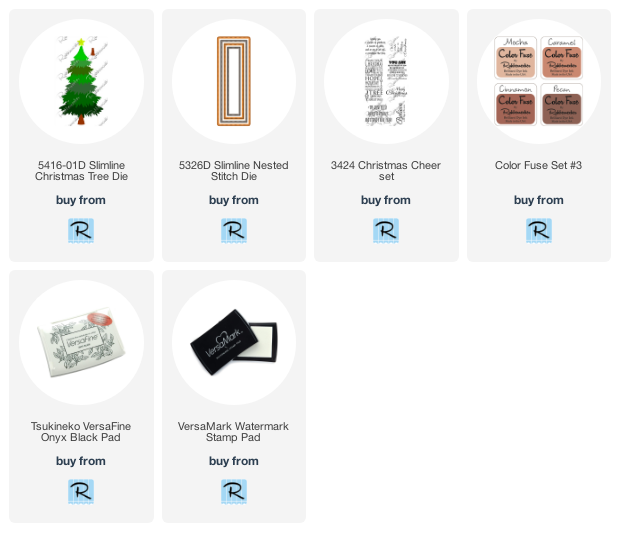
 Hello crafty friends!  Making Christmas cards in July makes me think of much cooler weather!  Which is good, because here in Texas we're in a major heat wave and severe drought.  Today I'm sharing my card featuring Rubbernecker Stamps gorgeous Slimline Christmas Tree die set.  I've heat embossed, shaped, and popped up the tree for extra dimension!  Read on for the details.

First I created my card base using some of my much loved, and hoarded (LOL!) patterned cardstock.  It's a vellum and gold  piece that I die cut with the largest Slimline Nested Stitch die.  You can use any patterned, festive paper that will coordinate with the tree you create.  I adhered it to a slimline card base that measures 3-¼" x 8-¼".

Next I created the tree.  First I die cut all of the Slimline Christmas Tree dies from 120# Neenah cardstock.  Then I added temporary adhesive to the back of the pieces, and a few at a time, I placed them in my MISTI.  I made sure that the grouping fell within the dimensions of the stars stamp from the Stars/Wavy Background Strip stamp.  I inked up the stamp with Versamark ink, then sprinkled on some gold sparkle embossing powder from my stash, and heat set it.  I repeated these steps until all the tree sections were heat embossed.

For the star topper, I pressed the Versamark pad directly onto it, picked it up with my reverse tweezers, added the embossing powder and heat set.  You can get a thicker layer by dipping it back into the embossing powder while it's still hot and heat setting again!

I die cut the tree trunk from woodgrain cardstock.  Then I used a small ink blender brush to color it with Pecan Ink from the Color Fuse set #3.  Before adhering the tree layers together, I used my fingers to curl the edges and round each section.  I added a thin line of glue just at the top edge of each tree layer to adhere the layers together.  Next I added a double layer of foam tape squares to the center back of the tree and added it to my card.

I stamped the sentiment from the Christmas Cheer set with Versafine Onyx Black ink and trimmed it into a rectangle shape.  Next I used a Pentel gold sparkle pen to color in the Christmas lights that are on the sentiment.  Then I added foam tape to the back to adhere it to the card.

I used the same gold sparkle pen to add more bling to the tree with random dots all over.  I love the subtle sparkle this adds!

I hope you've enjoyed my card today!  Thank you so much for stopping by!

Check out the product details here:

Tuesday, March 16, 2021

Slimline Happy Easter Card | Rubbernecker Stamps

Hello crafty friends!  Today I'm sharing a cute slimline card with Rubbernecker Stamps' new Bunnies Set.  This is such an adorable set that has three more sentiments plus three more bunnies in it!  So much fun!  I used their Color Fuse inks to add color to the grass and cloud layers too!  Keep reading for the details!

Card base:

  • Create a slimline card base by scoring a 7" x 8-½" white card stock at 3-½".  Fold at score line.
  • Die cut two pieces of white card stock with the largest Slimline Nested Stitch die.  On one blend Arctic Color Fuse ink along the top with a foam ink blending tool.  (I began with an ink blending brush, but with light colors, I find that a foam tool lays down the ink faster and more even.)
  • Use one of the Slimline Clouds dies and die cut the clouds across the top of the second Slimline Nested Stitch piece.
  • Blend Arctic ink along the bottom of the second piece leaving the area just below the cloud line white.  
  • Stamp the sentiment, as shown on the finished card, in black ink.  Add foam tape to the back of the cloud piece and adhere to the other Slimline Nested piece.  Adhere these to the card base.
  • Next, cut some white card stock into two 1-¼" x 8-½" strips.  Use the Slimline Grass dies to die cut the strips near the top edge.  Blend Mist and Basil Color Fuse inks on the grass strips.  
  • Next, die cut each grassy strip with the largest Slimline Nested die to add stitching along the bottom.  See the photo for further explanation.
  • Add liquid glue just along the bottom edge of the light green grass and adhere to the dark green grass.  Then add liquid glue to the back side just along the bottom and adhere to the card.  The reason for adding the glue just along the bottom edges is so I can easily tuck the images into the grass.

Card elements:

  • Stamp the images from the Bunnies Set with Copic safe ink.  Color them with Copic markers and fussy cut them out.  (There are coordinating dies that I ordered but had not received at the time I was making my card.)
  • Arrange the images and adhere with liquid glue.  Note:  I did not add glue to the bunnies' ears so I could slightly bend them up for dimension and to add even more cuteness to them!
  • Die cut white card stock with the Small Butterflies die.  Use a black Micron .05 pen to draw the butterflies bodies, then color with Copic markers.
  • Add a dot of glue to the center of the butterflies and adhere to the card.  When dry, bend the wings up for some dimension.


To finish, I added some sparkle with a clear glitter pen and Glossy Accents to the egg details.  I know it doesn't show in the photos (I tried!!) but it does add a fun bit of bling!


I hope my card today has inspired you to get hopping on those Easter cards!  Thank you so much for stopping by!!!


Click the images to check them out:

Sunday, September 13, 2020

Celebrate Autumn: Layering Stamps with Embossing | Rubbernecker Stamps

Hello friends!  Today I've added a twist to using layering stamps by embossing the final layer!  I've used Rubbernecker Stamps' beautiful Autumn Harvest stamp set for my slimline card today!

Here are the steps for my autumn card:

  • I began by centering one of the Slimline Nested Stitch dies (the second largest) in the middle of the Slimline Deckle Die.  Use tape to keep them together.
  • Trace a pencil line around the inside of the rectangle.  (see photo) Be sure to keep them together as we will use them later for die cutting.


  • I roughly planned where the branches would go, using the pencil line as my guide, so I would know where to stamp my sentiment.  See photo above.
  • Next I stamped the sentiment with Versamark ink and added copper embossing powder, then heat set it.  I repeated this step to get a more dimensional look.
  • Stamp the base layers of the stamps in Mocha ink from the Color Fuse Set #3.  I placed the branches randomly, here and there, using the sentiment and pencil line as my guide.

  • Position the second layer of the branches. For this layer I used a variety of inks.  I used Mango, Citrus, and Apricot on the different branches.  The included layering guide makes this very easy!
  • For the final layer, instead of stamping it with inks, I used embossing powder.
  • Make sure all of the inked layers are dry!  Use your anti-static bag, then stamp the third layer with Versamark ink.  I used embossing powders I had in my stash.  One was WOW copper and the other BEE Sweet, a golden yellow shade (and on sale now).  Heat set the powders with your heat tool.
  • Now use the two taped together dies and line the pencil line up with the inside of the rectangle die.  Run it through your die cutting machine.  Be sure to erase your pencil line!

  • I added foam tape to the back of the rectangle piece.
  • I centered it onto a coordinating card base and adhered it.  The card base is from The Paper Cut's Festive Variety Scored Slimline Cards pack.
  • I added liquid glue to the deckled frame and adhered it around the rectangle.
  • To finish it up I added some coordinating sequins from my stash.  I never can have too much bling! Haha!

I loved adding the embossed layer to this card, and I hope I've inspired you to give it a try.  Have a wonderful and crafty week!