Showing posts with label Sweet Stacks: Mini Slimline. Show all posts

Wednesday, January 12, 2022

Lovely Layers: Roses Birthday Card | Honey Bee Stamps

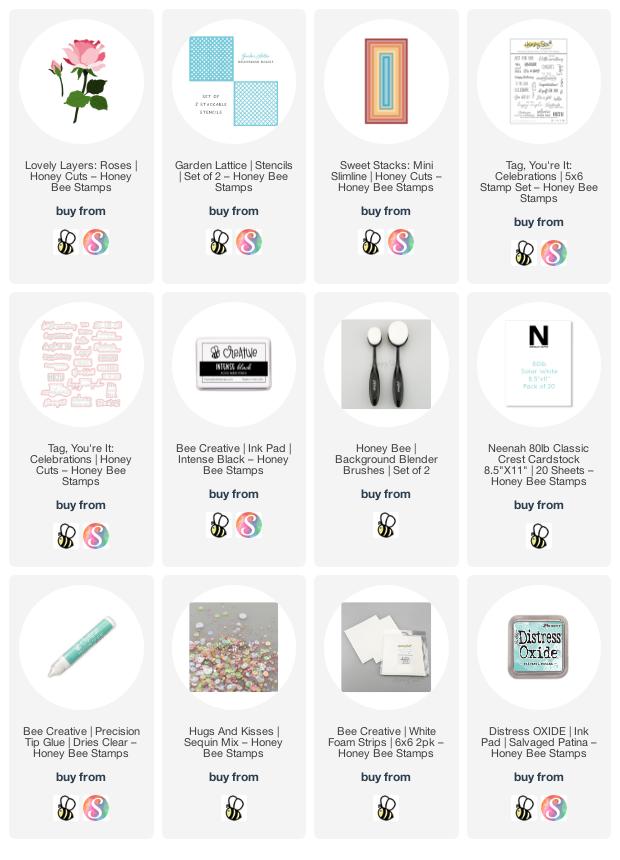
 Hello Honey Bee friends! Since I'm so very low on birthday cards I've made one using the gorgeous Lovely Layers: Roses Honey Cuts. All of the Lovely Layers series are absolutely beautiful, and today I took a bit more time to Copic color my layers to get the look of even more dimension!

I began by die cutting all of the Lovely Layers: Roses dies from 80# Neenah. Then I used Copic markers to color each layer. I used R22, R32, R21, and R20 for the rose and rose bud layers and G28, G07, YG25, and YG03 for the stem and leaves. I used some thin foam strips in-between each layer for even more dimension. (This will most likely be a card that I hand deliver, or I could place it in a padded envelope for mailing.)

Next I created my card base and panel. I scored a 6-½" x 6-¼" piece of 80# Neenah a 3-¼" and folded it with my bone folder. Then I used the next to largest Sweet Stacks: Mini Slimline Honey Cut to cut another piece of 80# Neenah. I used a Detail Blender Brush to ink on Salvaged Patina Distress Oxide in a light-to-dark ombré pattern. Then I spritzed a bit of water onto it, let it set a minute and pressed a paper towel to the piece to soak up extra water. Next I placed the top layer Garden Lattice stencil over the panel and blended more Salvaged Patina through the stencils on the bottom left and upper right of the panel.

I mixed a bit of white Perfect Pearls with a few drops of water and used a paint brush to add spatters to it. I also added a few drops of the Perfect Pearls mixture to the rose and leaves. I used Bee Creative glue to adhere the rose, rose bud and leaves to the card. Then I added a few sequins from the Hugs and Kisses sequin mix to add more sparkle!

I stamped the sentiment from the Tag, You're It: Celebrations stamp set with Intense Black ink. I used the coordinating Honey Cut to cut it out and popped it up with a few foam squares.

Thank you so very much for stopping by! I hope you have a wonderful, creative day!

Thank you for choosing to shop with my affiliate links:

Wednesday, November 10, 2021

Merry Christmouse | Honey Bee Stamps

Happy Wednesday crafty friends! Today I'm sharing a cute mini slimline card I made using the totally adorable Merry Little Mice stamps and coordinating Honey Cuts by Honey Bee Stamps. I made an inky snowy background with lots of sparkles and spatters to set the scene for the mice--keep reading for the details.


 First I die cut some watercolor paper with the largest die from Sweet Stacks: Mini Slimline Honey Cuts. Then I spritzed on some Villainous Potion Distress Oxide Spray near the top of the card. I used a paper towel to dab up some of the color and then dried it with my heat tool. I don't have the Oxide Sprays of my next two colors, Salvaged Patina and Spun Sugar, but I do have the Oxide ink pad re-inkers. I just squeezed out a bit of the colors and used a brayer to swipe on the colors, overlapping them just a bit.

Then I used my heat tool to dry the panel, and spattered on some white gouache. I also used a white gel pen to add white dots.

Next I die cut more watercolor card with the hills in the Horizon Slimline Border Honey Cuts. I trimmed them to 3" and glue one directly to the inky panel and popped up the second one. I then put a line of Bee Creative glue along the edges, sprinkled on some chunky glitter and set it aside to dry.

I stamped the images from the Merry Little Mice set with Intense Black ink onto 80# Neenah Solar White. I used some Copic markers to color them and then cut them out with the coordinating Honey Cuts. I added some white dots with a white gel pen to the mice's cheeks and also to the Christmas tree.  Next I stamped the sentiment from Merry Christmouse with Versamark, added black embossing powder and heat set it.  I used the coordinating Honey Cut to cut it out.

To assemble the card, I adhered the inked panel to a side-folding card base with Bee Creative Glue. You can create by scoring a piece of 6-½" x 6-¼" card stock longways at 3-¼". I popped up all of the card images with foam tape and foam squares. I used my nonstick scissors to cut a few small foam strips for the music notes.

I decided to make a coordinating envelope to go with my mini slimline card.  I die cut some 32# printer paper I have in my stash with the Mini Slimline Envelope dies.  I adhered the pieces together with Bee Creative glue.  Then I used the Snowfall Background stencil to add some pink snowflakes to the front of the envelope.  This was really easy with a Background Blender Brush and some Spun Sugar Distress Oxide ink.

I added a bit more sparkle and shine by adding some Glossy Accents to the tree's ornaments.  Then I used a clear glitter pen to add sparkle to the star and splatters to the background.

I hope you've enjoyed my inky, mouse-filled card today!  Thank you so much for stopping by!

Links for products I've used today:  (thank you, if you use my link to purchase anything!)