Friday, June 30, 2023

Stampendous Hugs Collection by Spellbinders

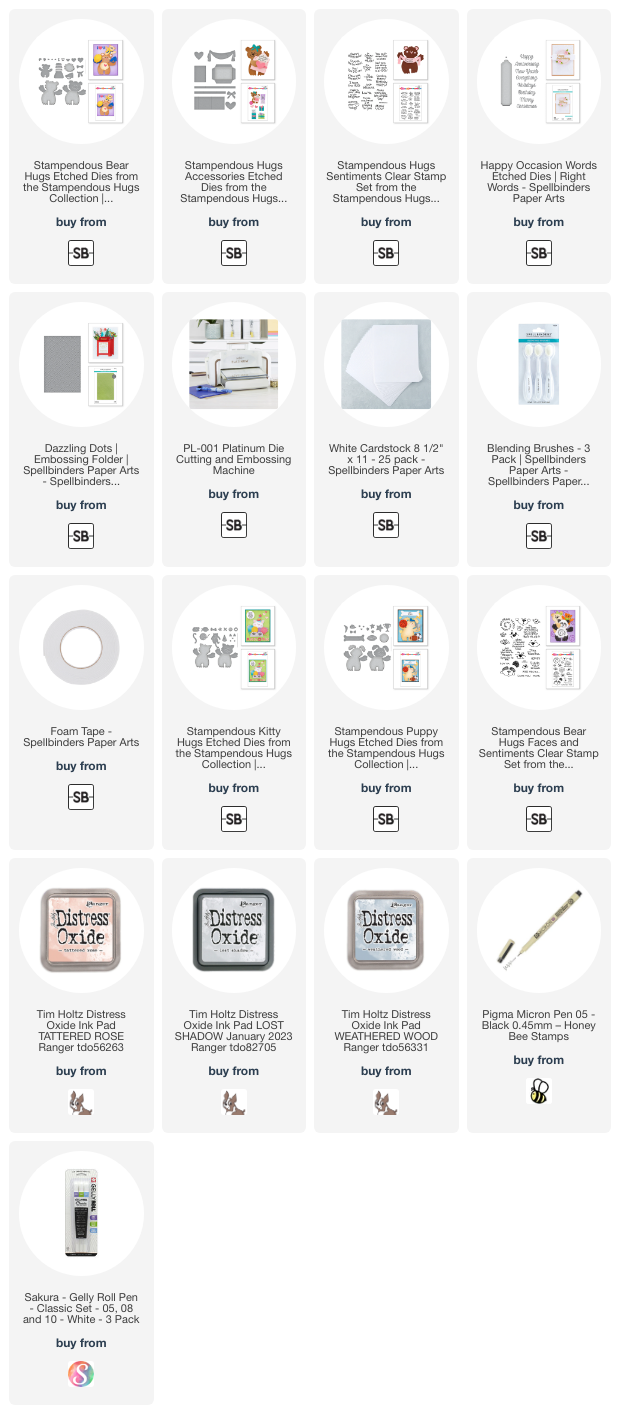
Happy Friday!  Today I'm sharing two cards that feature products from the new Stampendous Hugs Collection. In addition to the bears I used, there are also kitty and puppy sets that are SO cute!  Did you know that Spellbinders now carries Stampendous products?

I used the totally adorable Bear Hugs die set for the main elements of both cards.  The set includes both the large and small bear plus several adorable accessories!

For this first card I die cut the large bear and the dies for the tummy, ears, nose, and eyes from white cardstock.  I added the die for the face and ran that through my Platinum machine.  I also cut the banner die from the new Hugs Accessories die set from white cardstock.

I stamped a sentiment from the Bear Hugs Faces and Sentiments sets onto the banner.  I did use my MISTI since I had to curve the stamp to fit onto the banner.  There is a sweet sentiment stamp set in this collection with a few curved sentiments that I have on my wish list!

Then I used C00, C01, and C03 Copic markers to add shading to the bear and banner.  I inked up the tummy and bow using a blender brush and Tattered Rose Distress Oxide ink.  Then I added shading to both with a coordinating R11 Copic marker.  I colored the ears and cheeks with R11and R00 Copic markers.

After I glued the pieces on the bear I set that aside to create the background.  I stamped the paw print found in the Bear Hugs Faces and Sentiments set with Saltwater Taffy Distress Oxide ink.  I trimmed the piece to 4" x 5-¼".  Then I colored a scrap of white cardstock with the R11 Copic and when it was dry, die cut the hearts (Bear Hugs die set).

I glued the hearts around and between the paw prints with some hanging off the edges.  After I trimmed off the overhang, I glued those around the edges of the panel.  Then I used a black marker to add dots.  It's one I've had forever, and is no longer produced.  It was made by Zig and called Dotta•Riffic--LOL!  The smaller dots are made with a black Micron 05 pen.  I trimmed it to 4" x 5-¼" and glued it to an A2 black cardstock panel, and then to an A2 card base.

I added a few details to the cheeks and ears with a white gel pen.  And now for my second card.

This sweet card came together so quickly for me!  (Which rarely happens--Haha!)   I created the card base and layers by first inking up the edges of an A2 sized piece of white cardstock with Saltwater Taffy Distress Oxide ink.  I glued that to a top-folding A2 card base.  After I embossed white cardstock with the Dazzling Dots embossing folder and trimmed it to 4" x 5-¼", I adhered that to the card.

Then I die cut the small bear (Bear Hugs) and the bow, heart, and ribbons (Hugs Accessories) from white cardstock.  I die cut the envelope (Hugs Accessories) from some patterned paper in my stash.

I inked Saltwater Taffy Oxide onto the bow and heart with an ink blending brush.  I used a fine tipped glue to assemble the pocket (that looks like a present since I added the bow!) and adhered the ribbon and bow to it.

I colored the bear with Lost Shadow and Weathered Wood Oxide inks.  Then I stamped his cute face (Bear Hugs Faces and Sentiments) in black ink.  I used a Copic marker to color the cheeks.

The sentiment is stamped with black ink and then I did some partial die cutting with a die in the Happy Occasion Words die set.  After I punched a hole at the top I tied on the twine and adhered it to the little bear's paw.  I inserted the bear into the pocket and added a few dots of glue to secure it.  Then I popped the piece up with foam tape.

These sets are so sweet and totally adorable!  Be sure to check out the entire Stampendous Hugs Collection!  Thanks so much for stopping by, and I hope you have a wonderful, and crafty, weekend!

Thank you for using my affiliate links to shop (never any additional cost to you)!

Wednesday, June 28, 2023

Birthday Card with a Cute Pink Cabin

Happy Wednesday crafty friends!! Today I'm sharing a sweet birthday card for Honey Bee Stamps featuring a pink Summer Cabin and the gorgeous Spring Medley embossing folder.

First I die cut one of the cute cabins from the Summer Cabins Honey Cuts. The white pieces are 80# Neenah and the others are colored cardstock from my stash. I did use a brown Copic marker to color the trunks of the trees and also a blue marker for the backing I made to go behind the windows.

Next I used glue with a fine tip to make it easy to assemble the pieces of the cabin and trees. There's also a very handy link to a layering guide you can download and print in the product description.


Next I ran the Spring Medley 3D embossing folder and pink cardstock through my die cutting machine. I trimmed the embossed piece to 4" x 2-¾". I also trimmed a narrow strip of green cardstock.

Before adhering any element to my A2 card base, I used a Detail Blender brush to ink on a bit of Tumbled Glass Distress Oxide ink to create a sky for my scene. I used the embossed panel and the cabin as a guide for where to place the ink.

Next I adhered the pink embossed piece to my card and then the green strip. I used thin foam circles to adhere the cabin, and glue to adhere the other elements except the small tree. I popped it up with foam tape.

I stamped the sentiment from the Mini Messages: Everyday set in Intense black ink. Then I cut it out with a die from Mini Messages Banners. I added a narrow foam tape strip to pop it up.

I totally love how this turned out, and I hope you do too! I enjoy using sets like the Summer Cabins in a bit of an unexpected way. Thank you so much for stopping by today--you are appreciated!

Thank you for using my affiliate links to shop (never any additional cost to you)!

Tuesday, June 27, 2023

Let's Make A Clean & Simple Birthday Card

Happy Tuesday friends!  Today I'm sharing another CAS card featuring the Open Flower #1 die by Rubbernecker Stamps.  I love how easy and quick this was to make!

First I die cut the Open Flower #1 die three times from 80# Neenah and used glue to adhere the layers together.

Next I used blending brushes to color the back layer of the blossoms with Posey, Scarlet, and Crimson inks from Color Fuse #4 darkest to lightest.

The gray layer is a piece of paper from the Welcome Spring paper pad and is die cut with the Quilted Stitch Cover die.  I trimmed it to 3-¾" x 5" and matted it on top of a white layer and then onto a coordinating colored layer.

I stamped the sentiment from the Birthday Celebrations stamp set with Hearth ink (Color Fuse #12).  Then I trimmed it into a rectangle and added foam to the back on the ends only.

For a touch of bling I added gem stickers to the three berries.

Thank you so much for stopping by!  I hope you have a wonderful, and crafty, day!

Thank you for choosing to use my affiliate links (never any additional cost to you)!

Friday, June 23, 2023

My First Card with the new Spellbinders BetterPress!!

I'm sure most of you have heard about the newest product from Spellbinders, right?  It's called the BetterPress Letterpress System and gives the look of traditional letter press!!

There are several good videos showing how to use the BetterPress system on Spellbinders' YouTube channel, so I won't spend time explaining the how of it.  But I can say this, it is very easy to use!  Also, so you know, I purchased the BetterPress Starter Bundle (that was available for preorder) myself and therefore, any opinion is exactly what I think.  The now available BetterPress Letterpress System also includes a black mini ink pad, a sampler pack of Cotton Card Panels, and a roll of Best Ever Craft Tape.

First I positioned the included BetterPress Press Plates onto the Chase with Magnetic Insert.  I followed the directions for inking the Press Plate with the specialty BetterPress black ink.  I used the included Best Ever Craft Tape to adhere the BetterPress Cotton Card Panel to the Platen.

Okay, I know all of that sounds like Greek, right?!!  LOL!  But once you watch a video, you will see that it is not too complicated after all!

I ran the system through my Platinum die cutting machine (click HERE for a list of compatible products) and WOW!  Photos just don't do it justice!  I colored the image with a few of my Zig watercolor markers.  I also added yellow and dark gray splatters to the layer.  Then I die cut it with an Essential Arches die and a black matting layer.

Here's a super closeup of an extra sentiment where you may be able to see the beauty of the BetterPress:

I also used the largest Essential Arches die to make a folded card base for the layers.  After I tied some gingham ribbon around it, I popped it up with foam tape.

So you know, I did try coloring another image with my Copic markers.  The colors blended fairly well on the Cotton Card panel, but not as good as the Neenah I usually use.  The green markers seemed okay, however, when I started coloring the flowers with a light yellow marker, there was a bit of smearing of the black ink.  That's when I stopped that!  Watercolors worked great on the Cotton Cards as do pencils.

I hope you've enjoyed my review of the new BetterPress Letterpress System.  I can honestly say that I'm very happy I gave into my impulse to purchase this new product!  Haha!  I can't wait to create more cards with it!  Thanks so much for stopping by today--you are so appreciated!

Thank you for using my affiliate links to shop (never any additional cost to you)!

Wednesday, June 21, 2023

Simon Says Stamp Out Of This World 2023 release -- Card Featuring the New Garden Spires Embossing Folder

There's a fabulous new release over at Simon Says Stamp!  It's called Out Of This World and as usual, there's a wide variety of styles of stamps and dies to choose from!

My card features the beautiful Garden Spires embossing folder.  This card came together very quickly by inking up the embossing folder!

To create the embossed layer, I used a brayer to add Distress Oxide ink to the side of the Garden Spires embossing folder that has the flat surface with the image recessed.  I inked it with Peeled Paint Distress Oxide ink, then placed an A2 sized piece of 80# Neenah.  I knew I wanted to do multiple layers of ink, so I put a few pieces of removable tape just at the edges of the cardstock.

I ran it through my Spellbinders Platinum, opened the folder and used the brayer to add Bundled Sage Oxide ink.  Keep repeating the steps until you are happy with the look.  I trimmed the piece to 4" x 5-¼".

You can see a few imperfections but I like the rustic look!  Next I took a very old gold metallic pigment ink pad (that is apparently no longer produced) and very lightly rubbed it across the raised embossed image.  I also lightly swiped it around the edges of the embossed panel.

I wrapped some jute twine around the panel and tied it in a knot.  Then I added foam tape strips to the back to adhere it to my card base.

Next I swiped the gold ink pad onto a scrap piece of white cardstock.  Then I ran it through my Platinum with the Flickering Butterflies die.  I added a dot of glue just to the middle of the butterflies so the wings can pop up.

I die cut the sentiment four times from white cardstock.  The one I have is from Simon Says Stamp and retired, but I found this one by Hero Arts that is identical!  It also comes with a coordinating stamp set.  I used glue to adhere all of the layers together and then to the card.

Thanks so much for stopping by today!  Be sure to check out all of the other fabulous new products over at Simon Says Stamp!

Thank you so much for using my affiliate links to shop (never any additional cost to you)!

A Beautiful Day -- A Fun Card with Distress Spray Stains

Happy Wednesday crafty friends! Have you noticed that lately I'm very much into using my inks for lots of fun techniques? Well today's card is no exception!  Haha!  I've used the beautiful Lovely Layers: Water Lily by Honey Bee Stamps on my card with lots of ink sprays and stenciling! Check out the the details below!

First I created the background layers for the Water Lily. My thoughts were to create a pond surrounded by a grassy meadow. For all of the layers and flower I used Distress Watercolor cardstock. I began by coloring panels of the watercolor cardstock. For the green layer I first sprayed on Twisted Citron Distress Spray Stain. I used my water mister to spritz it with water to totally saturate the panel. You can let it air dry or use your heat tool to dry. The main thing is to always dry one layer before moving onto the next layer of ink.

Since I don't have any other green Distress Ink Spray Stains, I added Mowed Lawn Distress ink with the ink smooshing technique. Just press the ink pad onto your craft mat, lightly spritz with water, and dip the panel in. Dry, dip and repeat until you are happy! I created another panel to use to die cut the green pieces of the Lovely Layers: Water Lily.

Next I used the Grassy Hill border stencil to add in the grass. I used a Detail Blender brush and Rustic Wilderness Distress ink to add multiple layers of grass.  I used some white paint to add dots to emulate small flowers with a #1 paint brush.

I trimmed the grassy panel to 5-½" x 4-5/8" and adhered it to a white card base. Yes, the size is unusual, but it will fit easily into an A7 envelope. Next I created a blue watery panel using the same technique as the grassy panel, but I only used two Distress Sprays Stains: Salvaged Patina and Mermaid Lagoon. Die cut the dry panel with the largest die in the Ocean Deep Scene Builder Honey Cuts. I used Bee Creative glue to adhere it to the card.

I used the same techniques to create the Lovely Layers: Water Lily. The watercolor cardstock was spritzed with Saltwater Taffy and Abandoned Coral Distress Spray Stains. Before I die cut the layers, I added white paint splatters. The flower has some thin foam dots between the layers to show off the dimension.

I stamped the sentiment from the Mini Messages: Everyday with Intense Black ink and cut it out with a Mini Messages Banner die. A thin foam strip was used to adhere it to the card.  I added a few Ombré Pearl Stickers for some subtle bling.

It's so fun to create your own inky panels! No two are alike and yet all will be beautiful! I hope I've given you some inspiration to give these techniques a try. Thank you so much for stopping by today!

I so appreciate you using my affiliate links to shop (never any additional cost to you)!

Saturday, June 17, 2023

Birthday Card and Wax Seals

Today I'm sharing a card that features Spellbinders new Sealed Blooming Stems die set from the new Sealed For Summer collection!  I added a fun wax seal to the card in lieu of stamping a sentiment.  (P.S.:  I just noticed that as of the date of this blog, the product title describes these as "hot foil plates".  They are not!)

First I created the stems and flowers by die cutting all of the pieces in the Seal Blooming Stems set from colored cardstock.  I have all of the cardstock I used in the list below.  Using colored cardstock makes it super easy and quick to create the elements for a card.  I didn't even add shading to the die cuts--may be a first for me!  Haha!

After I glued the layers together, I created my wax seal by melting some frosted wax beads.  I just use my heat tool to melt wax beads in the melting spoon.  So much faster!  I poured the melted wax onto my silicone mat and pressed the Sweet Happy Birthday wax seal stamp into the wax.  Once it had cooled, I used a gold pen to highlight the sentiment and flower.

For the A2 card base and layers, I added a dark violet layer to the card.  I had an embossed piece leftover from a previous project that I used for the next layer.  It was embossed with the gorgeous Flower Frenzy 3D embossing folder and measures 3" x 4".

I glued the Blooming Stems onto the embossed layer.  Then I added an wax seal sticker to the back of the wax seal to adhere it to the card.

This was such an easy card to make and I really love how it turned out!  I hope you do too!  Thanks so much for stopping by today!

Thank you for using my affiliate links to shop (never any additional cost to you)!

Thursday, June 15, 2023

The Most Adorable House Mouse Collection!

Have y'all seen the new House Mouse Collection that's over at Spellbinders?  Oh my gosh, I just think these sweet mice are the most adorable ever!!  And, they have names that are listed on the product packaging!  My card today features the Spring Rain stamp set.  Check out the line art in these.  It is so very detailed and since they are red rubber, you get the most crisp stamped image!

I stamped the sweet Spring Rain image onto 80# Neenah with Copic safe ink.  Then I used my Copic markers to color the images.  When I finished coloring with my Copics, I used a few Prismacolor pencils to add more detailing to the fur.

I used a black gel pen to darken the eyes and noses.  Since the pencils muted some of the stamped lines a bit, I used a Micron 005 black pen to add those back in.  A white gel pen added details to the eyes and cheeks.

Next I cut the image out with the largest A2 Matting Basics B die.  Since this is a rainy scene, I used an ink blending brush to carefully darken the edges with Lost Shadow Distress Ink.  I was very careful to not overdo this step!

I added a dark grey layer that I die cut with the largest A2 Matting Basics A die.  These were adhered to an A2 card base.

To finish, I stamped the sentiment from the Spring Rain set in black ink.  Then I used the rectangle strip in the A2 Matting Basics B set to die cut the sentiment.  I added a bit of thin foam tape to the back for dimension.

It doesn't show at all in the photos, but I did add some clear Nuvo drops to each of the raindrops after I sparkled them up with a clear glitter pen!

I've linked all of the House Mouse sets in my list below.  See if you don't agree that they are the most adorable ever!  Thanks so much for stopping by!

I so appreciate you using my affiliate links to shop (never at any additional cost to you)!

Wednesday, June 14, 2023

Retirement Card Using Products in an Unexpected Way!

Happy Wednesday crafty friends! This retirement card I'm sharing today features a few new products from Honey Bee Stamps newest Adventure Awaits release along with some previously released products that I still love! When I was making this card, I was reminding myself that I (we) need to always look at the products for what they are, not what they may be called. Keep reading and you'll see what I'm talking about!


Here is the first example of looking just at the product, not at what the name of it is. I used the Ocean Circlescape Honey Cuts to create a small "lake" scene that would coordinate with the new Lovely Layers: Rod & Reel and the Lovely Layers: Trees!

After I die cut the Ocean Circlescape die from 80# Neenah, I added a few pieces of removable tape to the back of the "lake" layers for ease of ink blending. Then I used several Distress Oxide inks and my Detail Blending brushes to color the lake and sunset. For the lake I used: Chipped Sapphire, Uncharted Mariner, and Salty Ocean. I added some water splatters and white paint splatters to the waves. For the sunset I used: Squeezed Lemonade, Picked Raspberry, Wilted Violet and Blueprint Sketch. 

I cut a circle with a die from the Circlescape Shaker Frames Honey Cuts. Then I used Bee Creative glue to adhere the Ocean Circlescape to the die cut circle.

The Lovely Layers: Rod & Reel pieces were die cut from 80# Neenah and the rod portion from silver cardstock. I used a few Copic markers to color the rod pieces, tackle box, and the fish. I used glue to adhere the rod pieces together.

The Lovely Layers: Trees are also die cut from 80# Neenah and colored with Mowed Lawn, Rustic Wilderness, and Twisted Citron Distress Oxide inks. I colored the trunks with a brown Copic marker.

Here is the second example of looking at the product, not the name. I die cut a piece of paper from the Make It Merry paper pad with the largest A7 Double Stitched Frames die for the card base layer. It was the perfect color to coordinate with my card!

The sentiment strips from the new Mini Messages: Everyday are stamped with Intense black ink and die cut with the coordinating dies. The trees and sentiments have foam tape to pop them up a bit, and the other elements are adhered with glue.

I love combining new products with older favorites! And with this design and card style, just switch out the sentiment to make a birthday, Father's Day, or other masculine card.

I hope you've found inspiration today for looking at your Honey Bee goodies in a different way! If you give this a try, I hope you'll share it over on the Honey Bee Buzzworthy Facebook group (you can share any card made with Honey Bee products in addition to the challenge cards) and tag me--I'd love to see what you create! Thank you so much for stopping by!

Thank you very much for using my affiliate links (never any additional cost to you)!

Tuesday, June 13, 2023

Thinking Of You -- A Fun Textured Background Card

 Hello friends!  Today I'm sharing a CAS card featuring Rubbernecker Stamps Open Greenery #1 Die and the Repeating Bricks Stencil.  This card not only is clean and simple, but quick and easy to make!

First I created the embossed brick background.  I added some embossing paste through the Repeating Brick stencil that I tinted with one drop of Mocha re-inker.  This is from Rubbernecker's Color Fuse set # 3.  I set that aside to dry.  (All inks are in the list below.)

Next I die cut three of the Open Greenery #1 Die from 80# Neenah.  I used one of these awesome Paper Pouncers to quickly color each one with inks from the Color Fuse set #9.  I used Beachside, Whisper, and Dreamer inks.

The sentiment from the Short Phrases #1 is stamped in Pecan ink (Color Fuse #3).  I trimmed it into a strip and hand cut fish tail ends.

Making sure the brick embossed piece was dry, I trimmed it to 3-½" x 4-½".  I added thin foam tape to the back to pop it up onto an A2 card base.

Next I glued the Greenery pieces together with dots of glue just at the base and middle center of each piece while offsetting them.  Liquid glue keeps them secured to the embossed layer.

I added pieces of foam tape at each end of the sentiment strip to adhere it to the card.  I added a tiny bit of bling with a couple of coordinating pearl stickers on the top greenery layer.

I love how this card turned out and sure hope I've given you inspiration for your card making!  Thanks so very much for stopping by!

Thank for using my affiliate links to shop (never any additional cost to you)!

Sunday, June 11, 2023

Today Is All About You!

Today I'm sharing a fun card that features Spellbinders new Glimmering All About You hot foil plate and the Tiny Dots embossing folder!  This was so easy and quick to make that this is a short blog post!  These are just two of the several new products in the It's My Party Too release (click the link to check it out).

I have all of my supplies in the links below for you to check out.  First I die cut the balloon that's in the Birthday Basics die set three times.  I kept them in the negative space with some removable tape for easy rainbow ink blending.  I stamped three balloon strings from the same set in Distress inks.  All of the inks are Distress Inks--just choose your favorite rainbow shades!

Next I used my Glimmer Hot Foil System to add rainbow foil to the Glimmering All About You hot foil plate.  I used the included die to cut it out.  Just look at the pretty shine!!

I glued the strings to the back of the balloons and added foam tape.  I adhered them to an A2 panel of white cardstock that I embossed with the Tiny Dots embossing folder.  I also popped up the sentiment with foam tape.

This is such a fun rainbow card that, I think, is suitable for just about anyone's birthday!  I hope you have a wonderful day, and I appreciate you stopping by!

Thank you so much for using my affiliate links (never any additional cost to you)!