Thursday, July 28, 2022

True Gifts of Christmas - Hot Foiled Christmas Card

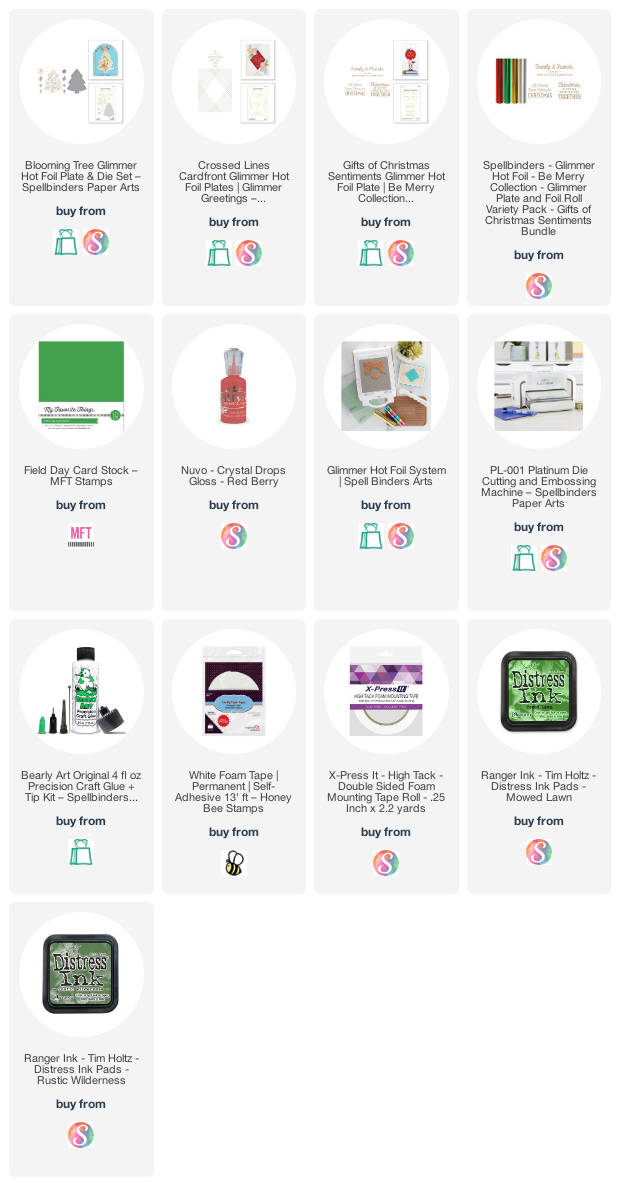
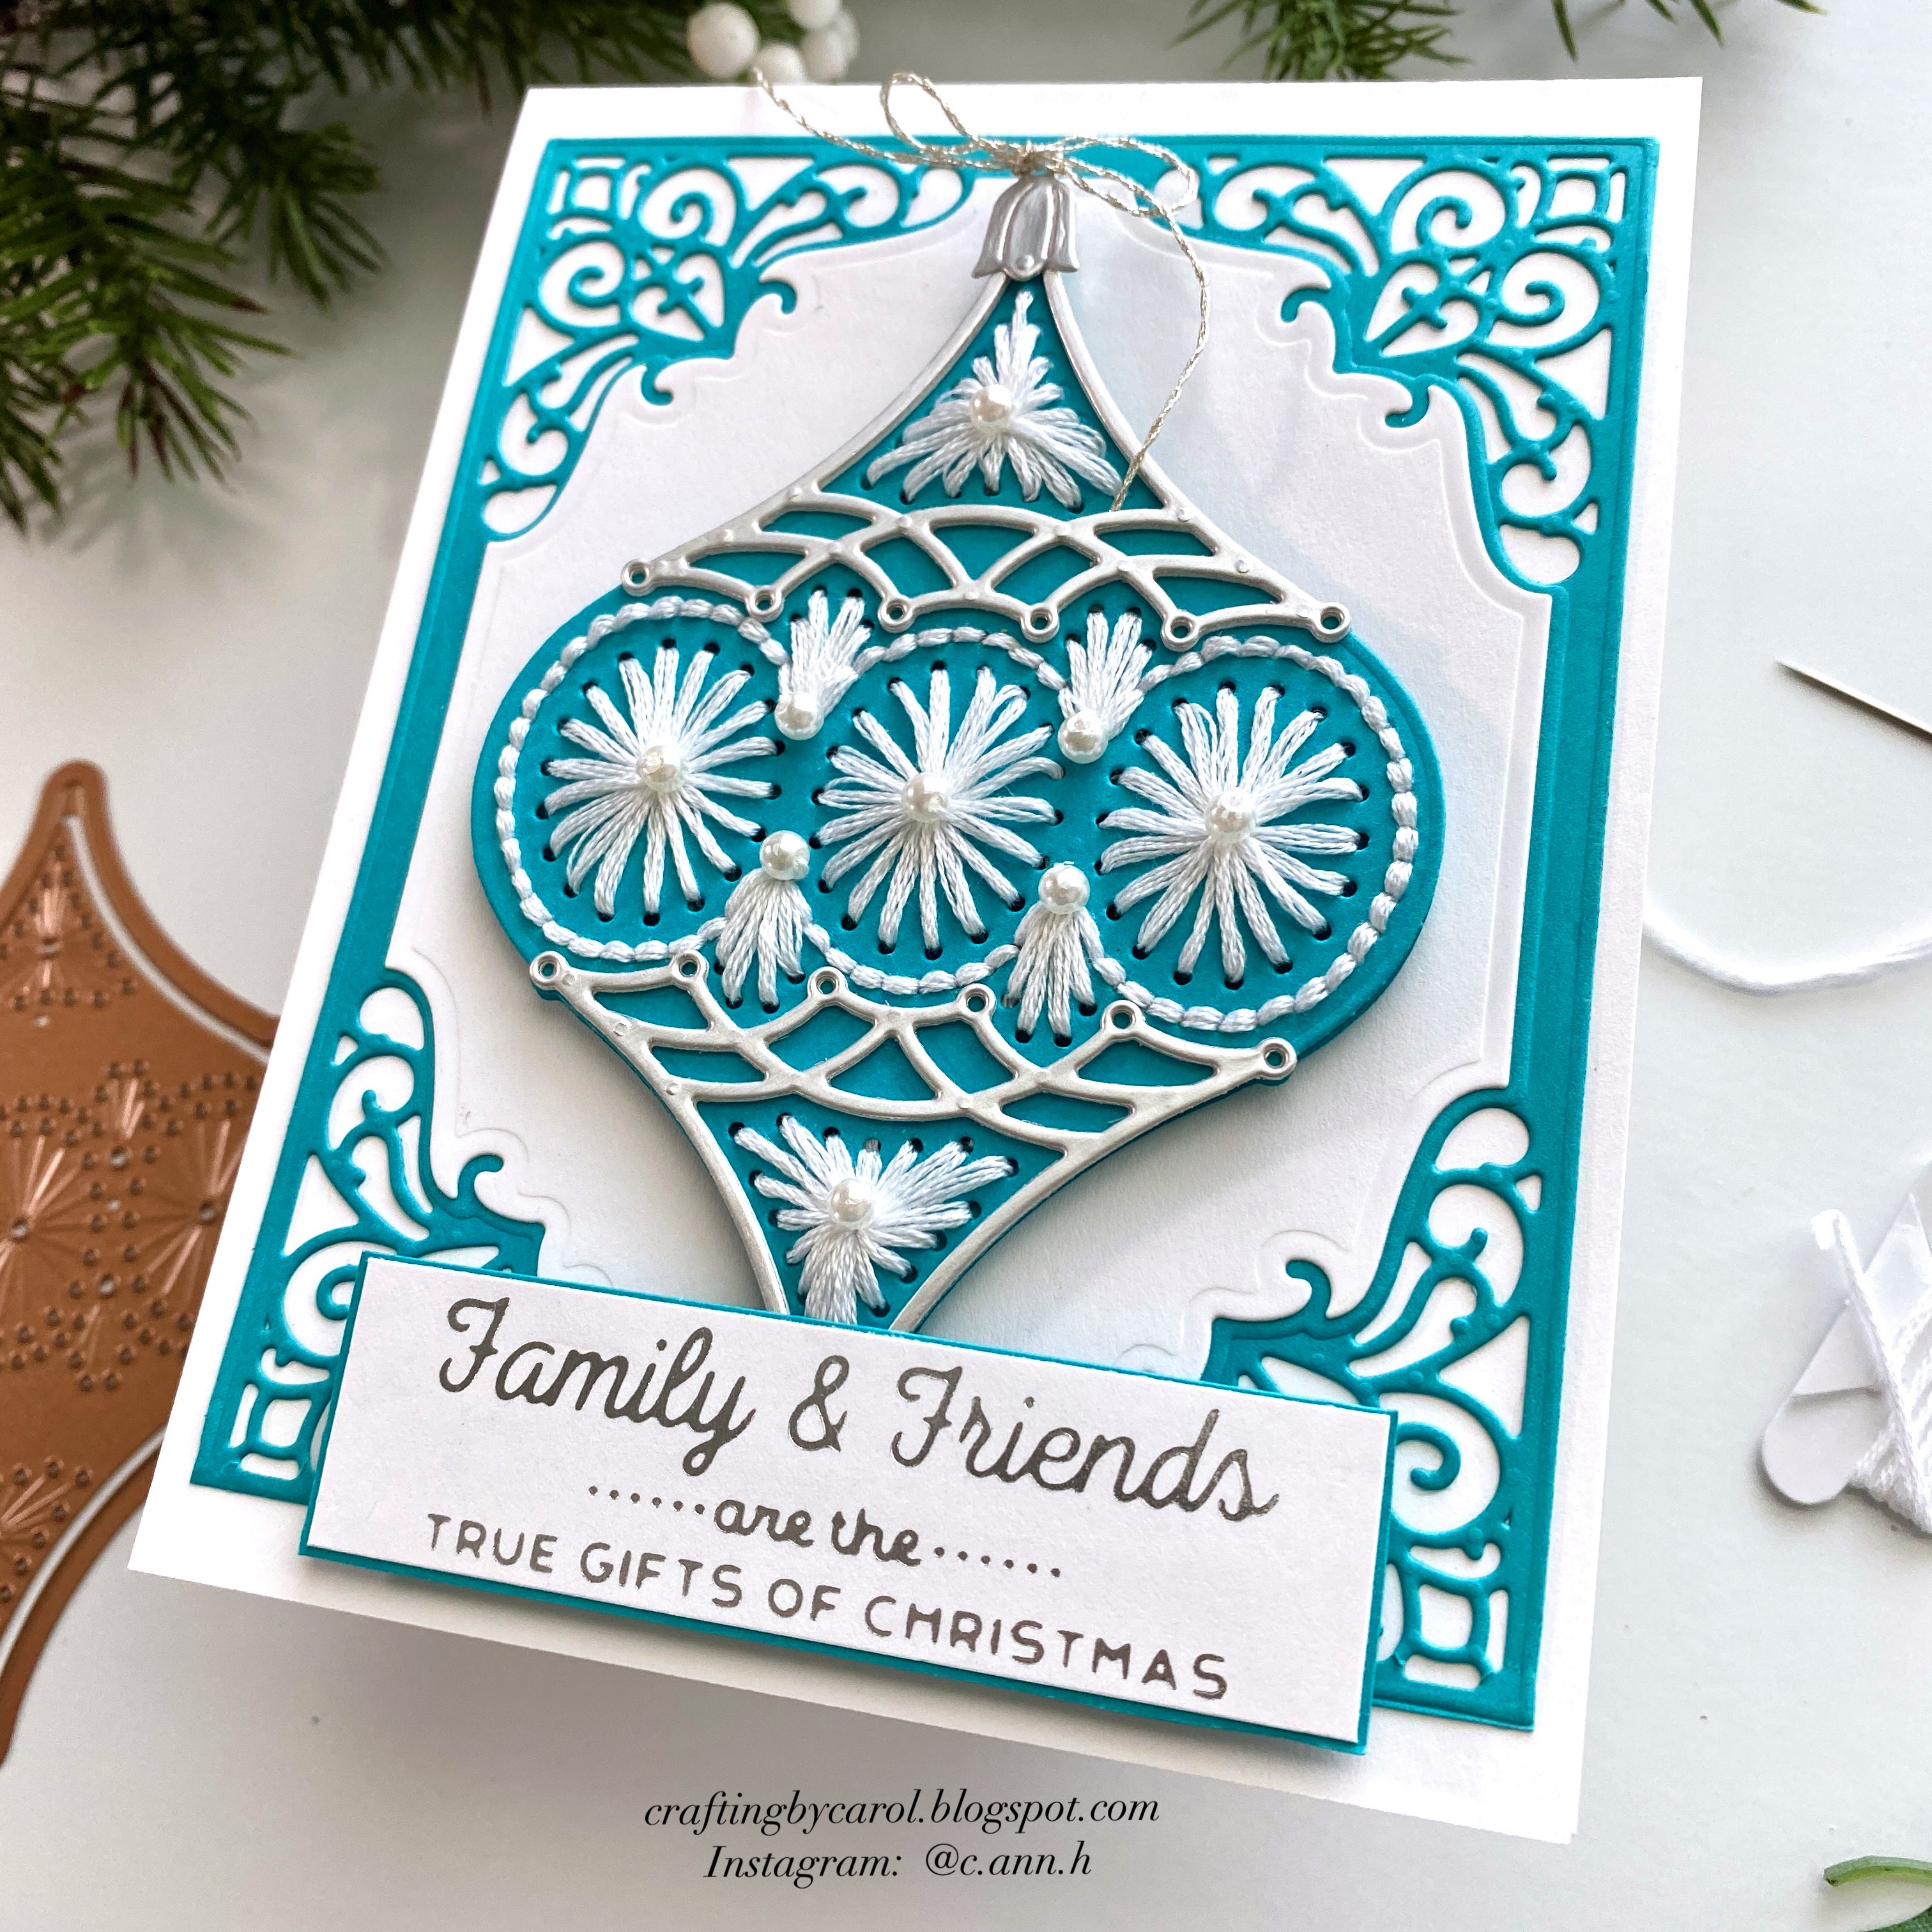
 Hello friends!  I'm still adding to my Christmas card stash and today I'm sharing my card that features a couple of Spellbinders' new products from their Glimmer Greetings release!  These are beautiful hot foiling sets that will come in handy to create quick, and beautiful, cards!

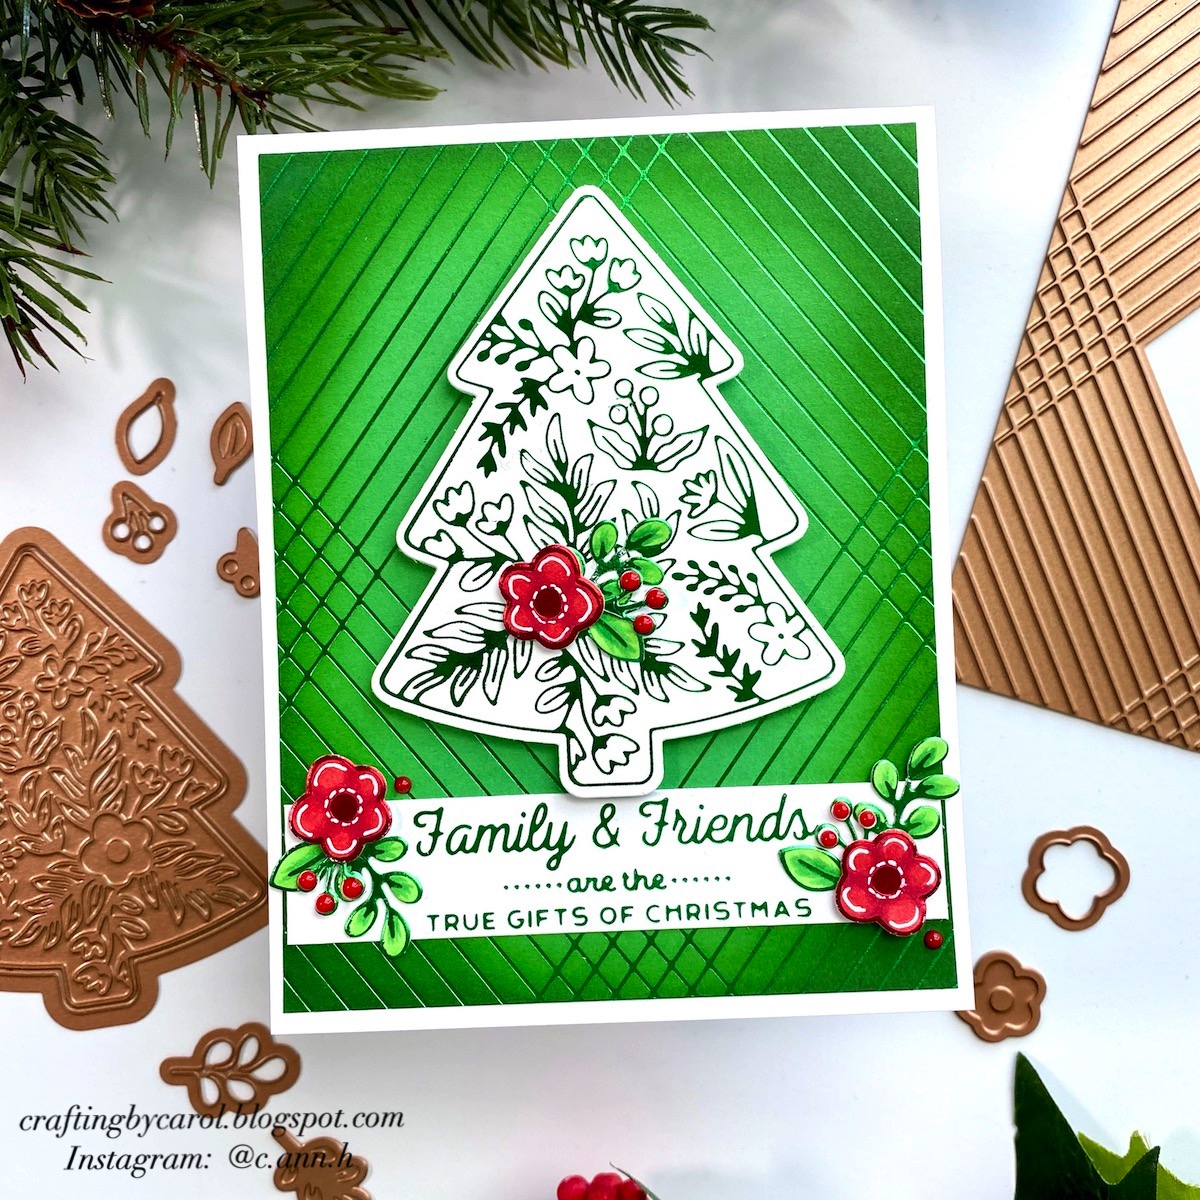
I used my Spellbinders Glimmer Hot Foil machine and Platinum die cutting machines for this project.  First I foiled some green foil with the Crossed Lines Cardfront hot foil plate onto green cardstock.  I trimmed it to 4" x 5-¼".  Next I added some Mowed Lawn Distress ink around the edges with an ink blender brush.  Then I brushed on just a touch of Rustic Wilderness Distress ink. Then I adhered it to my card front.

Then I foiled the elements from the Blooming Tree Hot Foil & Die set with red and green foils.  These all part of a set of four in the Holiday Variety foil set.  This set has all of the coordinating dies included so you can die cut the pieces after you foil them--I love that!  I die cut the pieces and then used a few Copic markers to color the flowers and leaves.  

The sentiment is from the Gifts of Christmas Sentiments hot foil plates set.  (Note: This currently ½ off over on Spellbinders site!!)  After I foiled one of them in green foil, I trimmed to fit the card and adhered it with glue.  I added some foam tape to the tree and flowers and adhered them to the card base.  I used glue for the leaves.

For a bit of embellishment, I used a white gel pen to add detailing to the flowers.  Then I added drops of Red Berry Nuvo Crystal Drops.

I love how this card turned out, and hope you do too!  Thank you so much for stopping by!

Wednesday, July 27, 2022

Hello Friend Card with Succulent Garden Builder Dies

 Hello Honey Bee friends! Today I've fun with the Succulent Garden Builder Honey Cuts and have paired it up with a different way to use the On The Line: Succulents set. I love finding unique ways to use stamps other than what might first come to mind! Read on for the details of how I created my wall arrangement!

To create the card base and layers, trim a piece of patterned paper from the Marvelous Moments 6" x 8-½" paper pad to 2" x 5-½" and adhere it with Bee Creative glue at the bottom of and A2 card base. Next I trimmed some 80# Neenah white cardstock to 2-¼" x 5-½". Using my scoring board and tool, I added scored lines at every ¼". Then I adhered it to the top of the card. I added a ¼" strip of white cardstock to cover the line where the two pieces meet.

Next I die cut all of the pieces from the Succulent Garden Builder Honey Cuts I wanted from 80# white Neenah cardstock. You could definitely use colored cardstock scraps, but sometimes I'd just rather color the pieces rather than dig through my scraps! LOL! I used various Copic markers to color the pieces.  Then I used a white gel pen to add some details to the plants.

Then I stamped one of the main pieces from the On The Line: Succulents set in No Line Coloring ink. I also colored this with my Copic markers. And yes, I did color these as flowers, which makes even another way to use this beautiful set! I used all the same color of markers for all of the card elements so that it will all be cohesive in the color scheme. I used the coordinating Honey Cuts to die cut the piece. Then I used one of the longest Wood Frame Builder Honey Cuts to create my shelf. This time I did use a piece of scrap cardstock.  I trimmed the shelf to 4".  Then I glued the On The Line Succulents piece to the shelf and added foam tape strips to the back. I added a few foam strip pieces to the back of the hanging basket too. The sentiment is also from the On The Line: Succulents set and die cut with the coordinating Honey Cut.

Coloring die cut pieces is so relaxing for me, and I sure hope you've enjoyed another take on the On The Line Succulentsset! I think the Succulent Builder pairs so well with it! Thank you so much for stopping by today!

Tuesday, July 26, 2022

Christmas In July - A Slimline Card with Gold Embossed Dimensional Tree

 Hello crafty friends!  Making Christmas cards in July makes me think of much cooler weather!  Which is good, because here in Texas we're in a major heat wave and severe drought.  Today I'm sharing my card featuring Rubbernecker Stamps gorgeous Slimline Christmas Tree die set.  I've heat embossed, shaped, and popped up the tree for extra dimension!  Read on for the details.

First I created my card base using some of my much loved, and hoarded (LOL!) patterned cardstock.  It's a vellum and gold  piece that I die cut with the largest Slimline Nested Stitch die.  You can use any patterned, festive paper that will coordinate with the tree you create.  I adhered it to a slimline card base that measures 3-¼" x 8-¼".

Next I created the tree.  First I die cut all of the Slimline Christmas Tree dies from 120# Neenah cardstock.  Then I added temporary adhesive to the back of the pieces, and a few at a time, I placed them in my MISTI.  I made sure that the grouping fell within the dimensions of the stars stamp from the Stars/Wavy Background Strip stamp.  I inked up the stamp with Versamark ink, then sprinkled on some gold sparkle embossing powder from my stash, and heat set it.  I repeated these steps until all the tree sections were heat embossed.

For the star topper, I pressed the Versamark pad directly onto it, picked it up with my reverse tweezers, added the embossing powder and heat set.  You can get a thicker layer by dipping it back into the embossing powder while it's still hot and heat setting again!

I die cut the tree trunk from woodgrain cardstock.  Then I used a small ink blender brush to color it with Pecan Ink from the Color Fuse set #3.  Before adhering the tree layers together, I used my fingers to curl the edges and round each section.  I added a thin line of glue just at the top edge of each tree layer to adhere the layers together.  Next I added a double layer of foam tape squares to the center back of the tree and added it to my card.

I stamped the sentiment from the Christmas Cheer set with Versafine Onyx Black ink and trimmed it into a rectangle shape.  Next I used a Pentel gold sparkle pen to color in the Christmas lights that are on the sentiment.  Then I added foam tape to the back to adhere it to the card.

I used the same gold sparkle pen to add more bling to the tree with random dots all over.  I love the subtle sparkle this adds!

I hope you've enjoyed my card today!  Thank you so much for stopping by!

Check out the product details here:

Wednesday, July 20, 2022

Thinking of You Card with No Line Coloring

 Happy Wednesday crafty friends! Today I'm sharing my card using the beautiful On The Line: Succulents stamps and Honey Cuts. I've done some no-line coloring too, and set the scene with some paper from the beautiful to 6" x 8-½" Marvelous Moments paper pad. Check out the details!

First I stamped both succulent images from On The Line: Succulents in Bee Creative No-Line Coloring ink onto 80# Neenah cardstock.  I used my MISTI to stamp them 2-3 times to darken the ink (hey! My eyes aren't so young anymore--LOL!)   It's been quite a while since I've done no-line coloring and it's a technique that I really enjoy! I used these Copic markers to color the images:

  • Pink tipped succulents: V01, G24, G21, G20, RV13, RV10
  • Bluish green succulents: G19, G16, G02, G000
  • Dark green leaves: G29, G07, G05
  • Succulent sprigs: YG17, YG25, YG21

Here's a really close-up photo of my coloring:

I used my Bitty Buzz Cutter and the coordinating Honey Cuts to cut them out. There is an actual line that stamps with the succulents, and there was no way I was going to try using a Copic marker for that. I looked through my Prismacolor Pencils and found that the 70% French Grey color was just right. I just used a ruler and then drew the line.

Then I stamped one of the several sentiments included in the On The Line: Succulents set with Intense Black ink. I absolutely love that there are coordinating dies for the sentiments, and used the coordinating one to cut it out.

Next I chose some paper from the Marvelous Moments paper pad. I absolutely love the new size of 6" x 8-½"!! This size is large enough for 5" x 7" cards, slimline cards; and as I've done here, I only needed one sheet of paper! I trimmed my chosen paper to a piece measuring 4" x 5-¼". I used the reverse side of the remaining piece of the paper and trimmed strip to 2" x 4". I adhered these to a top-folding A2 card base.

I used foam tape to adhere the succulent images and sentiment to my card. Then I used a few of the sparkly gems from the Marvelous Moments Gem Stickers to add some bling!

I love how this card turned out! Other than the coloring time, it came together in a snap! I have more ideas for this On The Line: Succulents set such as a gate-fold card, a step-fold card, and I'm sure there are other ideas too!

I sure hope I've inspired you to give this gorgeous set a try. If you check my Instagram later today, I plan on posting a reel to show some of the process for this card. Thank you so much for stopping by! Have a fabulous day!

Links to the products I've used today:  (affiliate links--never any additional cost to you)

Tuesday, July 19, 2022

Stitched Ornament Christmas Card

Hello friends!  I hope your week is off to a good start!  Today I'm excited to share my card using the new Stitched Ornament from Spellbinders new Stitchmas Christmas collection!  My ornament is also removable to be used as a keepsake ornament to hang.  Check out the details below!


 First I die cut some Lagoon cardstock (links below) with the outline and stitching portion of the Stitched Ornament die.  I cut one more with just the outline die and set it aside for later.  I used all six strands of white DMC embroidery thread to add my stitches.  I just did basic stitching and made sure to always be stitching down into the center points of the sections.  I've had these pearl beads in my stash forever, and used two strands of the white thread to add several into the centers of the sections.

To finish up the ornament, I die cut the decorative ornament pieces from silver cardstock and adhered them to my ornament.  I tied some silver thread into a bow at the top.  Next I added glue to the extra die cut ornament and adhered it to the back of the stitched ornament and set it aside to dry.

For the card base I die cut more Lagoon cardstock with the two outer dies of the A2 Filigree Marquis die set.  I die cut the decorative center from white cardstock and adhered it to the blue filigree layer.  These were then adhered to an A2 card base.

I used my Glimmer Machine to silver foil the sentiment from the Gifts of Christmas Sentiments set.  I added a Lagoon mat layer and popped it up onto the card.

I wanted this ornament to be removable by the recipient so I added two removable glue dots to the back and adhered it to the card.

You could write the year and a message on the back of the ornament, or even use it alone as a gift tag!

Have you tried stitching dies?  I highly recommend them and you don't need any sewing skills at all to use them!  Thank you so much for stopping by!

Thank you for using my links for your shopping (affiliate links, never any extra cost for you)

Saturday, July 16, 2022

Little Note, Big Thanks!

Today I have a card I made using Spellbinders All-Occasion Mailbox Greetings foil plates.  This is one of several products in their beautiful Parcel and Post Collection release!  There are four different themed foil plates in this set and I chose the thank you sentiment.  I love having thank you cards on hand!

First I used my Glimmer Machine to foil the sentiment onto Spellbinders Glimmer Specialty cardstock with pink foil.  I used my paper trimmer to cut it into a rectangle shape.  

Next I used the Hand Drawn Scallops embossing folder to emboss some pink cardstock.  I trimmed it to 4" x 5-¼" and adhered it to an A2 card base.

I really love the shine of the pink foil!  Next I die cut some of the flowers and greenery from the Be Bold Blooms die set with cardstock scraps.  I played around with my sentiment and flowers to arrange them just right.  Then I added foam tape to the sentiment and a few of the flowers.  I used liquid glue to adhere the other elements.

I think this may be the shortest blog post I've ever written!  LOL!  But seriously, this card was that quick.  Who doesn't love a card that's quick, easy, and yet so beautiful?!!  Thanks so much for stopping by.  I hope you have a wonderful, crafty weekend!

Thank you for using my links:  (affiliate links--never any additional cost for you)

Wednesday, July 13, 2022

Ocean Deep Scene Builder Dimensional Thank You Card

Hello Honey Bee Friends! Today I have this thank you card I made featuring the awesome Ocean Deep Scene Builder Honey Cuts. I used them in a different way by using the negative portion of the die cuts to make this dimensional, see-all-the-way-through, 5" x 7" card. Read on for the details!

First I created the card base layers. I dove deep (get the pun? LOL!) into my cardstock stash and chose four ombré shades of turquoise cardstock. Then I cut each piece into a 5" x 7" rectangle--EXCEPT the second to darkest shade which was cut to 5-¼" x 7". Use a score board to score it at ¼". Then beginning with the lightest shade of cardstock, I die cut it with the largest of the Ocean Deep Scene Builder dies. (Set the die cut pieces aside to use on another card.) I placed the next shade of cardstock behind the one I just die cut in order to get the second to largest Ocean Deep die positioned. I repeated these steps for each subsequent layer. 

Next I die cut the smallest Ocean Deep die with another piece of the darkest cardstock. To make that last piece stand out, I used an ink blender brush to add Uncharted Mariner Distress Ink over it.

To assemble the card, first I took the scored layer and added Bee Creative glue just along the ¼" scored piece of the layer and folded it over the edge of the darkest cardstock to the back. While that was drying I added foam tape to the back of the top three layers and adhered them to the card, ending with the largest opening on top.

That's the order I made this card in.  However!! Notice the stenciling? It would be LOTS easier to stencil that layer with the top layer of the Layered Waves stencil set before adhering!! I managed to add the Salvaged Patina Distress Oxide ink without making a mess after I had adhered the layers. Whew! Haha!

Next I die cut all of the underwater elements also in the Ocean Deep Scene Builder set from 80# Neenah. I used (way too many to list here) Copic markers to color each one. I added details such as the eyes of the fish and turtle with a black Micron 05 pen.

Then I had fun arranging the plants and animals on the card throughout the layers. I adhered each on with Bee Creative glue. Check out this next photo that shows what the card looks like when it's open.


I stamped the sentiment from the Seas The Day stamp set with Intense Black ink and then used the coordinating Honey Cut to cut it out. I glued it to the inside of the card making sure it was centered when looking at the closed card.

Of course, I needed some bling on the card! There are two shades of gem stickers in the Bee Bliss Gem Sticker set that coordinating perfectly! 

This card was so fun to make! It reminds me of snorkeling in clear blue waters and seeing the beautiful life in the waters! Thank you so much for stopping by!!

Tuesday, July 12, 2022

Let's Make Christmas Cards in July!

I love getting a head start on my holiday cards!  So we all at Rubbernecker Stamps are sharing holiday card inspirations to help get those ideas flowing!  Today, my card features the gorgeous Poinsettia #2 die set.

First I die cut the Poinsettia #2 dies two times from Specialty Cardstock.  I love the subtle texture this paper gives!  I used small ink blender brushes and sponge daubers to color the petals using Color Fuse inks from Set #4 and Set #10.  I applied Crimson ink at the tips of the petals, working towards the centers with each lighter shade.  I colored the largest petal with Basil ink.

Next I used flower shaping tools and a foam pad to add shape and dimension to each layer.  I colored the little flower centers with Fern ink from Set #11, and then shaped them with a tiny balled stylus.

To jazz up the flowers even more, I added splatters with a paintbrush and ink using a drop of the re-inker for Crimson and splatters of Basil re-inker on the green petals.  Next I mixed a small scoop of Confetti White Perfect Pearls with water and splattered that over all.  I set the pieces aside to dry.

I created my card base by stamping the greeting from the Christmas Cheer set with Versafine Onyx Black ink onto white 80# cardstock.  Then I trimmed it to 4" x 5-¼".  Next I ran the piece through my die cutting machine with the Diamond Pierced Cover die.

I really do like being matchy-matchy (LOL!) so I made a coordinating base layer by swiping the Scarlet ink pad along all four edges of an A2 white card.  I adhered the layer to the pierced layer with glue.  I glued my flower layers together and adhered them to my card.  I added a few pearl stickers here to the card for some extra bling!

Thank you so much for stopping by and I hope you've been inspired to get started on your holiday cards!

Product links for my card supplies:

Saturday, July 9, 2022

A Quick and Easy Birthday Card with Spellbinders Stitched Fanfare Die

 Happy Saturday friends!  Today I'm sharing a super quick and easy birthday card made with Spellbinders new Stitched Fanfare die and the Stylized Happy Birthday sentiment.  This cover die is made to be stitched on with embroidery thread, but I wanted to show you an idea to use it without the stitching!

First I added an A2 sized layer of coral cardstock from my stash to my card base.  Then I die cut the Stitched Fanfare die from 110# Neenah cardstock.  I added pieces of foam tape to the back to adhere it to the card.

Then I added small gem stickers to the die cut hole of each section.  This would normally be used when you stitched the die cut, but I love that this can be used in such a pretty way when you don't have time for stitching!

I die cut the Stylized Happy Birthday top layer three times from 80# Neenah.  I glue all of the layers together, then adhered them to the coordinating coral cardstock shadow layer.  I added some foam tape to the back to pop it up on the card.

That's seriously all there is to it!  I want to keep this idea in mind and use a more masculine colored cardstock and maybe enamel dots instead of the gems for a card for the guys!  Thanks so much for stopping by today!  Have a wonderful, crafty weekend!

These are links to the products I've used:

Wednesday, July 6, 2022

Friends Are Like Seashells We Collect

Happy Wednesday!! Today I have a card I made that features the beautiful new Lovely Layers: Seashore Honey Cuts. This is one of many fabulous new products in the Perfect Day release. Since the beach/ocean is one of my very favorite places, I couldn't wait to have a play with these beautiful dies!

First I used the new Waves Pierced A2 Cover Plate die to add the pierced waves to 80# Neenah cardstock. Then I used blender brushes to ink up the piece with Distress Inks. I used Mermaid Lagoon, Salty Ocean, and Uncharted Mariner. I used Bee Creative glue to add it to an A2 card base.  (All supplies are linked below.)

Next I die cut all of the pieces in the Lovely Layers: Seashore die set from 80# Neenah. Then I used the tan rubber embossing mat to get even more detail from the etched lines of the dies. This really does deepen the embossed lines even more than the die cutting does! I used various Copic markers to color the shells and sea grass. If you need a guide for the layers, check out the images over on the product page. I placed thin foam squares between each layer for extra dimension.

I arranged the images and popped some up with foam dots and adhered the others with Bee Creative glue.

To finish up, I stamped the sentiment from the new Seas The Day stamp set in black ink. I die cut it with the coordinating Honey Cut, then popped it up with foam dots. I added a bit of bling by gluing on a few small Clear Dew Drops.

Be sure to check out all of the other beautiful new ocean themed sets over in the Honey Bee shop! (The new wedding, florals, and baby sets are just as awesome too!) Thank you so much for stopping by--have a wonderful day!