Wednesday, June 26, 2024

Because Of The Brave, We Celebrate!

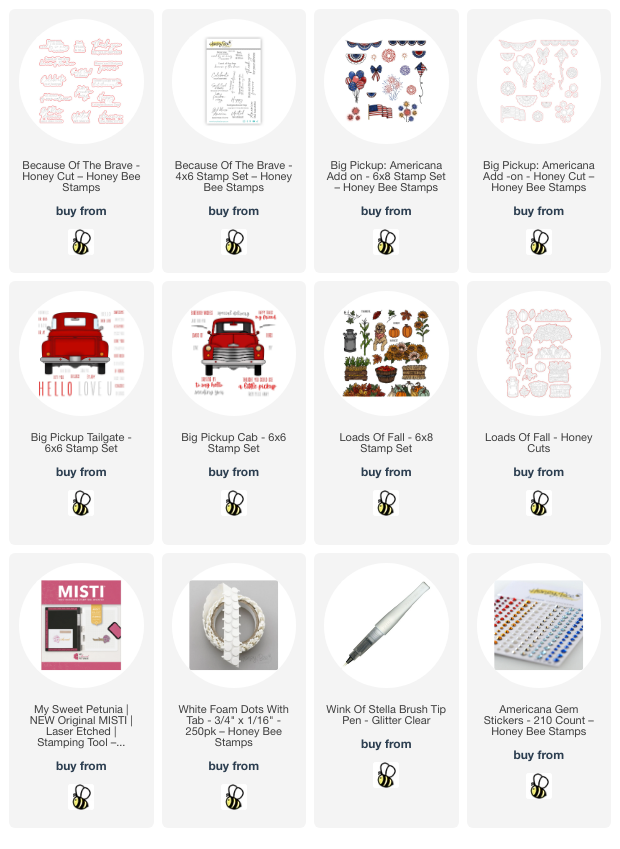
Hello friends! It's officially summer and it sure feels like it here in Texas!! Our first summer holiday is next week, and I thought it was a great time to pull out Honey Bee Stamps' awesome Big Pickup: Americana Add-on and use it with our much loved Big Pickup Tailgate stamps and dies!  This is just one of several awesome products in the Sunkissed Summer release that is perfect for celebrating our heroes!

First I stamped the Big Pickup Tailgate stamp and a few images from the Big Pickup: Americana Add-on set with Intense Black ink onto 80# Neenah. I also stamped the most adorable dog that is in the Loads of Fall Add-on. I colored the images with Copic markers. Here is a list of the markers I used:

  • Truck: R59, R46, R35
  • Blues: B39, B37, B26, B16
  • Dog: E55, E23, E53, E51, E50
  • Grays: C9, C7, C5, C3, C1, C00; N9, N8, N7

When I finished coloring, I die cut all of the images with the coordinating dies.  I forgot to stamp the license plate and chose the sentiment "blessed" from the Tailgate stamp set.  I think it's perfect because I feel blessed to be born in our great country!

To make the shaped card base, I cut a sheet of 80# Neenah to 5" x 9". I scored it at 4-½". Then I placed the Big Pickup: Tailgate die onto the folded card with the top edge just off of the folded edge. I ran it through my die cutting machine. Then I glued the colored Big Pickup: Tailgate to the card.

To make the multi-colored fireworks with the stamp from the Americana Add-on I placed white cardstock into my MISTI. Then I used a blue and red watercolor marker to color directly onto the stamp. After stamping it down, I repeated the steps several times to get the coverage I liked. Then I swiped a clear sparkle pen over the stamp to add a bit of sparkle. I repeated this a few times until I was happy with it. I know the photos don't show the sparkle, but it is there, I promise!

I used glue and foam dots to adhere all of the elements to the truck. Then I used a white gel pen to add detailing to the tires and tail lights.

Next I stamped a sentiment from the Because of The Brave stamp set with red ink and cut it out with the coordinating die. I glued this on the inside of the card.

I added a few gems from the Americana Gem stickers for a bit more sparkle!

I love the Big Pickup series and this new Americana Add-on is just fantastic!  Thanks so much for stopping by.  Have a wonderful and crafty day!

Thank you for using my affiliate links to shop (never any additional cost to you)!

Monday, June 24, 2024

Floral For You 3D Emboss & Cut Folder Anniversary Card

Ooh, y'all!  I'm in love with Spellbinders' new Floral For You 3D Emboss & Cut Folder!!!  Emboss and die cut in one pass?  Yes, please!!!

I went with an all white card to make a special anniversary card.  This Floral For You set is absolutely awesome--you just place the dies onto the embossing folder, add your cardstock, and then run it through your die cutting machine!  Use the same sandwich for your machine that you would for any 3D embossing folder.

Before I ran the folder and dies through my machine, I used a brayer to swipe on clear embossing ink.  After this was embossed and die cut, I added clear sparkle embossing powder to each piece and heat set it.  I will save the other two pieces for other projects.

I made a shaped card base from white cardstock with an Essential Arches die.  Then I glued the embossed panel to the base.

I added a sentiment from the Always and Forever Sentiment Strips Press Plate & Die Set.  The beautiful butterfly is one of six in the Summer Day Butterflies.  I Love the bit of sparkle it adds to the card.  A few more bits of sparkle with a few clear gems.

There's another fabulous 3D Emboss & Cut Folder called Mushrooms From Me To You that you might want to check out too.  I have to say that I REALLY hope Spellbinders comes out with many more of these!!

Thanks for stopping by!  I hope your day is wonderful with lots of crafty time!

Thank you for shopping with my affiliate links (never any additional cost to you)!

Sunday, June 23, 2024

I Love You More Than Coffee...

I'm on a roll with the masculine cards lately, haha!  Today's fun card features Brass & Bliss' Mix and Match Coffee Cups die set with the Boats and Waves Stencil.  Patterned paper from the Life Upon The Sea paper pad gave me instant color too!  All of the detailed directions to make this card are over on the Brass & Bliss blog.

I die cut blue paper from the Life Upon The Sea with the Nested Rectangle die first.  Then I added texture paste through the Boats and Waves stencil and set it aside to dry.

I pulled out that paper crimper I've had forever to crimp the sleeve for the coffee cup made from more paper in the Life Upon The Sea paper pad.  The Mix and Match Coffee Cup dies have a variety of styles of cups to choose from.

I stamped a sentiment from the Let's Meet For Coffee set in Cinnamon ink for a coordinated look.

Be sure to click over the the Brass & Bliss blog to see process photos and more details!  Thanks so much for stopping by!

Thank you for using my affiliate links to shop (never any additional cost to you)!

Saturday, June 22, 2024

A Little Hello From Me To You

Happy Saturday!  Today I'm sharing this sweet hello card featuring Spellbinders' beautiful Layered Iris dies and the A Little Hello Sentiments stamps and dies.

I die cut the Layered Iris dies from white, Purple Mist, and Rainforest cardstocks.  I added a bit of shading to the flower with coordinating purple and green inks.

The white card base layer was die cut with a Fluted Classics Oval.  I die cut Lilac Blossom cardstock with the next largest oval die.  Then I embossed it with the Dazzling Dots embossing folder.

I used glue to adhere it behind the oval in the white layer, then glued it to an A2 card base.

I die cut the "hello" with the dies in the A Little Hello Sentiments set.  Two of the top layer were die cut and then I glued all of the layers together.

I love how the sentiments in the A Little Hello Sentiments are all one stamp with one die to cut them all out at once!  What a time saver!!

And that's it!  Super easy, yet so beautiful!  Thanks, always, for stopping by!  Have a wonderful Saturday!

Thank you for using my affiliate links to shop (never any additional cost to you)!

Wednesday, June 19, 2024

Summer Birthday Card with Ink Blended Plumerias

Hello crafty friends! Today I have a card for those that have a summer birthday! I've used Honey Bee Stamps gorgeous Bold Background: Plumeria for this summery birthday card!  Plumerias are one of my favorite flowers and I was excited to use this set today!

I die cut all of the flower layers of the Bold Background: Plumeria Honey Cuts from 80# white cardstock. Then I used various small ink blending brushes to color the layers with Distress Oxide inks. My inspiration for the colors came from a web search of plumeria images! First I brushed on Spun Sugar Distress Oxide with a small blending brush. Then I added Picked Raspberry Oxide ink to the edges. I was able to achieve the detailing by using a size 5 Beeluxe Detail Blending Brush. I love how that tiny brush makes it easy to color a small area!

I used another size 5 brush to dab on Squeezed Lemonade and Mustard Seed Oxide to the centers of the flowers.

I die cut the background and leaves of the Bold Background: Plumeria from green cardstock. This made it super easy and quick to blend on Mowed Lawn and Rustic Wilderness to add a bit of shading to the pieces.

I used glue to adhere the layers of the flowers. The Layering Guide was very helpful for assembling the flower layers. I noticed a great tip on the Guide that said to adhere the leaves to the background first!

I embossed white cardstock with one of my favorite -- the Spring Medley 3D embossing folder. I trimmed it to A2 size and glue it to a card base. Then I adhered the background with leaves to the card. Next I adhered the Plumerias to the base with glue.

I chose one of the sentiments from the Sunkissed Summer stamp set and stamped it with black ink. Then I cut it out with the coordinating die and glued it to the card.

I added a few coordinating pearls from the Travel Pearl Stickers set to the center of the open plumeria.

I really appreciate you stopping by to check out my card!  Have a wonderful and crafty day!

Thank you for using my affiliate links to shop (never any additional cost to you)!

Wednesday, June 12, 2024

Wishing You An Adventurous Birthday - An Interactive Card

Hello crafty friends! Have you checked out the fabulous new Sunkissed Summer release by Honey Bee Stamps?  I love how there are several items for making cards for the guys! I struggle with masculine cards but not anymore. Today I'm sharing this fun interactive birthday card for our guys that features the Born To Fly and Aviator stamps. This was super easy and fun to make!  If you would like to see the card in action, check out my reel on Instagram!

Still photos don't show you that the two airplanes from the Born To Fly stamp set that I heat embossed in silver actually swing back and forth! I will have a reel posted to my Instagram soon today that will show it in motion.

First I make the background layer by stamping the Aviator background stamp with clear embossing ink onto 80# Neenah. Be sure to treat the cardstock with your anti-static powder first! Then I added white embossing powder and heat set it.

Next I used blender brushes to add Lucky Clover, Cracked Pistachio, and Twisted Citron Distress Oxide inks over the panel. I repeated the inking to get it blended just right. When I finished, I rubbed a clean paper towel over the embossing to remove the excess ink and restore the whiteness of the embossing.

I trimmed the piece to 4" x 5-¼" and glued it to an A2 card base.

Next I die cut two strips of white cardstock with the cloud die from the Horizon Slimline Borders die set. The shorter strip of clouds is about 1" tall and the wider one is 1-½". I glued the wide cloud strips to the card, one at the top and the other at the bottom of the card base.

Before proceeding, smoosh the Lucky Clover Distress Oxide ink pad onto your craft mat. Dilute with some water. Then use a paintbrush to add splatters onto the card base and cloud pieces.

I added foam dots to the back of one of the other cloud strips and adhered it over the other cloud layer at the bottom of the card.

To make the interactive part you will need two pieces of clear nylon string or fishing line, if you have that around the house. As mentioned above, I stamped and silver heat embossed two of the airplanes from the Born To Fly set. I cut them out with the coordinating Born To Fly dies.

To attach the airplanes to the nylon string, I placed the end on the back of the plane and secured it with foam tape pieces. NOTE: DO NOT remove the foam tape backing if you want the airplanes to swing! The smooth backing will help the planes glide over the card surface. Repeat for the other plane.

I adhered the top of the nylon string to the back of the upper cloud strip with foam dots. If you have extra string above the cloud, just trim it with your scissors. Remove the backing of the foam tape on the cloud strip to adhere to the card.

To finish I added a sentiment from the Plane Awesome stamp set that was die cut with the coordinating die.

Of course, you can totally simplify these steps by omitting the string and adhering the airplanes directly to the card. But I think the interactive aspect make for a fun surprise for the recipient!

I hope you have been inspired by my card today! Thank you so much for stopping by. Have a wonderful and crafty day!

Thank for using my affiliate links to shop (never any additional costs to you)!

Tuesday, June 11, 2024

You Melt My Heart - Spellbinders June Stitching & Embossing Clubs

Today I'm sharing my card featuring the Spellbinders Stitching Die and Embossing Folder June clubs!  This month's Stitching Die is an easy and quick stitching session too!

First I inked a piece of 80# Neenah with Worn Lipstick Distress Oxide with an ink blending brush.  Then I added water splatters and after several seconds, used a clean paper towel to blot the excess.  Next I added white watercolor splatters with a paint brush.  I set the piece aside to dry.

The June Stitching Die of the Month called "Stitched Ice Cream", contains all of the dies to make this sweet ice cream cone, plus two sentiment dies and the cherry!  The cardstock and thread I used are all from my stash.  The pink floss is DMC 957.  The off white is leftover from and old embroidery project and is more like a heavier DMC Pearl thread.

I inked up scraps of white cardstock with Lumberjack Plaid, Mowed Lawn, and Gathered Twigs Distress Oxide inks.  I die cut the cherry pieces and assembled it with glue.  To make it really stand out, I added Crystal Glaze to the cherry.

When the ink blended panel was dry, I used the June Embossing Folder (called Summertime Waves) to emboss it and then adhered it to an A2 card base with glue.

The sentiment I used is from the A Little Message Sentiments Press Plate & Die Set.  I used BetterPress black ink to press it into Porcelain Cotton cardstock with my BetterPress Letterpress system.  I cut it out with the included coordinating die.

Why didn't I use one of the sentiments in the Stitching Die set?  Ummm....lame brain, I guess! LOL!  I just totally spaced, but I do like the sentiment I used!

That's it for my sweet and yummy card!  If you'd like to check out all of Spellbinders clubs, click HERE to see all of the options!  Thank you so much for stopping by!

Thank you for using my affiliate links to shop (never any additional cost to you)!

Monday, June 10, 2024

Life Was Meant For Good Friends & Great Adventures!

 Happy Monday!  Today I'm sharing some details about my card that is part of Honey Bee Stamps Instagram Hop to celebrate their new Sunkissed Summer release!  This release is filled with all things summer with plenty of awesome supplies for the patriotic cards!

This card features the new Lovely Layers: Small Suitcases die set, the Air Mail 3D embossing folder, and the Plane Awesome stamps and coordinating dies.

I die cut the Lovely Layers: Small Suitcases dies from colored cardstock.  All of the little pieces for each suitcase were die cut from white cardstock or mat gold cardstock.  I used various brown Copic markers to make quick work of coloring the pieces.

I printed off the helpful Layering Guide to aid in the assembly of each suitcase.  Do you think you would struggle with all of these little dies?  Well, as I was pulling them to die cut, I labeled all of the pieces for each suitcase and took a couple of photos to share with you!

Next I embossed white cardstock with the amazing Air Mail 3D embossing folder.  I LOVE the textures on this folder!  I trimmed it to 4" x 5-¼" and adhered it to a coordinating pink layer and then to an A2 card base.

I stamped the sentiments from the Plane Awesome stamp set with clear embossing ink, added gold embossing powder and heat set it.  I cut them out with the coordinating Plane Awesome dies and die cut another layer from pink cardstock to layer behind.

I used foam adhesive to adhere the suitcases and sentiments to the card.

I hope you will join us over on the Instagram hop!  Honey Bee is giving away two $50 gift certificates to be randomly chosen among the commenters!  (Winners will be drawn 6/14.)  Thanks so much for stopping by!

Thank you for using my affiliate links to shop (never any additional cost to you)!

Sunday, June 9, 2024

Adorable House-Mouse Summer Fun Copic-colored Card

Yes, two posts in one day!!  Still way behind, but keep on going, right?!  Haha!

My card features the adorable Summer Fun stamp set from Spellbinders House-Mouse Summer Fun Collection!!

I stamped the adorable Summer Fun image and colored it with my Copic markers.  Here is a photo to show you the colors I used.

I die cut the panel with an A2 Matting Basics A die and filled in the bottom portion with more green markers for the grass.

I used a blending brush to ink on Tumbled Glass Distress Ink lightly here and there to create the look of clouds.  Then I adhered the piece to black cardstock die cut with an A2 Matting Basics B die.

I added a sheet of foam to the back of this piece to adhere it to an A2 card base.

I stamped the sentiment from the Summer Fun set in black ink and trimmed it into an angled banner strip.  I added foam tape to the back to adhere it to the card.

That's it!  Super easy card!  I adore all of these cute mice in the House-Mouse line!  Thank you for stopping by today!  I hope you have a wonderful week ahead!

Thank you for using my affiliate links to shop (never any additional cost to you)!

Like A Dad Father's Day Card

Today I'm over on the Brass & Bliss Craft Co. blog to share all of the details to make this easy Father's Day card!

I've used a few products from the latest Brass & Bliss Tropical Dreams release.  The beautiful Under The Sea cover plate die makes an instant background for my ombre inked panel!

I continued the ombre theme by stamp the sentiment from the Father's Day stamp set with the same Color Fuse inks.

After die cutting the sentiment with a Square Scallop die, I adhered it with foam tape.

I love the Life Upon The Sea paper pad with all of its ocean themed papers.  I chose one piece of paper and hand cut a few images to use as my embellishments!

Check out these products and more from the Tropical Dreams release here!  Thank you so much for stopping by!

Thank you for using my affiliate links to shop (never any additional cost to you)!

Saturday, June 8, 2024

Floral Card With Texture Paste Background

 Hi friends!!  I can't believe it's been a week since I've posted here!  I've been so busy! Last week I went to the super fun Nashville Craft Retreat, and my return flight was canceled resulting in a lost day creating with a lot of new products!

Today I'm sharing a few details of this card that I shared a reel for over on my Instagram.  It features the gorgeous Blooming Trumpet Flowers stamps and dies that were illustrated by the super talented Kelly Taylor!

I cut a quarter panel of Bristol Smooth cardstock first.  Then I used a palette knife to dip out three different colors of Paper Glaze.  I put the scoops at the top of the long edge of the cardstock then used a large palette spreader to smooth the glaze out.  I used Cream Puff Velvet Paper Glaze, Sea Glass Coral Glass Paper Glaze, and Clementine Preserves Velvet Paper Glaze.

I actually set it outside in the hot sunshine to dry!  LOL.

I colored the images from the Blooming Trumpet Flowers stamp set with my Copic markers and cut them out with the coordinating dies.  I used B41, R14, R22, R21, R05, YG67, YG25, YG17, YG25, and YG03.

After I die cut white cardstock with the A2 Saying Hello Cover Plate die I added narrow strips of foam tape to the back to adhere it to the dried texture paste background.  

Then I arranged the flowers and leaves on the card and adhered them with a bit of foam tape and/or glue.

The sentiment is one of a few included with the Blooming Trumpet Flowers set!

I certainly do love using texture paste any way I can!  Picket Fence Studios has a variety of types and colors to choose from that are all so beautiful!!

Thanks so much for stopping by today!  Have a fabulous Saturday!

Thank you for shopping with my affiliate links (never any additional cost to you)!