Showing posts with label Pierced Fancy Flakes A2 Cover Plate die. Show all posts

Wednesday, November 30, 2022

May Your Christmas Be Bright!

 Hello crafty friends!! Today I've pulled out some of my favorite holiday stamps and dies from Honey Bee Stamps previous releases and paired them with products from their newest Make it Merry release! For this card I created a sweet snowman scene with the Build A Snowman Honey Cuts and the new Mason Jar Vase Honey Cuts!
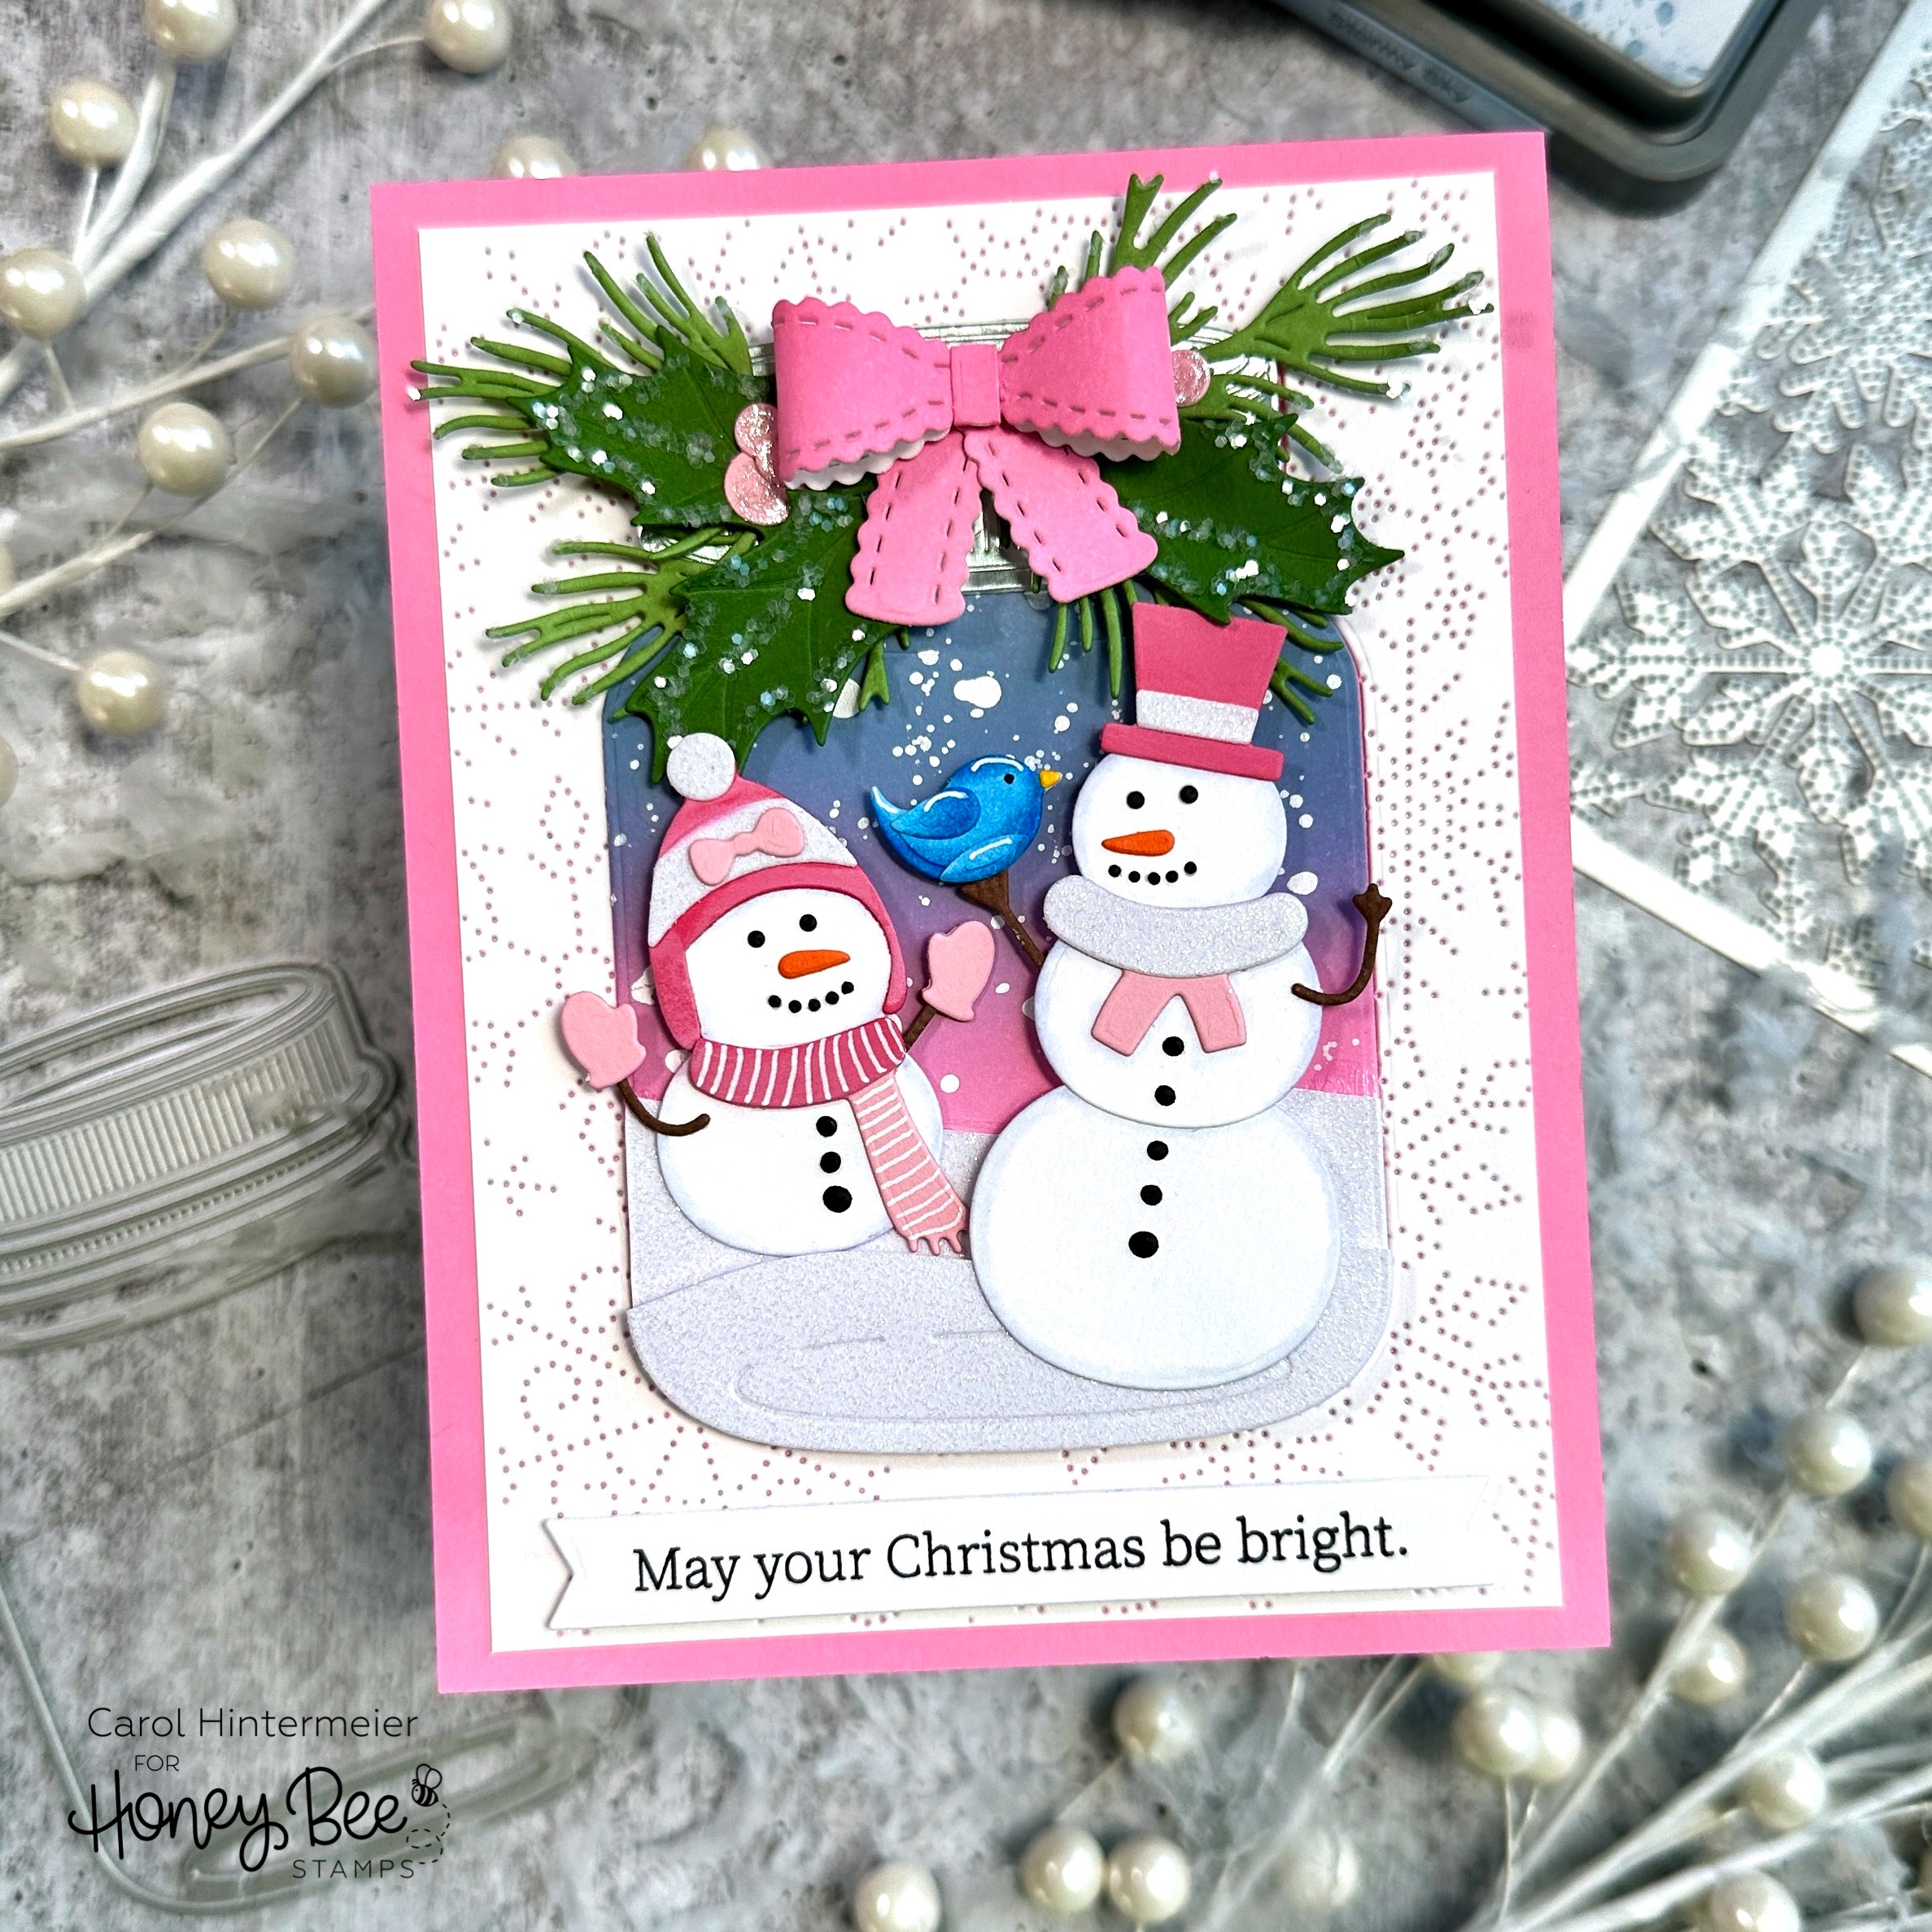
First I created the background by inking Kitsch Flamingo Distress Oxide around the edges of an A2 white cardstock panel. Then I die cut the Mason Jar Vase from another piece of white cardstock. Keeping the negative piece, I ran that through my die cutting machine with the Pierced Fancy Flakes A2 cover die. I trimmed it down and adhered it to the pink layer with glue and then to a top-folding A2 card base. (This is a good way to use all of that cardstock!!)

I die cut the Mason Jar Vase lid from silver cardstock. Before I adhered the lid to the jar, I blended Kitsch Flamingo and Stormy Sky Oxides on the mason jar. Then I added white paint splatters.

Next I took a piece of white glitter cardstock and die cut just the bottom portion of the Mason Jar Vase. I hand trimmed two hill shapes and adhered them to the mason jar with foam tape and glue.

I die cut the Build A Snowman Honey Cut pieces from various colored cardstock scraps in my stash. (I used a few blue Copic markers to color the little birdie.) I used a fine tipped glue, my reverse tweezers, and a Quickstik to assemble the cute snowmen. I adhered them with glue and some foam tape to the Mason Jar.

The greenery at the top is from the Lovely Layers: Winter Greenery Honey Cuts and the bow is from the Lovely Layers: Pinecone Honey Cuts.

I stamped the sentiment from the Inside: Holiday Sentiments stamp set with black ink and die cut it with a Sentiment Banners die.

I added a bit of chunky glitter to the greenery and some white gel pen details to the scarf and bird for a few fun extra touches!

Thank you so much for stopping by today!  I hope you have a wonderful day!

Thank you for using my affiliate links (never any additional cost to you).
Wednesday, November 24, 2021

Die Cutting Flowers With Felt | Honey Bee Stamps

Happy Wednesday (and day before Thanksgiving) crafty friends!  Today I'm sharing my card that features Honey Bee Stamps' Lovely Layers: Anemone that I die cut using felt!  These dies cut through the felt like butter!  Also, Honey Bee Stamps will be having FOUR days of special Black Friday deals beginning Friday, November 26, 2021.  If you love Honey Bee products like I do, you will not want to miss out on these awesome specials.  I have all of the specific details at the end of my post!

As you may know, felt is very soft and flexible. I found that if I adhered a piece of printer paper to the back of the felt before die cutting, it provided just the right amount of stability to make it much easier when handling the die cut pieces. I put a piece of double-sided adhesive on my printer paper, peeled off the other backer sheet and adhered the felt to the paper. Once that was done I die cut my flower layers and three of the leaves. The black flower center is black glitter sticky back foam, which goes right along with the dimension of the felt! I used a white gel pen to add dots to the black foam. I adhered the flower layers with Bee Creative glue and set it aside to dry. Check out the beautiful layers:

I have also thought about how beautiful fabric would look with these layers. I want to dig through my remnants and give that a try too. I would definitely add some interfacing to the back of the material before die cutting. (Yes, sewing is another talent of mine--hence the fabric remnants--LOL!)

The card base is an A2 top-folding card with a white glitter card stock layer adhered to it. Next I used the gorgeous Fancy Flakes A2 Cover Plate and die cut some white textured card stock. I've had this in my stash FORever, but the Honey Bee shop has this one that I think would look wonderful! Then I placed the Pierced Fancy Flakes cover plate over the die cut and ran it through my machine. I love the piercing look! I adhered the piece to the card with Bee Creative glue. Then I adhered the flower and leaves to the card.

Next I created the sentiment using the Bitty Buzzwords: Holidays stamp set and coordinating Honey Cuts. I ink blended Barn Door Distress Oxide onto some scrap card stock with a Detail Blender brush. I die cut "believe" from the inked paper and then twice more from white card stock. I adhered the layers with glue. Then I die cut the shadow from more white glitter card stock. I adhered the sentiment pieces together. 

Next I stamped the rest of the sentiment (from Bitty Buzzwords: Holidays stamp set) onto black card stock with Versamark ink. I added some white embossing powder and heat set it. After I trimmed it into a strip, I added black foam to the back and white foam to the other sentiment and adhered them to the card. The final touch was to add some Glossy Accents to the die cut sentiment--I really like how it makes it pop!!

I hope you've enjoyed my card using felt and that I've given you more inspiration for the Lovely Layers: Anemone!  I hope you have a wonderful Thanksgiving day tomorrow filled with fun and happy times.  If you are outside the US, have a wonderful, crafty day!  Thank you so much for stopping by--I'm very thankful for you!

Links to products I've used for this card (some may be affiliate links at NO additional cost to you--thank you for using my links💗)

Please note:  The times for all deals are midnight, PST; 3 am EST

  • Friday, 11-26-2021:  TWO deals Friday only: 1) 20% off your entire purchase; 2) Receive a free Precision Tip Glue Tube with orders of $75 or more.
  • Saturday, 11-27-2021: BOGO: Buy one, get one 50% of ALL dies!
  • Sunday, 11-28-2021:  BOGO:  All HBS brand paper pads and envelopes!
  • Monday, 11-29-2021:  Take an addition 25% of ALL retiring and clearance items!