Monday, June 1, 2020

Just A Note to Say Hi! | Art Impressions

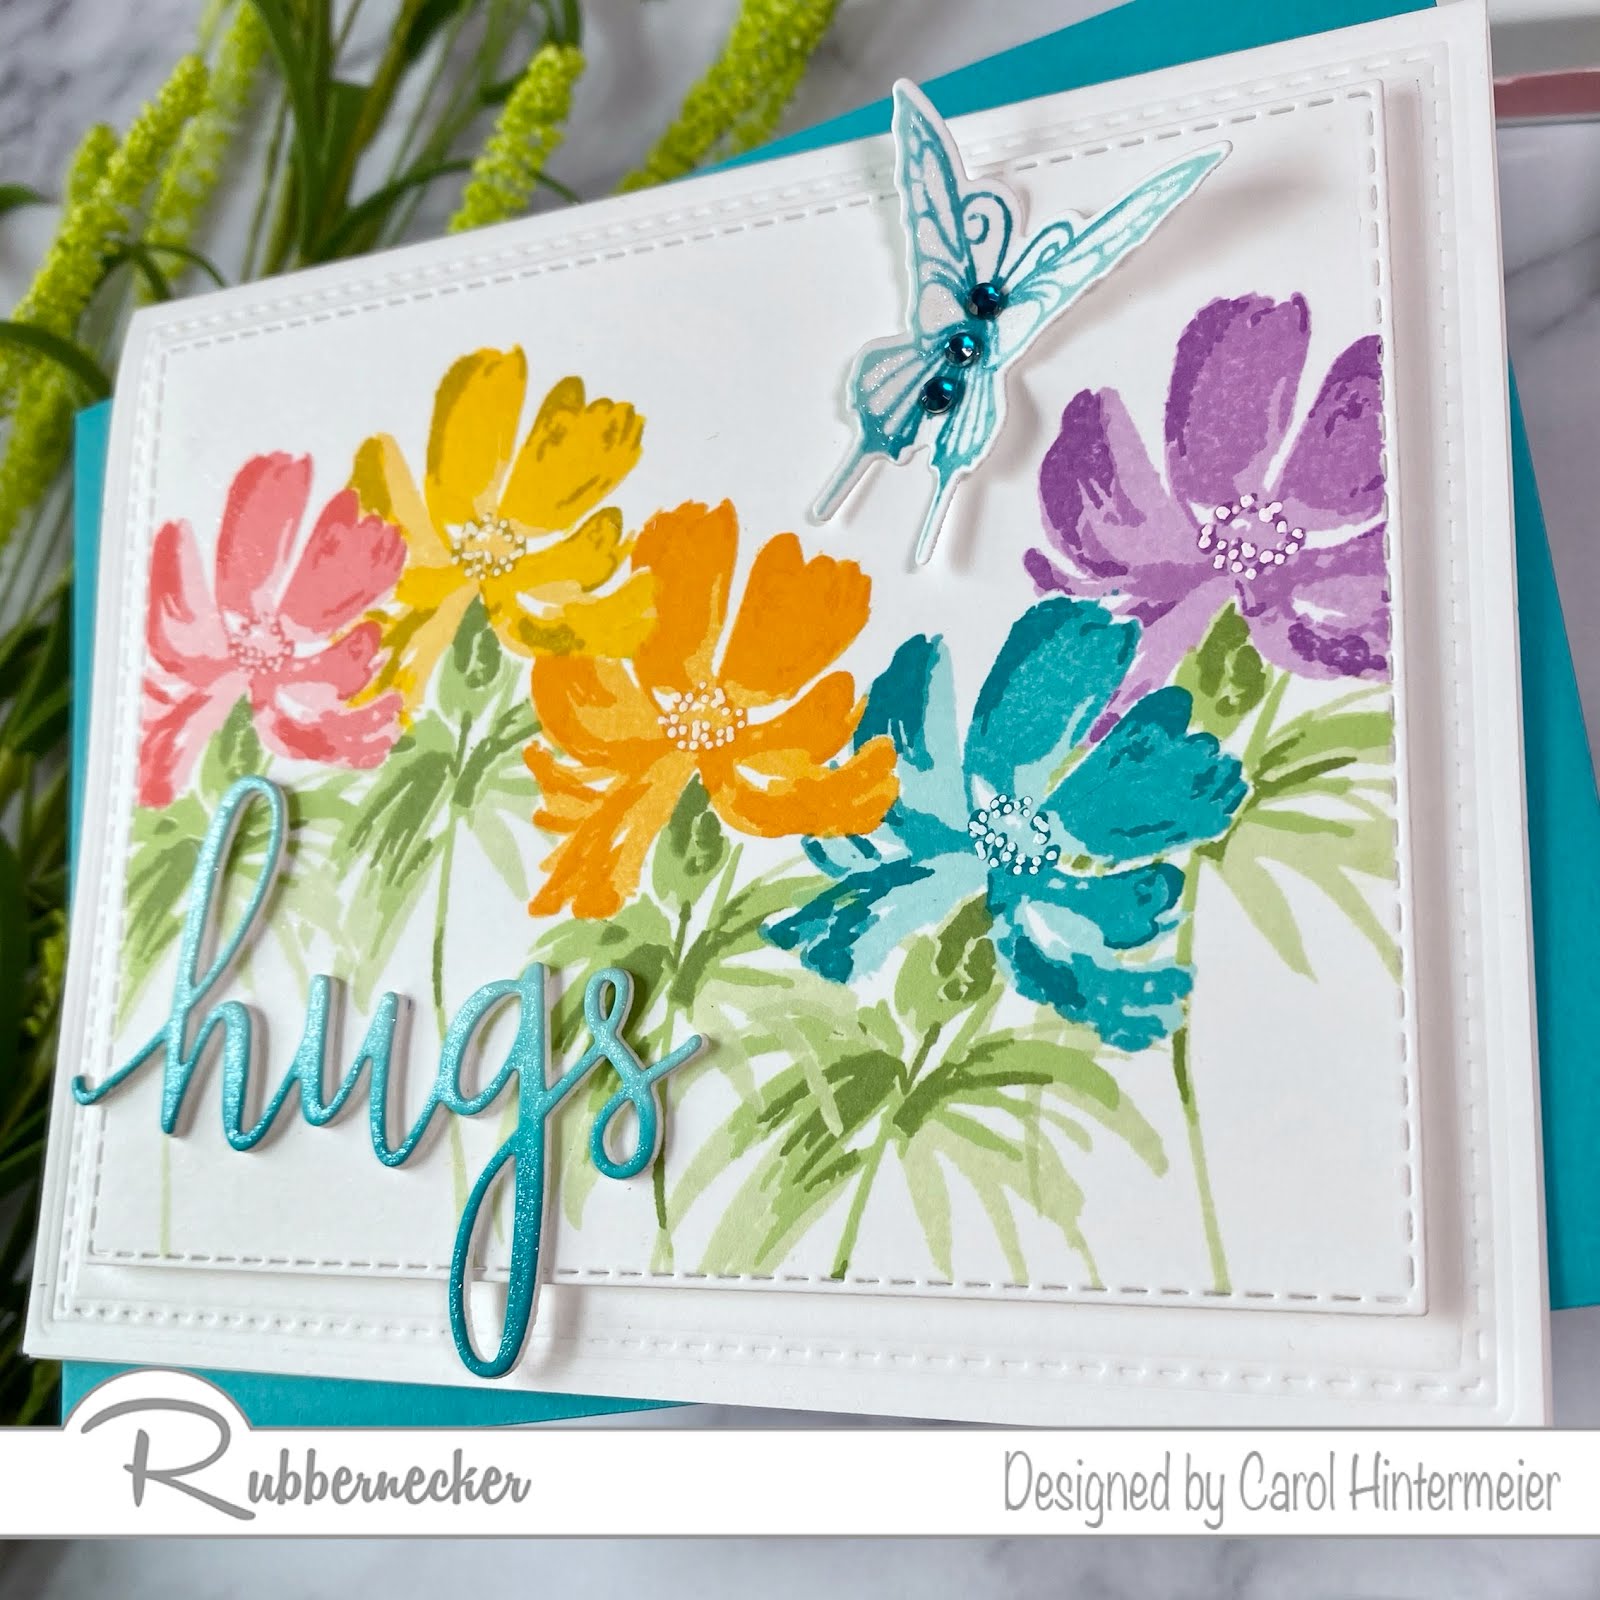
Hello friends!  Today I have a sweet card to just say, "Hi!" to that someone special that may need some happy mail!  I've used the beautiful Exclusive Hydrangeas set by Art Impressions that's available at Scrapbook.com.  My hydrangeas are pink with green in the middle because, in my part of Texas, we have alkaline soils and water, not acidic that makes them a blue shade.  Keep reading to see a photo that I took a few days ago of my hydrangea in my backyard.  I love hydrangeas and my photo was my inspiration!


I stamped the hydrangeas in my favorite Copic safe ink--Inkon3 Blackout Detail ink onto some Neenah Solar White 80# card stock.  I've listed my marker colors below.  (Make a note of how few markers I used--LOL!)  When I finished my coloring, I used a Rectangle Double Stitched die to cut it out.  I added some Apple Green Nuvo Crystal Drops to the flower centers and set it aside to dry.


Here is my backyard photo!  It's an older bloom, therefore, not as much green in it as what I colored.


So, onto my card!  I started with an A2 card base and added a black card stock and pink gingham layer and adhered it to the card base.  I added another black layer to the die cut hydrangeas panel.  I stamped one of the several sentiment from this set at the bottom of this panel in Versafine Onyx Black ink.  I added foam tape and adhered it to the card.


Thanks for stopping by today!  Now you know about my love for hydrangeas and also, this beautiful stamp set!  Happy crafting!


Copic markers I used:
G85, YG63, G43, RV21, RV10, RV00

Supplies:

Thursday, May 28, 2020

Hello Beautiful! - Floral Shaker Card

Hello beautiful friends!  Today I have a sweet shaker card using the Honey Bee Stamps Spring Bouquet Honey Cuts along with a few other of their products.  I've also been wanting to use some of the many sequins mixes I've been hoarding, um I mean accumulating!  LOL!


I began by creating the frame for the shaker portion.  I aligned the two largest A2 Double Stitched Frames Honey Cuts together, centering the smaller one inside the larger one.  I taped them together with some purple tape.  I believe I die cut about six of these from white card stock.  The number you need will depend upon the thickness of your shaker bits.  I glued five of them together and put a large stamp block on them to keep the frame flat while the glue dried.  Next I inked up the Woodgrain Background stamp with light gray ink and stamped the remaining frame.

Next I used some heat-resistant acetate and stamped the sentiment in Versamark clear embossing ink. The sentiment is from the Thanks A Bunch set.  I added white embossing powder and heat set it.  Make sure you let your heat gun warm up for about ½ minute and melt the embossing powder by applying the heat for just a few seconds at a time.  Trim the acetate to fit the frame and adhere with some 1/8" Scor-Tape.  Add more Scor-Tape onto the acetate and adhere the woodgrain stamped frame.  Turn the frame over and add the yellow sequin mix from the Rainbow Deluxe Sequin Set.  Next I adhered some patterned paper from The Bee's Knees 6x6 paper pad onto the back of the frame.  Next I adhered the shaker to a top-folding A2 card base.


Next die cut the flowers and leaf branches from patterned paper from the Spring Lullaby 6x6 paper pad.  I decided to color the leaf branches with a couple of Copic markers for some dimension.  The flower centers are from a scrap of patterned paper from The Bee's Knees paper pad.  I also die cut a few flowers from white card stock.  I used the Flower Shaping Kit tools to add dimension to to them.  I used liquid glue to adhere the flower layers together.


To finish up the flowers (and use more "saved" bling) I added some yellow enamel dots from the Spring Fling set to the flower centers.  I just love how Honey Bee's patterned papers and embellishments from different sets can be mixed and matched!  Now all that's left to do is arrange the flowers and branches using liquid glue to adhere them.


So, remember to use all the bling!  That just means you can totally justify buying more bling!  Haha! Thank you so much for stopping by!  I hope your days have been, and will be, safe, happy and crafty!


Supplies:

New Tea Circlet Mini Try-Fold | Art Impressions

Hello friends!  We are beginning week two of the All Layered Up challenge over at Art Impressions.  For my inspiration card, I used the so sweet and new Tea Circlet MTF!


I followed the directions on the packaging to create my card base.  Next, follow the directions for stamping and using the included die cuts to cut the openings.  I colored the images with my Copic markers (colors listed below.)  Yes, the Copic coloring does show as the card is opened, but it really doesn't bother me at all.


I added some pretty patterned paper for my layering using a pencil to trace the openings and then die cutting them.  The sentiment on the card front is from the WC Sentiments set.

I thought that sentiment went well with the one that's part of the stamp on the inside of the card.


Thank you for stopping by today!  I hope to see your entry in the All Layered Up challenge over at Art Impressions!!

I'm also entering this card in the Coffee Loving Cardmakers blog hop:


Copic markers:
E11, E13, BG07, BG53, BG000, C00, C0, C1, C2, C3,
R35, R43, R43, RV21, YG25, YG03, YG01, Y15, Y13, Y11

Supplies:

Monday, May 25, 2020

Keeping Christmas Blog Hop - May 2020

Hello friends!  While I may not remember what day it is, time sure does seem to continue to fly by!  It's already time for our inspirational blog hop to help get you going on the Christmas cards you'll need later this year.  Be sure to check each stop on the list I have below--these are some talented ladies!!!


I began with the intention of making one card with WPlus9's Winter Greenery stamps and dies using their Lavinia Layers Background dies.


I die cut four of the Lavinia Layers main die and one of the center.  I used my MISTI to do some multi-layer stamping of the large branch from the Winter Greenery set.  I don't remember what this technique is called, but I really like how this turned out!

I used two Altenew ink cube sets (listed below in the supply list) for my stamping layers, first stamping onto an A2 card base, then one of the Lavinia die cuts, and lastly the center die cut.  I stamped each piece before removing the stamp from the MISTI.  I used black embossing powder for the sentiment.


Now, this next card came about because I had stamped the other branches and die cut them out with the intention of using them on the first card.  As soon as I began to arrange them on it, I realized that these branches totally took away from my multi-layer stamping.   So I pulled out some silver glittered adhesive foam and die cut it out.  I used the lightest green ink to blend onto white card stock to be coordinated with the greenery.


I stamped the sentiment from the Most Wonderful set in Versamark, added silver embossing powder and heat set it.  For the berries on both cards, I added some clear sparkle and Nuvo Crystal Glaze for a bit of bling.


Thank you for stopping by today!  Here is the complete hop list and you sure need to go to each one as I know there will be some beautiful inspiration there for you!


Kelly Lunceford (Creator)
Carol Hintermeier <<< that's me

Supplies:
WPlus9:

Other:

Floral Thank You Card | Art Impressions

Happy Monday friends!  Today I have a sweet thank you card using the new Art Impressions Floral Invites set.  This beautiful set is perfect for invitations, but as you can see from my card, the images can be used for many different occasions!


I began by creating a top-folding A2 card base from 110# Neenah Solar White card stock.  I used the #110 card stock to reduce the warping from my heat embossing.  Next I used an anti-static bag on the card front, stamped the frames with Versamark, sprinkled on silver embossing powder and heat embossed it.

Then I stamped the floral image onto 80# Neenah in Copic safe ink (marker colors are listed below.)  When I finished the coloring, I fussy cut it out and added some foam tape to the back and adhered it on the card front.


I cut a strip of purple striped patterned paper to 4-¼" x 1-½" and adhered it to the card.  I added strips of silver mirror card to either side of the striped paper.  I stamped the sentiment in Versafine Onyx black ink and die cut it with the second smallest Hexagon Double Stitched Die.  Next add some foam tape to the back and adhere it to the front.

Finally, for a bit of embellishment I added some Nuvo Pale Periwinkle Jewel Drops to the berries and here and there around the frame.


Thanks so very much for stopping by today!  I hope you are staying safe, well, and of course--crafty!!


Copic markers:
G02, G07, G29, V000, V12, V15, V17,
YG03, YG25, YG67

Supplies:

Sunday, May 24, 2020

Sending Hugs Card & Stamp Masking Tips | Rubbernecker Stamps

Hello Rubbernecker friends!  Today I'm sharing this pretty floral card using the Summer Bloom stamp layering set.  I did lots of easy masking to make this beautiful card to send hugs to that special person!  This card is also a good example that when things don't go turn out exactly as you had hoped, just roll with it, and all turns out fine in the end!  Read on to see what I mean.


Here are the steps for my card:
  • Create a top-folding 5-½" x 4-¼" card base.  Open the card up and position the largest Nested Rectangle Small Stitched die on the card front.
  • Using the embossing sandwich for your die cutting machine, run this through to create the dry embossed stitched lines on the card.  This is a great way to get even more use from your dies!
  • Die cut white card stock with the second largest Nested Rectangle Small Stitched die.
  • Place this panel into a stamping tool and add some masking tape around the stitched edges.  See my photo below to see my work in progress. (This masking technique is best done with a stamping tool such as the MISTI in case you need to stamp a layer more than once.)
  • First stamp the base layer of the flower onto some masking paper and fussy cut it out.  You will need two masks.  Stamp one of the leaves base layer and fussy cut it.


Okay, now we are ready to begin stamping.  I will list which colors I used and the Color Fuse sets they are from, along with a few notations for you.  I stamped the base layer for all the flowers first so the ink would have time to dry between layers.
  • Three points to remember as you are stamping the layers: 1) "prime" your stamp by either rubbing an eraser or microfiber towel on it to remove the shine; 2) Make sure that each inked layer is totally dry before stamping the next layer; and 3) CLEAN your stamp as you go--I'll let you know soon how I learned this!  Haha!
  • Stamp the first flower using Posey, Scarlet, and Nectar from Color Fuse Set #4.  Place the flower mask onto the flower.
  • Stamp the second flower with Lemon, Custard, and Amaretto from Color Fuse Set #1.  This where I realized that I did not clean the base layer good enough after I stamped the first flower.  I was wondering why the Lemon ink looked so orange!!  I figured out that it picked up some residual pink ink from the first flower.  Oh well, I had to roll with it!  Move the mask to cover this flower.
  • Stamp the next flower with Mango, Citrus, and Apricot from Set #2.  I'm not sure why the third inked layer doesn't show up very well--oh, well, another "just roll with it"!  LOL!  Cover with the mask.
  • Stamp the blue flower with Beachside, Whisper, and Dreamer from Set #9.  Cover with the mask.
  • Stamp the last flower with Lavender, Lilac, and Orchid from Set #6.
  • Finally, stamp the leaves with Mist, Moss, and Clover from Set #10.  You will need to mask off the flowers sometimes using both flower masks.  It just all depends upon how you arranged your flowers as you were stamping them.  Use the mask for the greenery when needed.
  • Add foam tape to the back of the panel and adhere to the card front.
  • For the sentiment I die cut the Hugs four times from white card stock.
  • Leave one die cut in place to make it easier to blend ink in an ombré pattern.
  • I used an ink blending brush and the blues from Color Fuse Set #9.
  • Adhere all four layers together with liquid glue and let dry.
  • Attach it to the card front with glue.


  • I stamped the butterfly from the Brush Butterflies set with the blue ink cubes, again, in an ombré pattern.
  • Cut it out with the coordinating die from the Fluttering Butterflies die set.
  • Add glue just in the center and attach it to the card slightly bending the wings up.
  • Add some crystal gems to the body and clear sparkle to the wings and the sentiment.
  • Add white dots to the flower stamens with a white gel pen.


I really love how this happy card turned out and hope I've inspired you to give these layering stamps and masking a try!  Thank you for stopping by and have a wonderful, crafty week!  Don't forget to just roll with it! :)

Friday, May 22, 2020

When Do You Need Coffee? - Coffee Loving Cardmakers Blog Hop with Rubbernecker Stamps

Hello, and welcome to my blog!  I'm very excited to be participating, with Rubbernecker Stamps, in the Spring/Summer Coffee Lovers Blog Hop!  Also, all coffee themed products are 15% off with code JAVA15 entered at checkout at Rubbernecker!!  


So, when do YOU need coffee? I'm with Preston here and need it every day!  LOL!  For this card I've used the so adorable Preston stamp along with the Dandelion Garden Border stamp.


This was such an easy card to create!  First I stamped Preston in a brown ink to have a no-line coloring look.  Then I Copic colored Preston and cut him out with his coordinating die.  Next, using my MISTI, I stamped the Dandelion Garden Border stamp using Color Fuse Inks Set #10 beginning with the darkest green at the bottom and gradually going to the lighter inks as I got to the dandelion heads.  Then I used a Nested Rectangle Small Stitch die to cut the panel out.  For my green matting layer I used a blender brush and inked up the edges with Basil ink from Color Fuse Set #10 and die cut it with the largest Rectangle Stitched die.  I added the layers to a top-folding A2 card base.


To finish it up, I added foam squares to the back of Preston to pop him up on the card.  I stamped the Ending In Y sentiment in black ink onto the background panel.  For a bit of shine I added Nuvo Crystal Glaze to his eyes and the coffee cup.  I also added Key Lime Nuvo Jewel Drops to the dandelion centers.


Be sure to head back to the Coffee Loving Cardmakers blog to get the information on how to enter to win a prize.  There are SO many prizes so you won't want to miss it!  Thank you for stopping by today!

Supplies:
Rubbernecker supplies:

Other: