Pages

Monday, April 29, 2019

You Brighten My Day!, Art Impressions

Happy Monday!  I'm on the Art Impressions' blog with this sweet watercolored card.

Today I have one of my favorite type of cards to have on hand--one that I can use for many different reasons to send to a special person!  It's also my favorite type because it's watercoloring the Ai way!! In February I had the pleasure of attending an Ai Watercolor Class at the Stamp & Scrapbook Expo.  I also got to visit Art Impressions' beautiful booth and picked up this awesome WC Jars Set.  This was my first time playing with it and it was so relaxing to just color!


After I stamped and watercolored everything I cut the image out with a Hexagon Double Stitched Die and then used that die and the next larger one to cut out frames from the watercolor paper three times.     After I glued them together, I used the same blue that I used on the pitcher to color the frame.


I added a few clear hearts for just a bit of shine!


You are so kind to stop by and take a look--thank you!!  Have a wonderful week!


Tombow markers:  177 Dark Jade, 743 Hot Pink, 565 Deep Blue
Marvy marker:  100 Sapphire

Art Impressions supplies:

Monday, April 22, 2019

Peace Window, Art Impressions

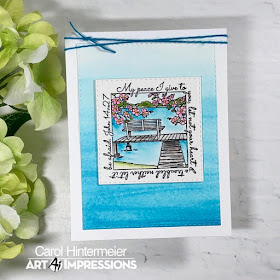
Hello friends!  Today on the Art Impressions blog I have two cards featuring the Peace Window.  The Window stamp set line is really fantastic with so many heartfelt sentiments around the windows.

This stamp would be a good one for a sympathy card or for someone that is going through the challenges life can throw at us.  These Window sets help you create beautiful cards that don't take a long time.  I actually made two cards--the sets are so easy to use!


For this card I stamped onto Strathmore Bristol smooth card stock and colored it with various watercolor markers, listed below.  I die cut it out with the largest of the Tag Double Stitched dies.


You might be wondering how I have a layer for the tag since there is only one die of this size in the set.  Here are the steps:
  • Put the tag die onto a piece of card stock and trace around the outside edge of the die with a pencil.
  • The pencil line will be your cut line.
  • Color about ¼" inside your pencil line with a coordinating color.
  • Cut out.  I used my paper trimmer for the straight lines and hand cut the curved corners.
  • Trace the tag hole onto the cut out tag layer and use a hole punch to cut.

Here is my second card.


 I stamped the image onto Strathmore watercolor paper with Versafine ink.  This set is so easy and quick to watercolor.  Just be sure to use a smaller brush.  I used a number 2 round brush and painted it using colors from the Altenew 36 Pan set (colors listed below.)  This was cut out with a Square Double Stitched Die.  I created an ombre wash of blue on a 4" x 5-¼" watercolor paper with a ½" flat brush for the card panel.  I cut it with a Rectangle Double Stitched die.


I always appreciate you stopping by and I thank you!  Have a great week!


Altenew Pan Set colors:
Bamboo, Forest Glades, Ocean Waves, Pink Diamond, Industrial Diamond
Tombow (*Marvy) markers:
055, 173, 177, 493, 565, 933, 969, *Brilliant Yellow

Supplies:

Sunday, April 21, 2019

2019 National Tea Day Blog Hop

Hello!  I'm very happy to have a card to share in the collaboration blog hop with Honey Bee Stamps and the fabulous gals at the Coffee Loving Cardmakers.  To see the complete lineup click the link for the Coffee Loving Cardmakers blog HERE or the Honey Bee Stamps blog HERE.  They, and Honey Bee Stamps, are giving away a $30 gift certificate to be chosen among the commenters!  You should have come from the sweet and so talented Brenda Noelke!


My card today uses Honey Bee Stamps' Tea Time and Perfect Blend stamps and dies.  I have a complete supply list at the end.


I started by stamping the sentiments and coffee beans in a repeating pattern on a piece of Neenah Desert Storm using Gathered Twigs Distress Oxide ink.

The coffee cup, spoon and cupcake are stamped in Gina K. Designs Amalgam ink and colored with Copic markers.  I've listed the colors below.  The other sentiments are also stamped in Gathered Twigs Distress Oxide ink.
           

Be sure to comment along the way for a chance at one of the $30 gift certificates!  The next stop in the hop list is Honey Bee Stamps!  Thank you so much for stopping by!   Carol :)


Copic markers:
Coffee cup:  BG09, BG15, BG32, E47, E59, C0, C1, C3
Spoon:  C0, C1, C3
Cupcake:  RV10, RV13, RV14, E13, E15 E29, E39

Supplies:

Friday, April 19, 2019

Honey Bee Stamps "Happy BEE-Day Release" Blog Hop Day 1

Hello!  I'm so glad to be a part of the Happy 4th BEE-day Blog Hop showing the fabulous products in this new release!  Be sure to visit each stop to see the beautiful inspiration for this release.  Also, be sure to COMMENT below and on EVERY stop today for a chance to win an awesome Honey Bee Stamps prize pack.  It will include the Rainbow Wishes stamps, dies, enamel dots, paper pack (YES we have paper packs now!), enamel  dots and gem stickers!


The entire lineup for the Day 1 Hop is listed below.  You should have come from the awesome Nichol Spohr!

First up is a card I made just for this hop!


I used Rainbow Wishes stamps, Rainbow Wishes Honey Cuts, and Rainbow Wishes Stencils.  This was really quick, fun and easy to make!  I used some fine glitter paper and die cut the rainbow.  I used the chisel end of my Copic markers to color each layer of the rainbow.  I scribbled patches of each color onto the glitter paper and then die cut the tiny hearts included in the Rainbow Wishes Honey Cuts.  The sentiment was stamped in Versafine Onyx Black ink.  Everything was adhered to the panel that I stenciled the clouds in with Tumbled Glass Distress Oxide ink.


The following cards are ones that I've shared this week for each day of the sneak peeks that you may have missed.  I've listed the products used for each card with a direct link to shop at Honey Bee Stamps.  Just click and you will be there!


Spring Peony Stamps and Honey Cuts; Radiant Stencil

This next card is a fun trifold!


Spring Chicks Stamps & Honey Cuts; Eggcellent Sentiments Stamps & Honey Cuts;
Chicken Coop Dies; the Patterned paper is Doodlebug Design Down on the Farm

I totally love all the cute pups in this set!


Puppy Love Stamps & Honey Cuts; Friends Furever Stamps & Honey Cuts;
Dog House Honey Cuts; Friends Forever Stencil set; (not new: Background Builder Stencils)

I have a blog post HERE with the details of my felt flowers card!


Stitched Flowers Honey Cuts; Bloom Stamps & Honey Cuts;
Double Stitched Oval Honey Cuts; Scallop Edge Oval Dies

I cut these balloons from vellum and used Distress Inks to color them!


I sponged the same Distress Ink colors on a piece of scrap paper and die cut the middle layer for the sentiment.


Happy Birthday Stamps & Honey Cuts; Balloon Bunch Honey Cuts

Next up on the hop is the amazing and so talented Leanne West!  Thank you so much for stopping by--don't forget to leave a comment for a chance to win!  I hope that you've been inspired by these projects!  We can't wait to see what you create with all of the new Honey Bee Stamps goodies!   Carol :)

Here is the complete Day 1 hop list:

Amy Rysavy
Jennifer McGuire
Galina Filipenko
Jana Millen
Ilda Dias
Nichol Spohr
Carol Hintermeier <<< that's me
Leanne West
Lydia Fiedler
Kathy Racoosin
Ashley Tucker
Bobbi Lemanski

The Day 2 blog hop will be tomorrow, April 20, with a totally different lineup of amazing designers and a Honey Bee Stamps Spring Fling Prize pack!  The hop will start HERE on April 20!

Thursday, April 18, 2019

It's Boot Scootin' Time!, Art Impressions

Hello friends!  It's week 2 of the Best Friends Challenge over at Art Impressions.  I might have been known to but on my boots and kick up my heels a bit, back in the day!  Haha!  That's probably why I love this new Cowgirls Set!  I think it is just perfect for that special friend.  The other sentiments in the set can be used for other occasions besides birthdays too.

I stamped the gals onto some Neenah paper with Versafine and used my Prismacolor pencils to color them.  I've listed the pencils below.  When I finished the coloring, I used the largest die from the Banner Double Stitched Die set to cut them out.  For the black layer behind the die cut, I just put the die down on the black paper and drew a pencil line around the outside of the die.  I used my paper cutter to cut along the straight lines and hand trimmed the points.  Easy!


I was happy that I just happened to have this adorable patterned paper from Doodlebug Design to use as a layer along with the gingham ribbon (I do love gingham!)


I hope I've given you some inspiration to make a card or two for those special friends!  Be sure to enter it into the Challenge over on Art Impressions blog.  Thank you so much for stopping by!!


Prismacolor Pencils:
Red hat/clothing: Espresso, Tuscan Red, Crimson Lake, Crimson Red, Poppy Red
Black hat/jeans:  Black, 90% Cool Grey, 70% Cool Grey
Blue shirt:  Black, Indigo Blue, Indianthrone Blue, Denim Blue, White
Brown outfit:   Dark Umber, Dark Brown, Chocolate, Beige Sienna
Brown boots:  Chocolate, Sienna Brown, Burnt Ochre
Light skin:  Burnt Ochre, Peach, Light Peach, Eggshell
Dark skin:  Dark Brown, Sienna Brown, Burnt Ochre, Beige, Peach
Black hair:  Black, 70% Warm Grey, White
Blonde hair:  Light Umber, Goldenrod, Sand, Eggshell
Reddish hair:  Terra Cotta, Burnt Ochre, Mineral Orange, Goldenrod

Supplies:
Art Impressions Cowgirls Set
Art Impressions Banner Double Stitched Dies
Art Impressions Tag Stitched Dies
Doodlebug Design Down on the Farm 6 x 6 paper pad
Gina K. Designs Black & White Gingham ribbon
Neenah Solar White 80# paper
Versafine Onyx Black ink
Prismacolor pencils

Wednesday, April 17, 2019

Honey Bee Stamps New Release Day Four!

Hello friends!  Have you been enjoying seeing all of the awesome new goodies from Honey Bee Stamps?  I have been blown away by everything!  Today I have a fun felt flower card featuring four different new products!  I used the new Stitched Flowers Honey Cuts and cut the flowers from felt!


For the stitching I just did a simple back stitch.   I roughly followed the cut stitch lines from the dies.  I did find out that if I added a paper shim when I die cut the felt, I could see the stitched lines much better.  I have a very old Spellbinders Grand Calibur and it may be just my machine, so do a test run with your machine to see how it cuts.  Also, you need to use a good quality felt, such as this wool felt from My Favorite Things (all listed below) to get a good clean cut from the dies.


For the card base, I cut two of the largest pieces using the largest dies from the new Scallop Edge Oval dies.  I sponged on some Peacock Feathers Distress Oxide around the edges of one.  On the second piece, I scored a line about ¾" from the top to create a hinge for the back of the card.  I adhered it to the inked piece just above the scored line.  The white layer is the largest die from the new Double Stitched Oval Honey Cuts.  The sentiments are from the new Bloom Stamps and Bloom Honey Cuts.  The base layer and top layer of the sentiment is also inked with Peacock Feathers.  I added some clear sparkle with a Spectrum Noir Sparkle pen to the top layer.


I really appreciate you stopping by to take a look!  If you've missed the other cards I've shared this week on Instagram, go find me @c.ann.h and check them out!  I'll have more cards there this week too!

Carol :)

Supplies:
Honey Bee Stamps products:
(The new products are available at midnight CDT April 18)

Felt and thread:
My Favorite Things felt:
Green-Eyed Monster (looks like this one is discontinued)
DMC 959 (turquoise)
DMC 772 (green)
DMC 603 (pink)
DMC 351 (dark coral)
Yellow thread is leftover from an embroidery kit

Monday, April 15, 2019

A Spot of Tea Anyone?, Art Impressions

Hello!  I'm on Art Impressions blog today with this beautiful dimensional card using Art Impressions' Tea Party PopCard set.  This is such a sweet set that makes a card to be used for many occasions.


The images were stamped with a Copic safe ink and colored with my Copics (colors listed below.)  All of the dies that you need are included in the set.  You do need the PopCard Template die that is sold separately. Also, all the directions to assemble this card are on the back of the packaging.  If, however, you are a bit more of a visual learner like I am, I found a video on Scrapbook.com's YouTube channel that Kate did that shows all of the steps and is so helpful.


For my inspiration in coloring, I did a web search of "china tea sets" and saw so many beautiful sets!  Almost all have some gold edges.  You can see the shine of gold where I used a gold gel pen to go over some stamped lines and I drew in a few more lines.  I used a white gel pen to add some highlights to the teapot and cups.


If you are wondering about the beautiful gold on the card front, I used the new Foil Quill Heat Pen by We R Memory Keepers.  The design is from Cricut's Design Space.  Those that know me well, know I do love the latest gadgets!  LOL!  I used two of the Double Stitched Rectangle dies to create a frame for the card front.  I cut it twice and adhered the two together for a bit of dimension.  These two butterflies are also part of the set so I added them to embellish the card front.


Thank you so much for stopping by and taking a look!  Happy crafting!


Copic markers:
Flowers:  Y11, Y13, Y15 RV21, RV23, RV25, YG03, GY25, YG17
Tea pot/cups:  B000, B00, B01, C0, C1
Strawberries:  R24, R27, R29
Cake:  E23, E29, E59

Monday, April 8, 2019

Watercolor Garden Window, Art Impressions

Hello!  It's Monday and that means I'm on the Art Impressions' blog to show you this sweet watercolored notecard using their Garden Window MTF (mini TryFold).


This set comes with three images along with two dies to cut out the openings for the first and second panels.  


Since I wanted to watercolor this, I used Strathmore Bristol Smooth paper and created my card base following the directions on the back of the packaging.  This is a smooth paper (as opposed to the texture of watercolor paper) that can take some water which is just right for this technique that doesn't require a lot of water. 

I stamped the images in Versafine Onyx Black ink as that will take water without bleeding.  I also used a stamp from the WC Wall Texture set to add a bit of detail around the window.  I added my color with my Zig and pulled out a bit of the color--you know--watercolor the Ai way!  :)  I used Tombow and Zig Clean Color Brush markers to color everything.  I've listed the colors at the end of this post.

Now, as you can see here on the inside view, I didn't stamp the image directly onto the base card.  Well, actually I did.  In spite of my best efforts, I still didn't get it lined up to my satisfaction, so here's a tip for you.  If you don't get that last image lined up just right, stamp it again on some scrap paper and die cut it, then glue it in place.  I didn't want to totally start over, so I'm glad I thought of this!  I think it actually adds a pretty touch to the inside!


Thank you for stopping by--I always appreciate it so much!  Have a wonderful, crafty week!


Watercolor markers:
Tombow numbers: 177, 565, 636
Zig Clean Color Real Brush:  Yellow, Bright Yellow, Pale Violet, 
English Lavender, Brick Beige, Gray Brown, Mid Gray

Supplies:

Monday, April 1, 2019

Day Spent Window, Art Impressions

My card for the Art Impressions blog today features the so sweet Day Spent Window set.  This is such a quick and easy stamp to use, so I made two cards!  One card is a simple easel style and the other has a die cut window in the card front to show the image that's adhered to the inside.  The sentiment on this stamp is perfect to use to send to a friend:  "A day spent with a friend is a day well spent indeed."


Have you noticed how so many of the stamps that are in the watercolor line also work with traditional cards?  The WC Sentiments Set was used for both of these cards.  I thought that the sentiments went perfectly with the sentiment that is around the scene.

For this card I used one of the Square Double Stitched dies to cut a window in the card front.  I used the same size die to cut the yellow paper to layer behind the stamped image.  I colored both images with Copic markers listed below.


This next card is a simple easel card.  I used an A2 card base that I added a second score line to at 2-¾" to create the easel.


I used one of the Flag Double Stitched dies to make the piece for the inside of the card that will help the easel to stand open.  I added some Nuvo Crystal Drops to both cards for a bit of embellishment.


I really do appreciate you stopping by!  Have a wonderful, crafty week!


Copic markers:
G03, G07, G09, G14, G19, G20, G28, G29, 
YG01, YG03, YG11, YG13, YG63, YG67,
B0000, B000, B00, N0, N2, E33, E35, E39,
R30, R32, R35, R37, Y11, Y13, Y15

Supplies:
Gina K. Designs Amalgam ink
Neenah Solar White #80