Pages

Monday, December 24, 2018

Merry Christmas!

Merry Christmas Eve to you all!  I have my final Christmas card to show here.  

Seriously, I do not know how I failed to post about this!  Several of us on the Honey Bee Stamps design team had the opportunity to create a card for Die-cutting Essentials Magazine which is published in the UK.  Our cards were featured in their October Issue 44.

Needless to say, it was SO thrilling to see my card in print, in a magazine!!!  If you are interested in the supplies I used, I have a list at the end of my post.


This year has been beyond my dreams for my card making world!  I just want to say thank you so much for your support and encouragement along the way.  I wish you all a very Merry Christmas and a happy, crafty 2019!

Carol 

Supplies:
Honey Bee Stamps Season's Tweetings stamps 
Honey Bee Stamps Season's Tweeting Honeycuts
Honey Bee Stamps Merry Christmas Honeycuts
Honey Bee Stamps Scallop A7 Card Frames
Honey Bee Stamps Let It Snow stamps
Spectrum Noir alcohol markers


Monday, December 10, 2018

Prancing Through the Snow, Art Impressions

Hello!  Are you ready for Christmas?  Only 15 more days--can you believe it??  I have this sweet card over on the Art Impressions Blog today. 


These sweet reindeer from Ai's Sleigh Bells set are so adorable!!  I've added lots of sparkle and shine for this snowy scene.


I have all of the details on Ai's blog and I hope you'll go over there to take a look!  Thank you so much for stopping to take a look!  :)


Copic markers:
E79, E25, E53, E33, E23, E30, R27, R17, R14, YG06, YG09, BG000, N2
Spectrum Noir markers:
IG5, IG8, IG9, Blender

Thursday, December 6, 2018

Meerkat Party!!! for Art Impressions


Hello to all!  Taking a little break from Christmas cards to show you this so fun new set from Art Impressions called Meerkat Set.  This is also the second week of Art Impressions Challenge 246 "Anything Goes".  You have until December 12, 5 p.m. EST to enter.  All the details are on their blog.

Honestly, when I first received this stamp set, I was asking myself, "What is a Meerkat?!!"  Well, I'm sure you know what I did next--a little Google search and I found this website that told me all about them.

So here we have this funny group of them.  I know from my search that a bunch of Meerkats is called a mob or a gang!   Well, it sure is the cutest mob or gang ever!

I stamped them onto Neenah Solar White 80# and colored with alcohol markers (colors listed below).  I cut that panel out with one of the Art Impressions' Square Stitched Rectangle dies.  I used a Ranger Distress Ink Blending brush to blend on some Tumbled Glass Distress Oxide ink for the sky and grass (I used a piece of Post-It tape to get the straight line.)


So here is the surprise inside!!!  I used My Favorite Things Trifold Slider to create this interactive scene with this SO cute Meerkat sliding towards his presents!  Rather than try to explain how to put this together,  click HERE for Jennifer McGuire's YouTube video that I followed.  Her Trifold Slider instructions begin at about the 23:45 mark.  She explains it perfectly!  On mine here, I used some acetate.  I think the next time I will try it with card stock to see how that works.

How CUTE is this Meerkat's expression?!!  It really does make me smile!


Thank you so much for stopping by and I hope you've enjoyed my card today.  Happy crafting!


Markers: (all Copic,  except *= Spectrum Noir)
Meercats: TN9*, TN6*, E15, E13, E11, E30, RV21, RV13
Bowties, hats, gifts: R14, R27, TR04, YR07, Y02, Y15, B18, B29, BV04, BV08, V04, PL2*, N2, B02, B16, YG06, YG09

Supplies:

Monday, December 3, 2018

Christmas Drive Window - Art Impressions

Hello!  Today's my day on the Art Impressions blog.  I'm using the newly released Christmas Drive Window.  This would be a great stamp to use for quick Christmas cards.


I colored this snowy scene using my alcohol markers.  The photos don't show it, but I used Glossy Accents on the windows of the truck and lamp for some extra shine.  Instead of making this into a card I created a table top decoration using the Square Double Stitched dies to cut the image.  I then used some pattern paper and die cut it with the 3D Frame Die.  It's very easy to put together.  The instructions are included on the packaging.  


Thank you so much for taking a look!  I do appreciate it!


Supplies:

Monday, November 19, 2018

Thankful for You! - Art Impression

Hello!  It's a few days before Thanksgiving and this Art Impressions Grateful Hearts Set is perfect for my card today!

I'm truly grateful for those of you that take a moment to click that link to my blog.  A double thanks to those few (you know who you are! :) that leave me a comment from time to time.  Your support and encouragement really means so much.  There are, of course, many things I'm thankful for that aren't card making related!  When you have the love of family and friends, your health, and so much more, it's the best!  And I'm so blessed!


So...on to my card!  I've colored this sweet stamp with my alcohol markers (colors listed below).  I originally stamped and masked the images on a standard A2 size card. 


 However, a couple of blunders had me pulling out my Art Impressions Circled Double Stitched dies to cut this out.  (I accidentally drew the ground line through the pumpkin on the far left as it didn't have a mask.  Then I set my card down into a large drop of water that totally soaked the upper right corner!!!)  Just goes to show you, most times you can overcome the mistakes and oopses!


Thank you so, so much for stopping by!  I hope you have a wonderful Thanksgiving!  I can't wait for Pumpkin Pie!!!!!  Hugs! :)


Spectrum Noir:
EB3, EB6, EB8, RB2, IG8, IG9, Blender

Copics:
N2, E13, E15, Y38, YR04, YR07, B63, B66, YG63, YG67, R20, R22

Other Supplies:
Distress Oxide: Tumbled Glass, Mowed Lawn

Thursday, November 15, 2018

Art Impressions Cat Twist Ties & Washi Tape Challenge Week 2

Hello to you all!  Art Impressions has a new release of their fun twist tie stamps with dies!

My card today features the new Cat Twist Ties!  If you are a cat love, this is a must have!  This card is also to inspire you to use washi tape and to enter Ai's current challenge:  Add Washi Tape!  You have until November 21 at 5:00 p.m. PST to enter.


Following the directions on the back of the package, I stamped the images onto Art Impressions Twist Ties Card.  These are really helpful to have on hand as they are precut to size and come with envelopes too.  I colored the cats with my alcohol markers (listed below).  Truth be known, I was very anxious about coloring cats!  I'm somewhat allergic and haven't payed attention to other crafters and their cat coloring.  So I Googled "cartoon cat colors" and got a lot of good ideas of colors to use.  Try it!  I've done this with other critters in the past and it's really helpful.

Here are the views as the card is opened:


For the inside, I put a piece of card stock inside, under the closed card and used a pencil to lightly trace as much of the heart shape as I could.  I took out the card and free-hand drew the rest of the heart and cut it out.  I then used Distress Inks to shade and color the heart.  I then adhered it down, centered behind the die cut portion on the front.  The sentiment is so cute and is included in the set.


Thank you so much for taking a look!  I hope you'll join in the challenge to use that washi tape we know you have!  :)


Spectrum Noir:
TN3, TN4, TN6, TN7, GY5, IG6, IG9
Copics:  RV00, N2, N4

Supplies:
Gina K. Designs Amalgam Ink
Queen & Company Washi Tape

Monday, November 12, 2018

Joy to The World - Art Impressions

Hello!  I hope your Monday is off to a great start!  I have my two more cards using the adorable Snow Friend Set by Art Impressions.  More details and photos are on the Art Impressions blog.

I colored the stamped images with my alcohol markers and have listed the colors below.

s


Thank you for stopping by!  It's always appreciated!!


Copic markers used:
B02, B16, N2, N4, RV00, RV21, RV23, RV25, RV29, 
Y17, Y38, YG13, YG25, YG3, YG67

Spectrum Noir:
BGR4, Blender

Monday, November 5, 2018

Joy of Christmas! - Art Impressions

Hello to you all!  I have this adorable snowman card on Art Impressions blog today!

I'm using one of the new clear Christmas stamp sets recently released called Snow Friend Set.


I used my alcohol markers to color this sweet snowman.  Then I die cut the colored image with Art Impressions' Rounded Rectangle A2 Double-Stitched die and layered it up on some coordinating card stock.  The next layer is one I had in my stash that I had inked and then stenciled the snow on with some texture paste.

For the finishing touches, I die cut snowflakes from silver card stock using Ai's Snowflake Dies.  I added some clear sparkle to his body and the lights with my Spectrum Noir Sparkle pen.  I added Glossy Accents to all the little lights.  I used a Uniball Silver pen on the skate blades.  You can see a bit of the sparkle and shine in this photo.


I really do love snowman stamps and this one is no exception!  There's another snowman stamp in this set and I'll be back next week with a card using it.  Until then, have a wonderful, crafty week!


Copic markers used:
BG15, BG45, BG49, R14, R24, R27, Y15, Y17, Y38, YR04

Spectrum Noir markers used:
BGR1, BGR2, RB1, RB3, FS6

Thursday, November 1, 2018

Sleigh Bells Set - Art Impressions

Hello!  It's Week 2 of Art Impressions' Challenge 244 "Lots of Layers"!  

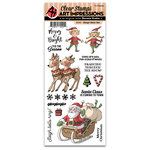
For my card today I've used the newly released Sleigh Bells Set.  This set not only has this adorable Santa in his sleigh, it has a pair of reindeer, two cute elves and several sentiments!  You can create so many cards from this one set!


After coloring the image I fussy cut it out.  I have several layers on this card.  Of course the bottom is the card base, next is the gingham paper, then the black card stock layers.  I die cut the ovals using Art Impressions Oval Double Stitched dies.  I die cut some hill layers and then used the oval to cut the bottom of the hills.  The black and white hill layers are popped up with foam tape and then Santa has some dimension with thick glue dots.


Thank you so much for stopping by!  I look forward to seeing your entry to our Lots of Layers challenge!  Happy crafting!


Copic Markers used:
E00, E000, R14, R20, R24, R27, R39

Spectrum Noir markers used:
MB1, MB4, RB1, RB2, TN7, BGR1, BGR2, IG8, IG9, AG3, AG4, AG5

Supplies:


Wednesday, October 31, 2018

Honey Bee Stamps Deerly Loved Release--Gift Bag Card

Hello!  Have you been enjoying seeing all of the inspiration this week for Honey Bee's new release?  I love every bit of this new release!!  And especially this Gift Bag Card die set!  I used two new stamp and die sets and a new stencil! 


I LOVE pulling out some texture paste, mixing in some Distress Ink and smoothing it over a stencil!  Here I used one of the new Polka Dot Background stencil set.  I combined the texture paste and Candied Apple Distress Ink and dumped in a good amount of Ranger Stickles Star Dust glitter.  


Did you notice that the insert has actual tissue paper?  I used the die to cut the top portion of the insert and glue the layers together and added a strip of red card stock to hide the edge.  The Gift Bag Card die also has three dies for three different tags to use.  I added a holly leaf and berries to it before attaching it to the ribbon.
Here is a close-up shot of the sparkly fun and dimension of the sentiment from the new Fa La La die set.  I really love how Honey Bee has shadows for so many of their sentiments!


I used the Honey Bee Stamps Gift Card Pocket die and cut some vellum to create a pocket for a gift card.  I stamped some holly leaves from the new Winter Anemone stamp set and Winter Anemone Honey Cuts.


I love all of the possibilities with this Gift Bag Card die.  It can be used for any occasion at all! Thank you so much for stopping by to take a look!

Carol

Monday, October 29, 2018

Framed Autumn Window - Art Impressions

Hello!  It's Monday and my day to be on Art Impressions blog!

My card today features the newly released Autumn Window to the World stamp set.


I colored the sweet image with my Spectrum Noir markers.  Then I used Ai's 3D Frame Die to create this frame using some pattern paper from Doodlebug Gingham-linen Rainbow Petite Prints 6 x 6 pad.  Once I assembled it (which is very easy) I adhered it all to some wood-look paper from Moda Scrap.


Thank you so very much for stopping by!  I appreciate you!

Monday, October 22, 2018

Haunted House WTW - Art Impressions

Hello!  It's getting close to Halloween and I've made a fun card using the new Art Impressions Haunted House Windows to The World (WTW).  All of the details are over on their blog HERE.    This set and the other new WTWs are now available in the online store at Art Impressions.

I colored this image using Prismacolor Pencils.  For the mat layer, I used a cut file in Design Space and cut it using my Cricut Explore Air 2.


Thank you so much for taking a look!